What is Animation?
Animation is not necessarily the re-creation of living things; it can be the exaggeration of living things to create more vivid forms.
Animation shows us change over time, which could be the position, size, colour or shape. It uses the principle of persistence of vision, such as the Zoetrope to create the illusion of movement an optical illusion. A sequence of still images or frames are perceived as a moving image, we blend images together and give them life.
The goal of the animator is to make the character move with the least amount of effort.
We use our imagination and inspiration to create feelings, thoughts, physics, anatomy and personality in objects. A caricature of action, giving life to something that the audience can empathise and identify with. It is breathing life into something, giving the appearance that something is alive and can tell a story.
Animation is changing the value of an attribute over time, representing change over time. Using keys, setting the values at important points in time, then use tangent properties to determine how the attribute value changes in between the keys.
12 Rules of animation
- Squash and Stretch: all matter in motion retains its volume but does not retain its shape creating fluidity, elasticity and vitality.
- Anticipation: give the audience a certain amount of information, the anticipatory action often moving in the opposite direction to the main action and generates energy for the action to come.
- Follow Through and Overlapping Action: so actions do not stop dead, soften the stop depending on mass and the nature of the action taking place.
- Timing: slow or quick giving different information. and linked to overlapping and follow through.
- Slow In and Slow Out: key poses and breakdown pose moving in and out of positions through gradual acceleration and deceleration.
- Arcs: moment travelling in arcs rather than straight lines otherwise the result can be stiff, abrupt and unnatural movement.
- Secondary Action: has the intention of supporting and strengthening the narrative or mood of a piece, providing additional character information.
- Staging: presenting concepts so there is no ambiguity with respect to the camera and visibility.
- Straight Ahead Action and Pose to Pose: animate starting at the beginning of the piece and working through to the end or blocking out the principal poses with the intervening action filling in afterwards.
- Exaggeration: animation is not reality and requires extra for believability, too subtle may be lost.
- Appeal: forming a relationship with the audience and they continue to watch
- Solid Drawing: strong foundations, understand real-world examples
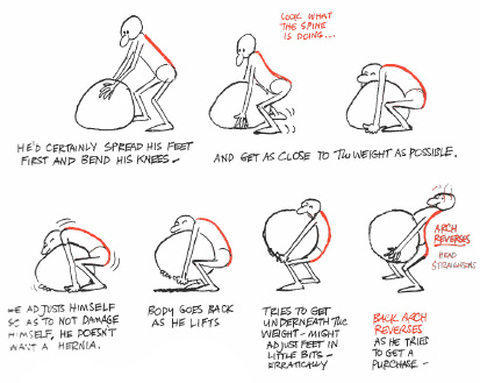
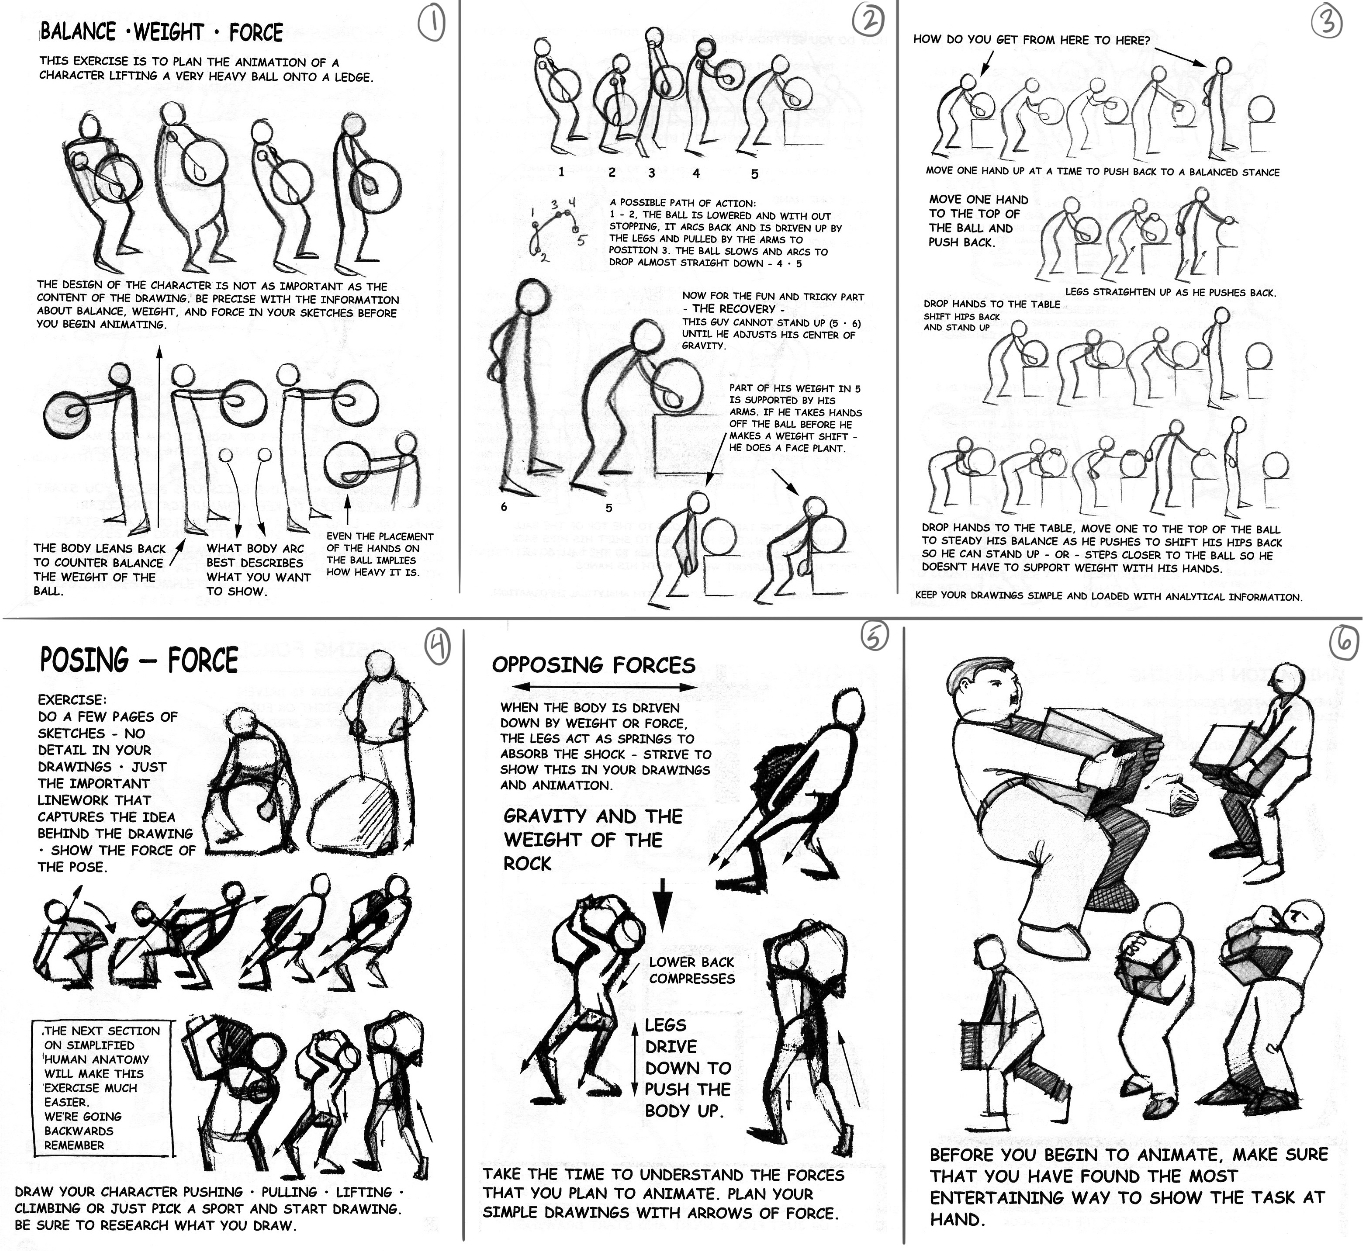
Creating the feeling of weight that the audience infers from the animation, people have an instinct for how nature works in motion, feeling the essence of its motion. The weight in motion, timing, arcs, spinning and follow-through.
Animation is created by interpolating between keyframed values. Animation curves visually describe how the values between two keyframes are interpolated over time. The keys have handles, the settings applied to the tangents of the curves specifies the overall shape of the curve before and after each key thus changing the interpolation of the selected keys or tangent handles. The computer program interpolates or draws in all the images in-between keyframes that have been altered by changing each of the parameters of each keyframe.
ANIMATION check pivots, geometry, hierarchy and groping making sure the scene will animate ok.
GRAPH EDITOR animation curves are a graphical representation of the animated attribute describing how it gets from one position to the next. The world axis is represented in the Graph Editor.
TANGENT HANDLES affect the behaviour of the curve, determining how the attribute value changes between the keys, controlling the spacing of the animation without affecting the timing, affecting the trajectory. Adjusting the key’s handles adjusts the curve therefore the curvature, The shape of the curve makes a difference e.g. ease-in, ease-out, flat, linear, step etc defining how the object moves. Tangents are handles that change the amount of curvature influence of a point on the animation curve.
FRAMES refer to a unit of time in animation.
KEYFRAMES are frames where the animator creates a pose for what is being animated, a pose, a position or other value has been saved in time. An object travels or changes from one keyframe to another. It can be colour, position, size or almost any aspect. Represents an object attribute’s position (vertical) over time (horizontal).
IN-BETWEEN frames are between keyframes.
INTERPOLATION movement between keyframes and in-between frames.
WEIGHT perception of mass, an objects movement, how it reacts is implied in ways such as how it is coloured, its contrast, shape, location, the negative space. Showing weight in motion affects believability. Squash and Stretch (gravity, movement, inertia) Ease-In and Ease-Out (objects never really stop suddenly, accelerate a bit before reaching full speed), Follow-Through and Anticipation (will have movement after the end of a movement and some movement before it moves)all contribute to the perception of mass.
INFINITY of CURVES and Set Curve Behaviour
NORMALISE CURVE DISPLAY view all the curves within a scale of -1 to 1
SELECTION HANDLES displays a small cross at the pivot point for objects and a hollow cross for the parent node.
CHARACTER SETS can be used to simplify the selection and keyframing process. A character set is a collection of attributes organised in a central place from the same or separate objects that are intended to be animated together. Character sets do not need to be actual physical characters, they are a collection of attributes that get keyframed and are animated together meaning that individual attributes in a set do not need to be keyframed individually. A collection of attributes that can be animated simultaneously by combining attributes in one Character Node to display all the attributes in the Channel Box for keyframing and can apply a Set Key that will key all the attributes within the set.
AUTO KEYFRAME inserts a keyframe at the current time for the selected object’s changed attributes only.
WORLD, OBJECT and LOCAL SPACE the Local axis for any given object shifts according to the object’s orientation
Animations moving faster than expected in Maya playback speed does not alter the timing of the animation, it changes the speed at which Maya plays the animation back in the window
Momentum is calculated by multiplying the mass of an object by its velocity also depending on direction, deflecting a moving object is considered a change of momentum. Weight and speed affect momentum and when two objects collide some or all of the momentum transfers from one object to the other.
MOTION TRAIL is the path of motion and can include the frame numbers.
GHOSTING to see an animated object a few frames before and after its current position, images that echo the animation, visualising movement and position of animated objects over time.
PATH ANIMATION by assigning an object to move along a curve.
COPY ANIMATION from one object to another e.g. when using a proxy object. Copy and past curves in the Graph Editor and make sure to be on the first frame of animation.
SELECTION HANDLES have a high selection order priority by default
Driven Keys are keyframes that are driven by the attributes of another object rather than time, creating a relationship between any two attributes. There is a driving object and a driven object or drive attributes on the same object.
Motion-Path Animation uses a curve to move an attached object along its path over time.
Motion Trails, animate the movement of an object and then create an editable motion trail.
Animating Constraints, which can be with more than one node and the weighting of the constraint strength can be blended and animated eg a Point and Orient Constraint. Changing several constraints from time to time as needed. The parenting of an object can be animated. Look in Maya’s Channel Box under SHAPES to see which constraint is applied to which object. One object can be constrained to several Locators that are parented to different Joints. Changing the weighting of different Constraints will change the animation of the constrained object to different Locators.
Animation Layers separates the keyframe data applied to objects creating options to add new motion that can override, blend or be combined with existing animation. Animation Layers can also be used with Driven Keys and hierarchical relationships can be created.
With 2D or 3D computer animation, keyframes are something that can be changed, they are used to establish the properties or attributes of an object or charater that can be changed over time.
It could be position, rotation, scale, transparency, structure of the 3D model, properties of the model, lights and materials. By changing a parameter value of an object overtime we create an animation.
TRANSFORMATION MODES
- Transform Tools from World to Local to move objects according to their local space, rather than world space.
PREFERENCES TO CONSIDER
Animation Preferences:
- Tangents to Weighted Tangents ON, providing more control over the shape of a curve between keys in the Graph Editor
- Default In Tangent and Default Out Tangent > Clamped which for starting points because they prevent values from overshooting between keys of similar value, while providing spline smoothness between. keys of different values.
Timeslider Preferences:
- Framerate choice between 2fps to 48000fps
- Set Start and End Time and Playback Start and End Times can be different allowing to focus on one animation cycle eg from 1 to 30 then the rest of the animation will then be cycled from frames
- Playback speed:
Play every frame plays every frame regardless of frame rate setting
Real-time forces playback at the frame rate that is set in Time in the Settings
Half/Twice plays back at half or twice the specified frame rate
Other plays back at a user defined percentage of the specified frame rate
Learning Maya 7 ‘The Modelling & Animation Handbook’ Training Guide and Palamar, T., 2016. Mastering Autodesk Maya 2016 has helpful explanations of these concepts and tools.
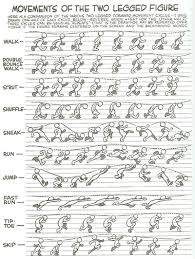
WALK CYCLE
The steps that can be repeated many times.
Key poses or Pose animation can be set at 5 frame intervals for the gross animation.
Frame:
- 1 or starting position
- 5 lift one leg and foot and position forward for the start of the walk, start moving the arms
- 10 approximately midstride for the first leg placing the forward leg on the ground straightening the knee, flattening the foot, bending and moving the body forward, rotating the back leg and move the arms more
- 15 start shift the weight to the front leg and lifting the back leg, knee and foot with toes pushing on the ground, swing the arms, start straightening the torso with the head forward
- 20 all the weight on the front foot, body over this leg, lift the rear leg which is bent ready to step forward, straighten the torso and keep the arms swinging
- 25 swing the whole body forward, bring the back leg up and forward ready to step with the first leg behind, lower the body and lean forward into the step
- 30 is similar to the pose at frame 10 with the opposite arm and leg in front
- repeat the next set of poses with the other arm and leg to correspond to the first set with frame 35 corresponding to frame 15, 40 matching 20
- adjusting the movement and timing to make the animation believable
NEWTON’S LAWS OF MOTION
An object in motion stays in motion at the same speed an din the same direction unless acted on by an unbalanced force. The law of inertia and the principle of animation called ‘follow through’.
When a force acts on a mass, acceleration is produced. The greater the mass, the greater the force required to achieve acceleration. Therefore, the same force acting on two different objects will produce two different accelerations. Force = mass x acceleration. Anticipation.
For every action, there is an equal and opposite reaction. Acting forces meet other forces acting in the opposite direction.
Starting out in class we looked at different types of rigs for the ball and characters and explored ways they can be brought to life. We covered setting up poses, the bouncing ball, a walk cycle and finishing the semester with an introduction to basic animation physics. Looking at the key principles: timing, spacing, weight, squash and stretch. Needed to research and get my own reference then break down the reference.
SOME IDEAS I came across that were of interest.
COG centre of gravity, the thing that moves the character everywhere
- How do I get better at this?
- People who do it the most do it the best, enthusiasm
- Goal is to get better
- Have multiple workflow strategies at your fingertips
- Path of least resistance for the director’s goal
Consider weight, Body Mechanics, Rhythm, Anticipation
- The ingredients are fun and compelling to look at
- There is a lack of being deliberate, need to understand what the intention is, where are the poses
- Resistance to put nice solid holds in the work, needs to be doing something
- Start with only the poses that you need, not relaxed, tension and know what is going to look like
- Being deliberate and work out from there
- Only show what we need to know
- How to work the intention into the shot
- What are you wanting to say
- Tell the story with holds
- Keep COG as simple as possible, it influences everything
- Weight everything falls at the same speed, how you show weight is that it covers differently
- Contrast, reason for contrast e.g. small v tall
- Some Parallax, how things move differently from different depts, FG is quick BG slowly, different rates. Be economical with camera and do not move unmotivated and tell the audience what they need to know, when they need to know it. Only show what we need to know.
- Cameras and Composition – do not use too many cameras and unmotivated cameras, as simple as possible. Always have some movement, some drift, ease in/out
Some WORKFLOW thoughts:
- Reference Editor, can update when rig is updated
- Display layers
- Outliner – camera rig, environment
- Make selection COG and feet, move that > create sets > quick selection sets > add to shelf
- World Mode
- Tear off Camera View
- Retain control of the workflow and by having sections can be as least destructive as possible
- Turn everything off and only access curbs curves
- One C shape to another C shape can be subtle
- Arcs as COG goes down some things settle later
- Poses, fewest number of poses as possible, set for a reason
- Can move poses along the timeline for speed
- Linear, place in position
- First pose is contact pose > Lowest Pose > Highest Pose, One Cycle > Copy > Paste for another cycle.
- Feet
- Start of hold, set deliberate holds, no keys where the holds are and in the Graph Editor can still see where the holds are. Hold is no movement, deliberate, moving hold, slow out from hold
- In-between poses can have sets of 3, on timeline always see groups of 3
- Key everything on both poses
- Linear then Spline, Auto Tangent
- Translate Y is the weight
- When all going down make somethings go up, building in some overlap
- Detail layer, concentrate on extremities add some more drag
+=6 moves it 6 frames in frames
BLOCKING
Blocking a shot consists of setting key poses every 5-10 frames to rough out the animation, the generalised motion before setting keys for the detailed motion. Studying the extreme positions that define the feel of the animation.
- does the motion and timing work in the scene
- is the motion either too fast or too slow
- is there continuity with other shots
5 Key Steps for Effective Blocking
How to create a good blocking step by step?
A LOOK AT AN ANIMATION BLOCKING TECHNIQUE IN MAYA
IN-BETWEENS and BREAKDOWNS
The drawings which define the movement, the arcs, rounding out and fine-tune the timing. The interpolations are created from one blocked key to another shaping the motion away from linear point to point. Consider using breakdown keys for the in-between keyframes, later these could be moved to maintain the relationship between the standard keyframes. Consider using subsets eg legs and hips and avoid keying all the attributes as done when blocking making it easier to make major changes later.
Maya Inbetweens
THE BREAKDOWN KEY
Riot Games’ K/DA Animation Breakdown
The 10 best VFX and animation breakdowns of 2018
MAYA BREAKDOWNS
PLAYBLAST
A playblast is a screen grab capturing the animation to get a realtime playback to view and evaluate the animation quickly using a compressed movie file.
MAYA Playblast an animation
FINE-TUNE
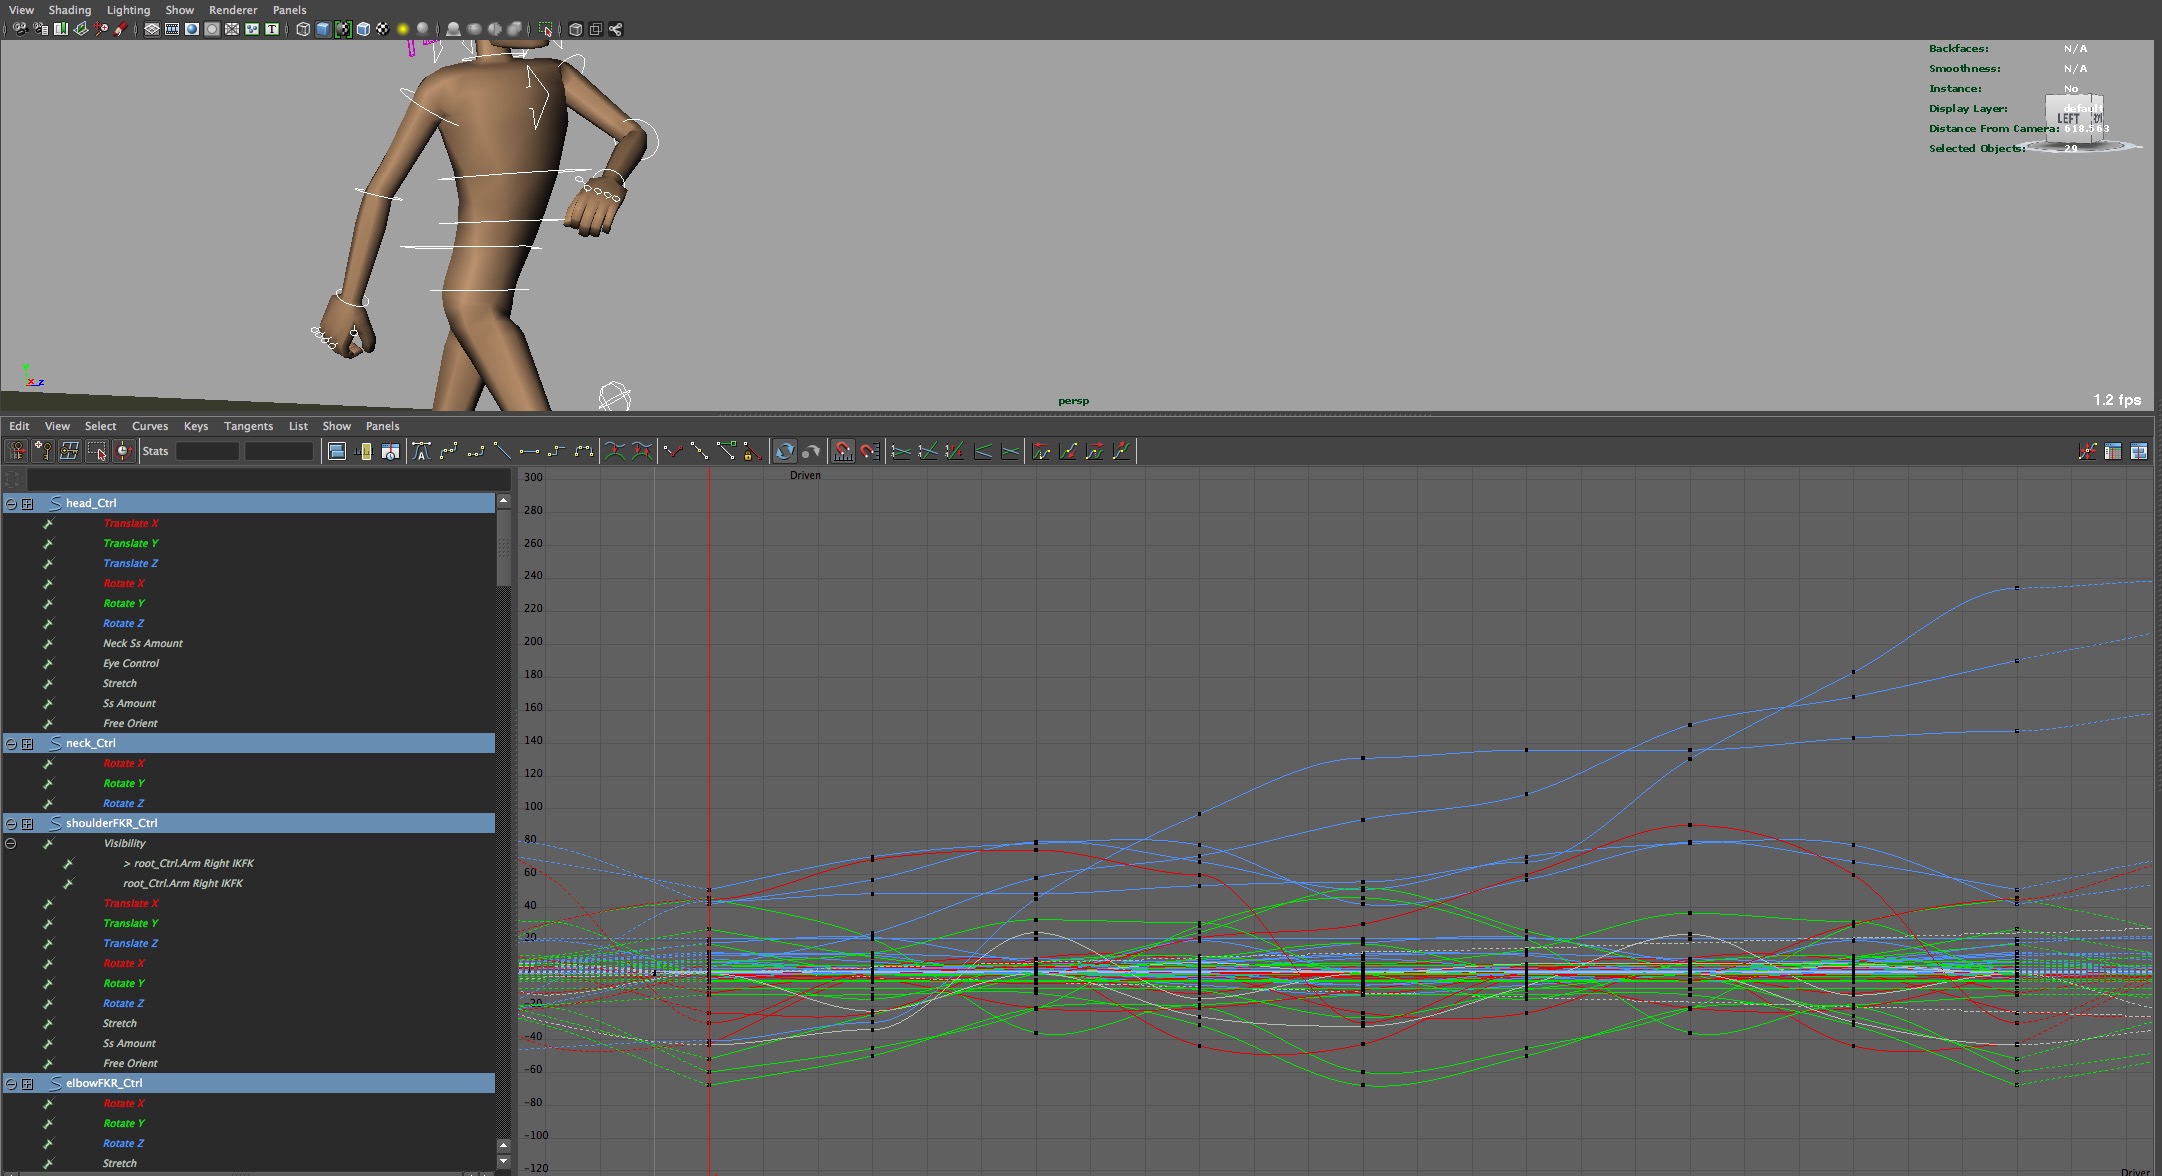
Work in layers, on major keys and in-betweens first, then secondary and tertiary keys next. Work with the Graph Editor using the tangency, interpolation and keeping keys on whole frames for cleaner curve management and editing.
Remove superfluous keys that are not contributing or were made ineffective in the Graph Editor.
Add subtle motions to major and minor joints and control points such as the hands, head, shoulders and hips that contribute to the motion of the attached joints.
Breaking Movement by offsetting the motion of the joints to achieve secondary motion in relation to the surrounding joints such as an arm moving to pick up an object creating subtle movements and accelerations to create realistic motion.
OFFSET KEYFRAMES PANEL FOR MAYA, STAGGER, CYCLE & RANDOMIZE KEYS
LIP-SYNC
Consider doing the lip-sync last after setting the context such as eye and head movements.
Like other animation first block then refine and finish with fine tuning the overall lip-sync eg M, A with jaw down, F blow cheeks, E, U, O finishing off with the curves in the Graph Editor.
BASIC ANIMATION PHYSICS
Choices from: Side step (left to right), Jump over a gap or an object, Jump on OR off an object, Step forward and settle, Jump on and off an object and settle or Turn 180 degrees.
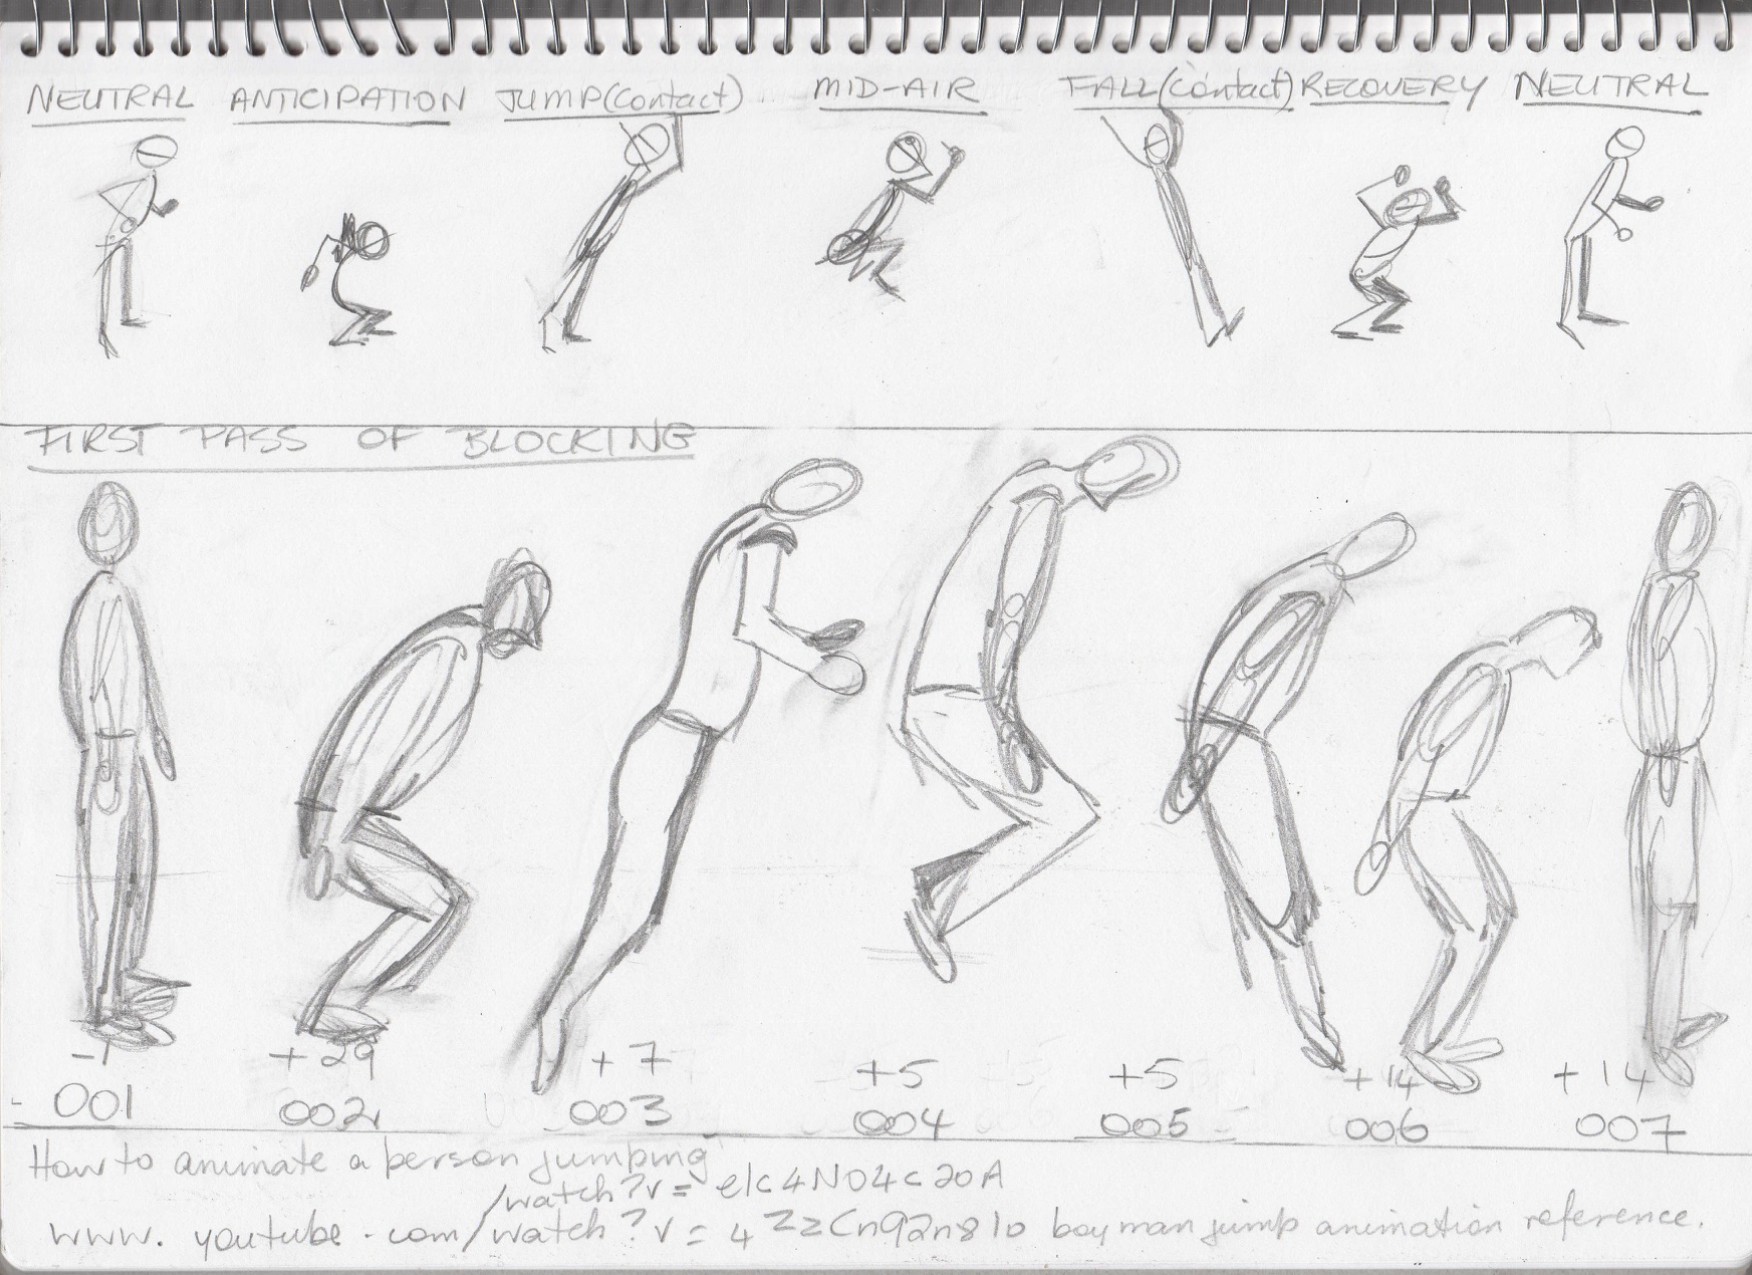
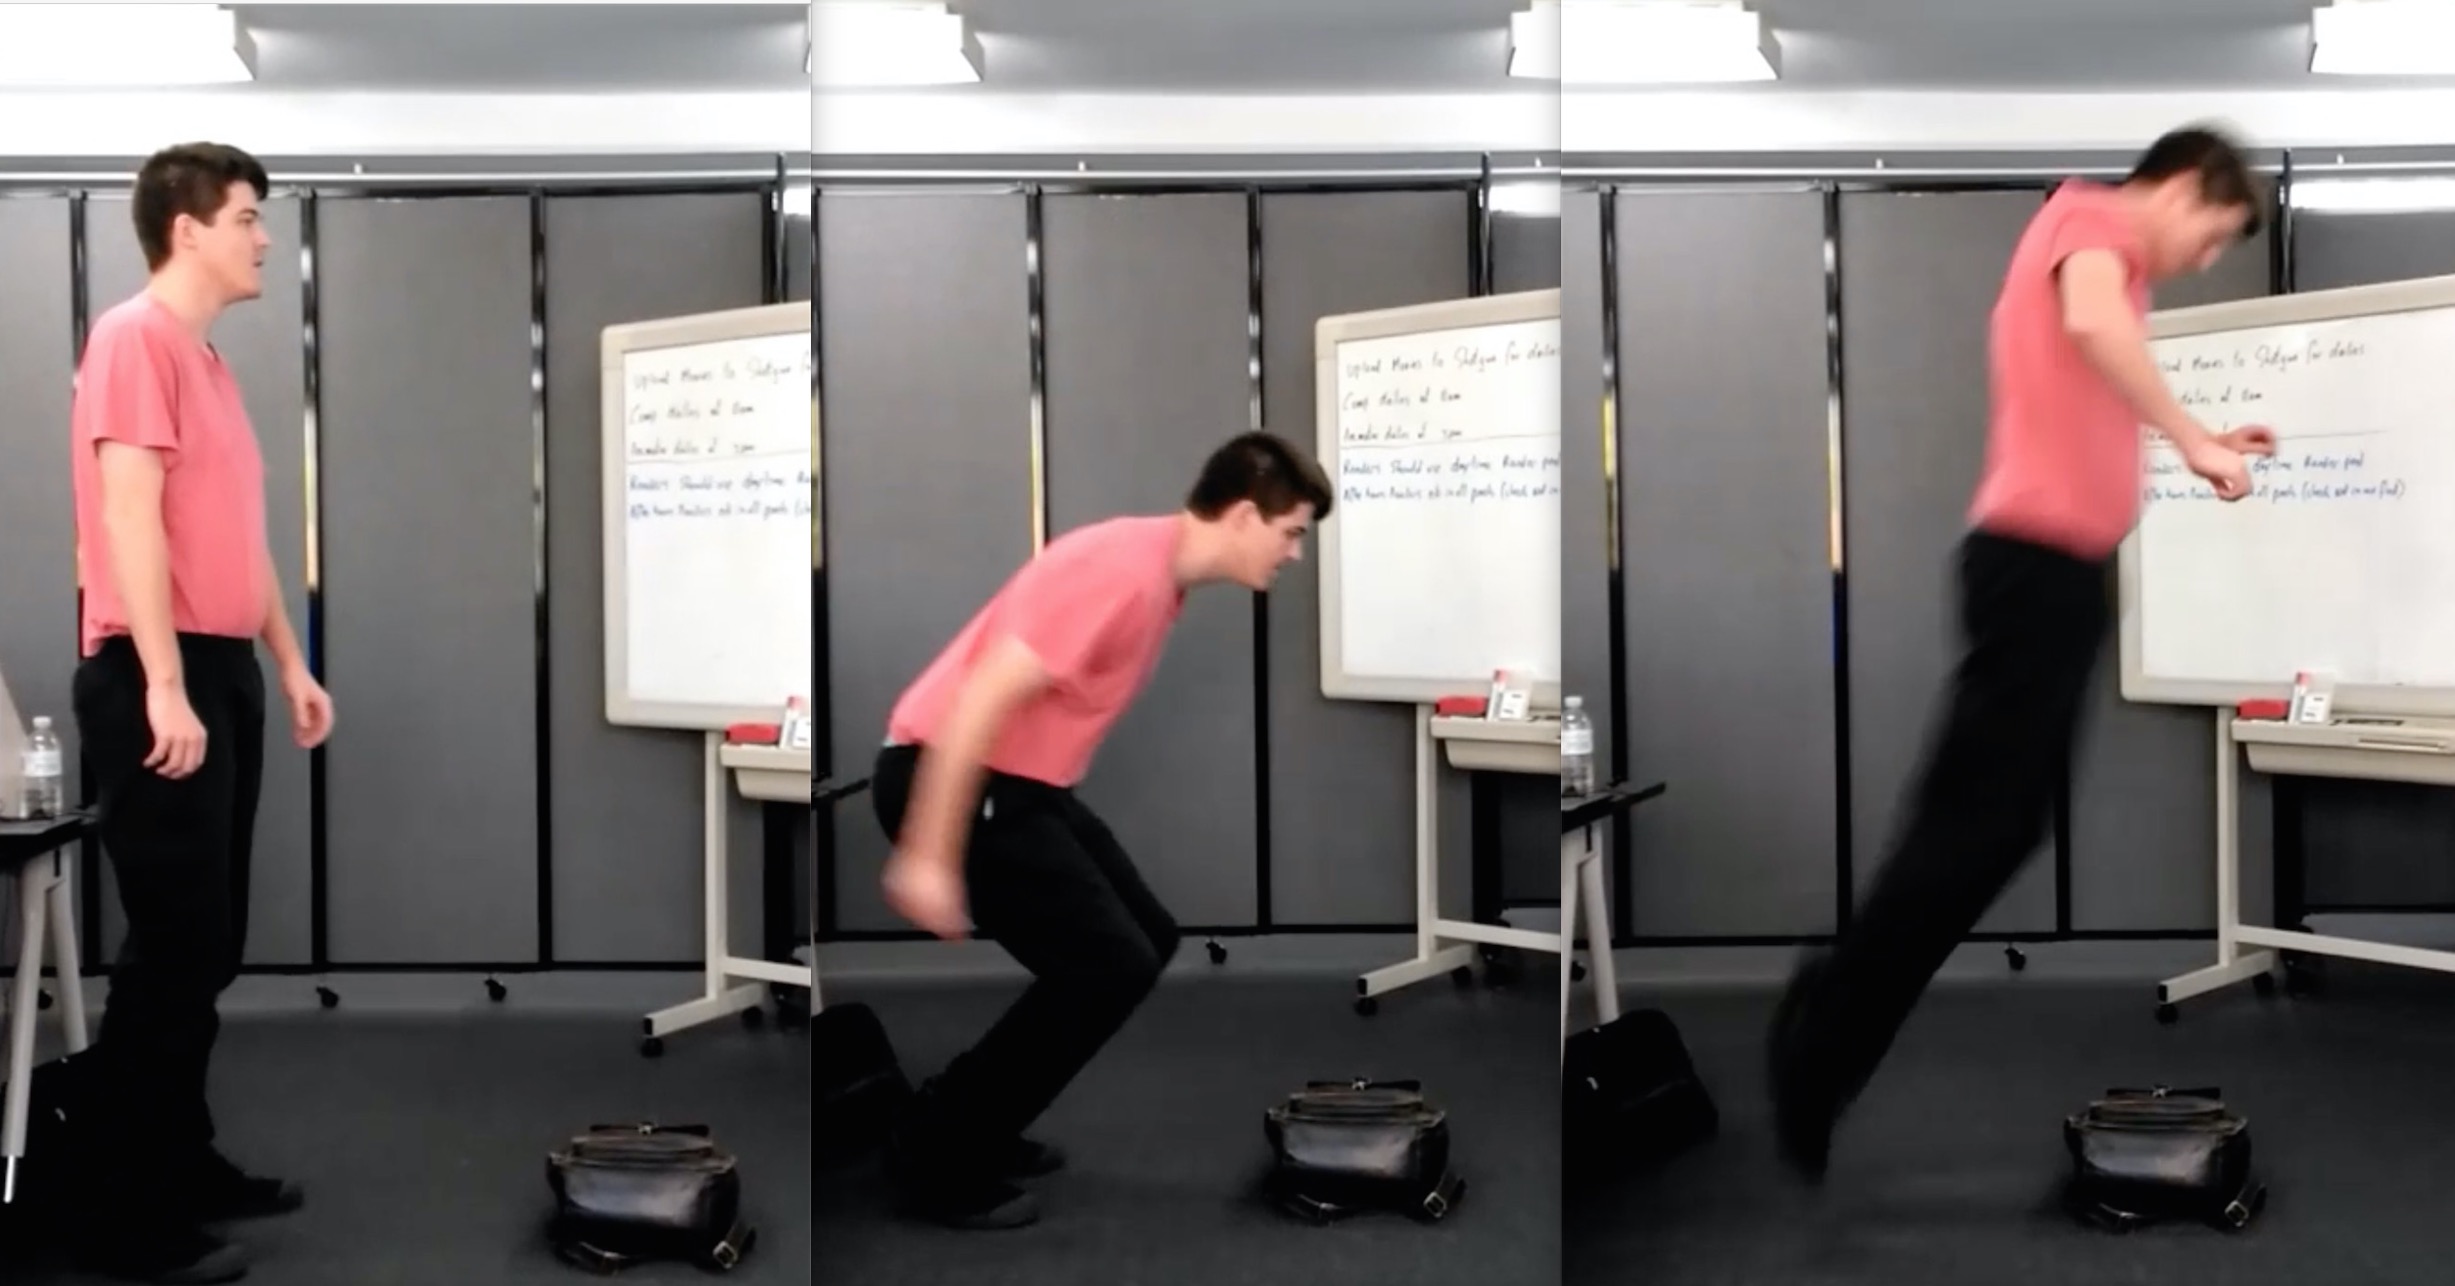
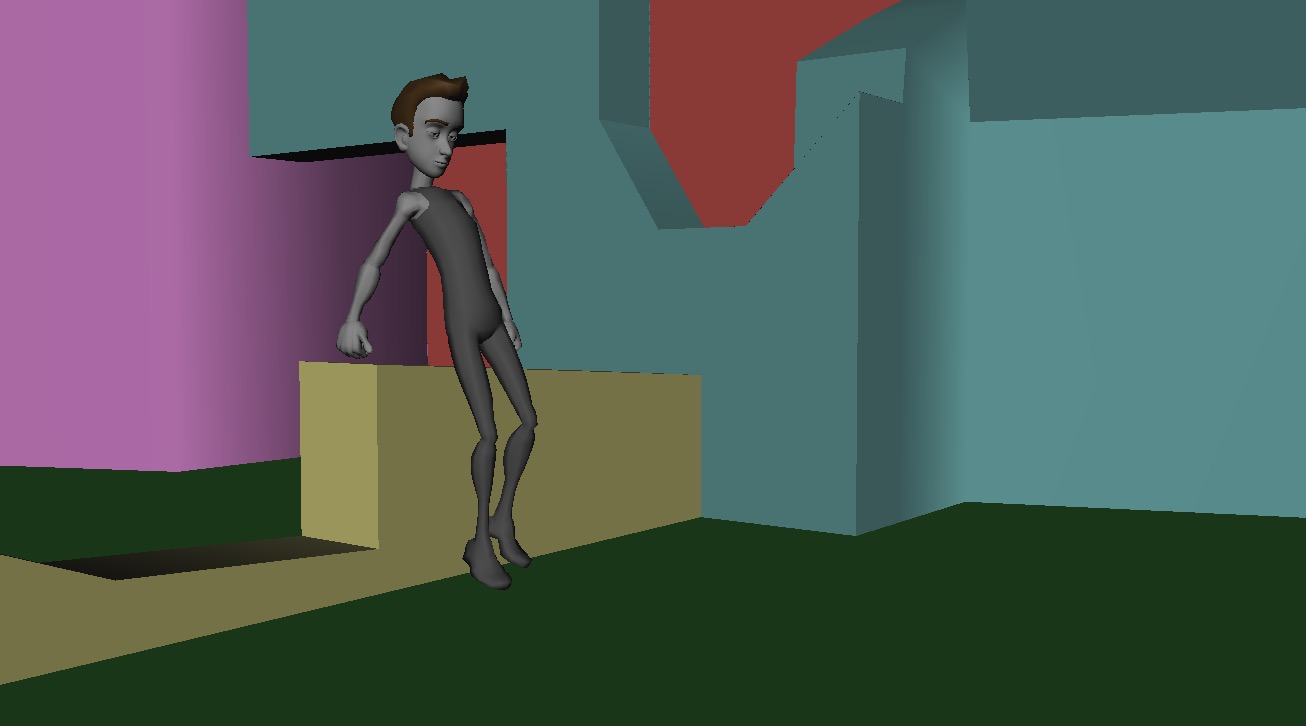
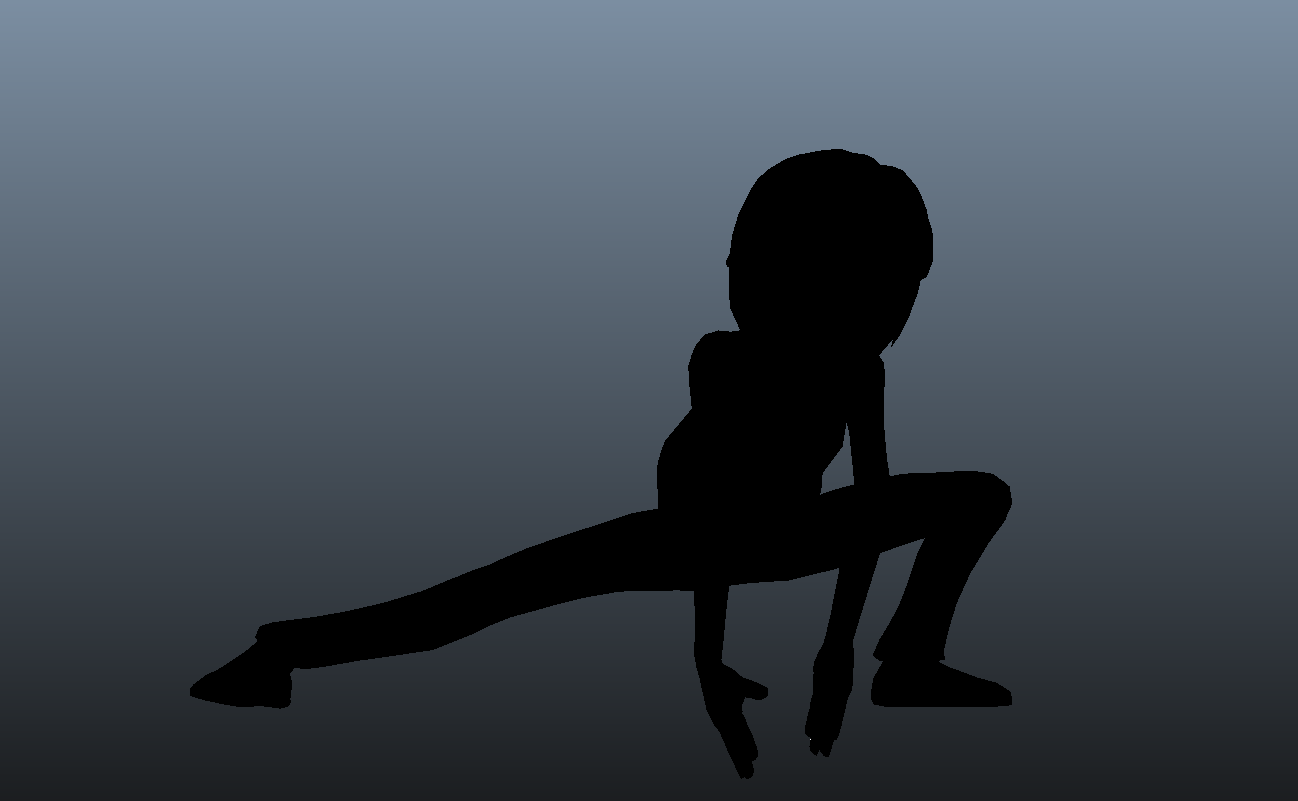
My choice to show the concepts of basic animation physics is jumping over an object. I’m looking at the references I have taken, breaking the movement down into key poses and doing thumbnails of the actions to see how the poses are and how they are working. What are the poses looking like, what is the character thinking and how are they behaving while doing the jump?
It is an energetic jump by a healthy, happy, fit, confident and coordinated young man.
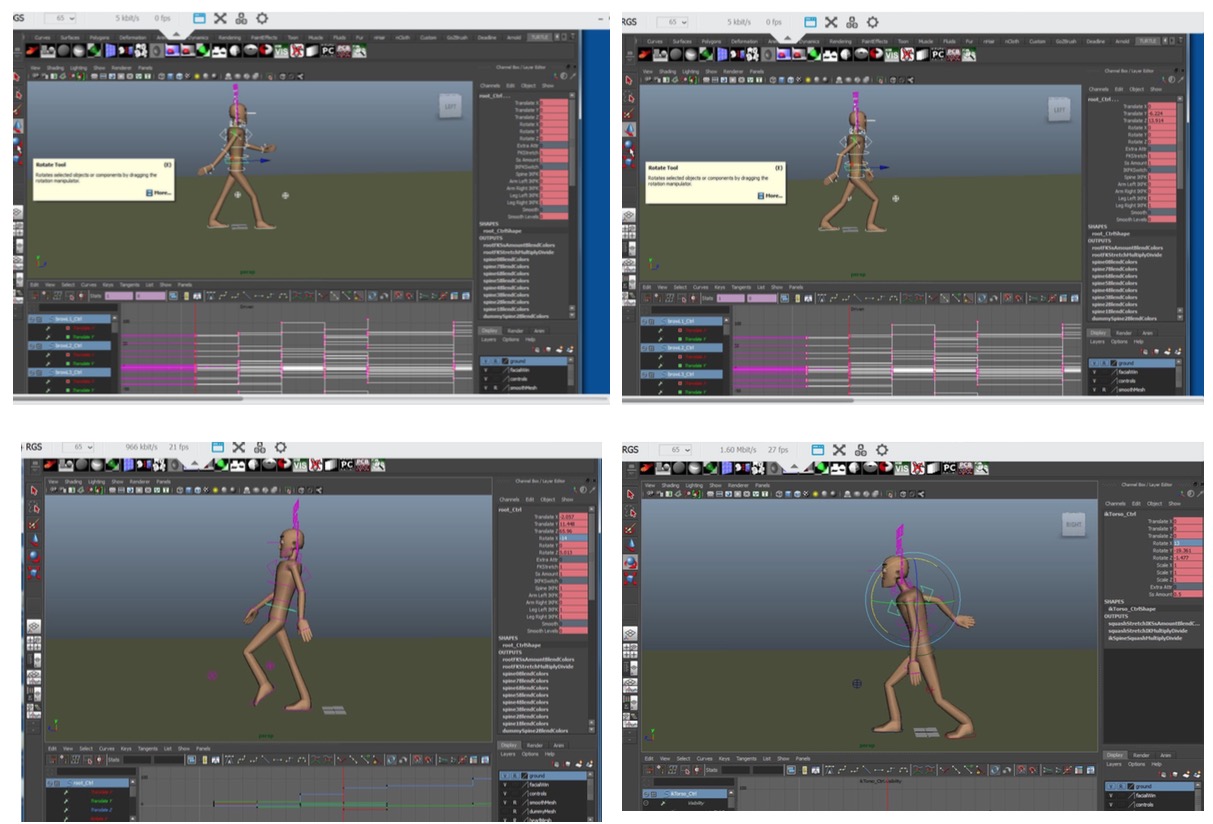
For this animation I’m using the Morpheus Rig by Josh Burton from the 11 second club and will see how the basic rig and animation controls are set up and how it is different from the Max rig that I used for the walk cycle.

Working out what the key poses are was a challenge, looking and observing how the action is happening, such as the feet touching the ground, the pivot point of the action, the up and down of the hips with the highest and lowest position, are the legs straight and what are the arms doing was not as easy as it appeared. I needed to look at the relationship between the shoulders and the hips along with the curve that the spine creates while looking for the line of action. Later on I needed to revisit the key poses as the first ones were not working as I had imagined and after some initial blocking I had a better understanding of what I was looking for. Back to the drawing board.


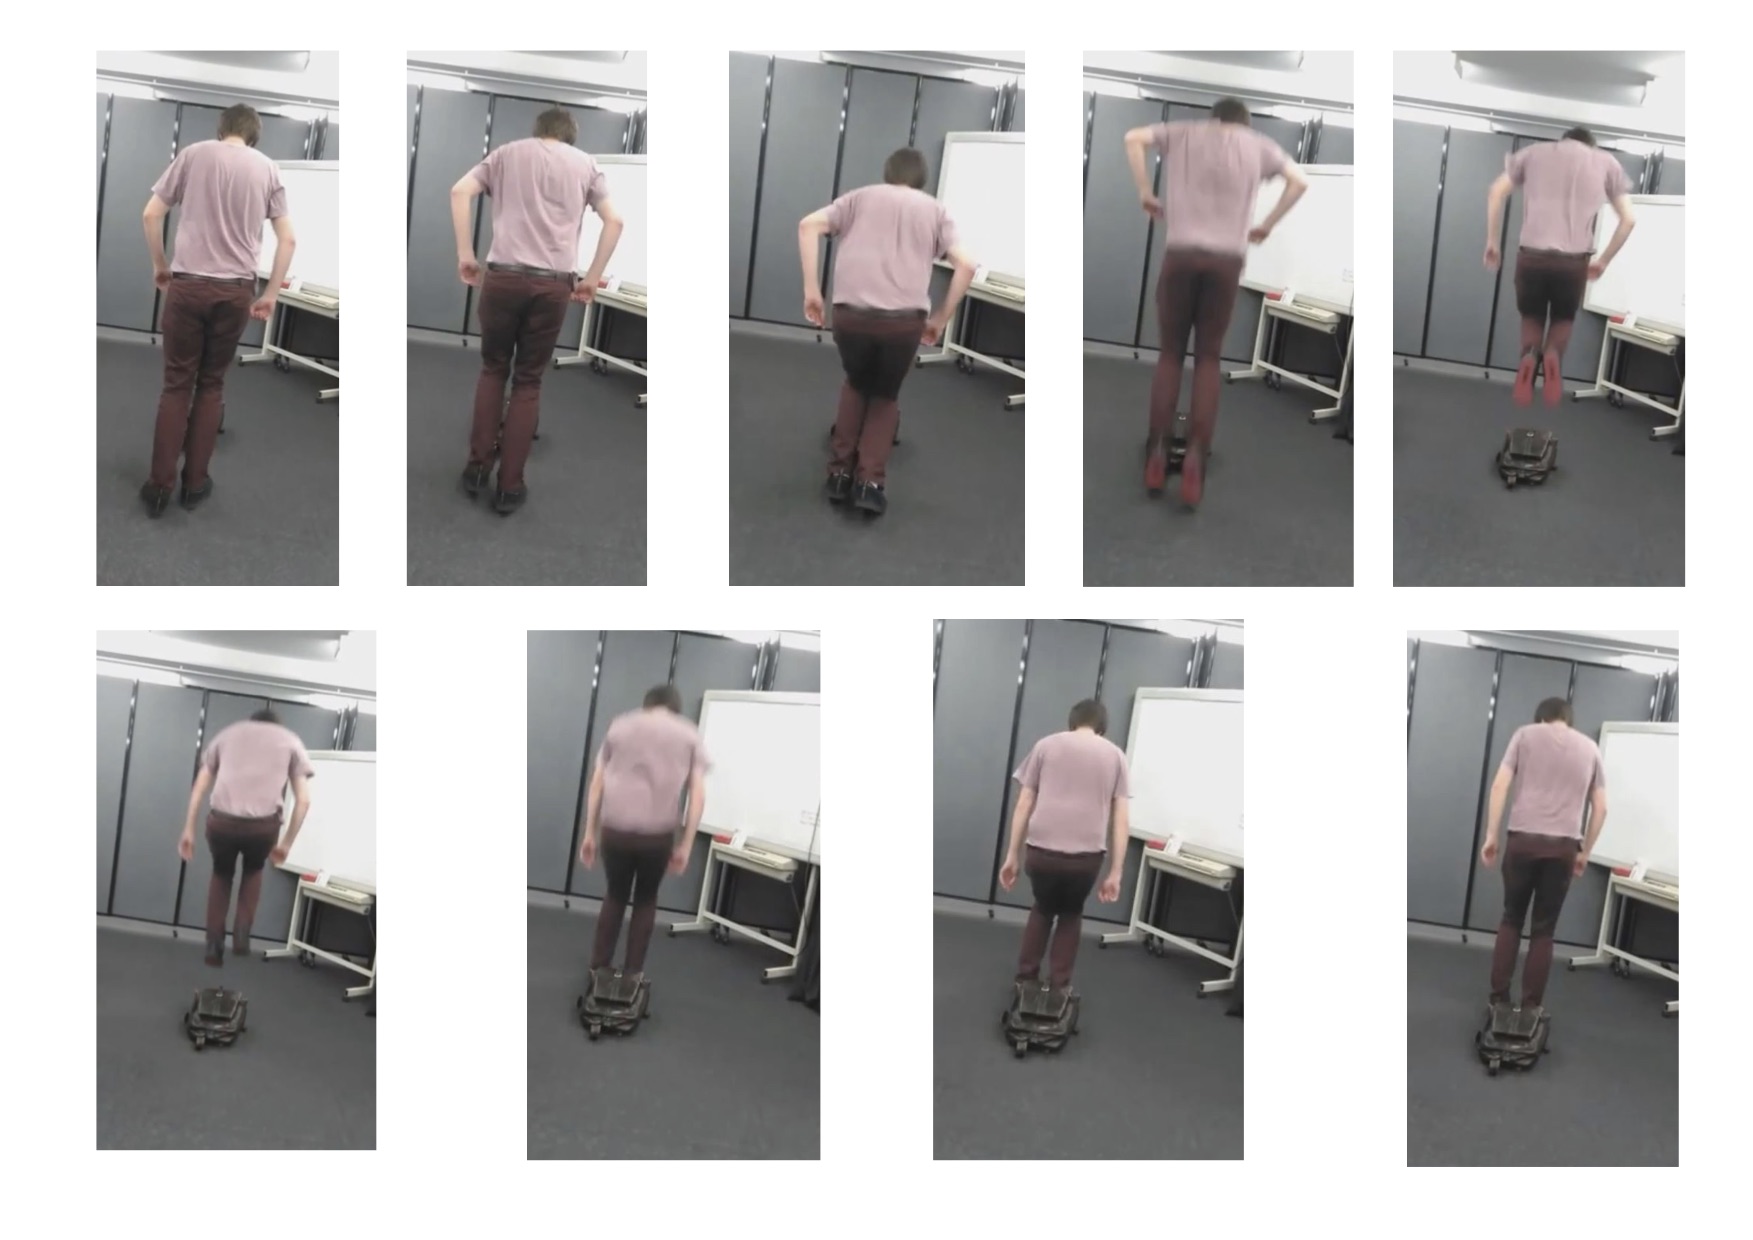 From the video reference I took snapshots of the back, side and front in these references that have helped with the positions of the arms and legs in relations to the body, the angle of the hips and the twist of the shoulders.
Link to Video Jump Reference: password animJumpRef108
THE FIRST PASS of BLOCKING
Like the blocking of the walk cycle I started with the hips and feet, then worked on improving how I placed the centre of gravity for the poses. I had problems with this when blocking the walk cycle. I’m looking at where the character is in and out of balance during the jump, the character needs to be out of balance to move and then put back into balance to make parts of the action, settle and stop.
The silhouette makes the pose more interesting and I need to refer to how this is looking more often. The video is an excellent reference though with the use of silhouette’s some slight changes makes the poses and action more interesting. Maintaining the physics, creating the line of action and keeping the poses interesting while positioning the character with each controller is a constant challenge. This is an experience of discovery of what the controllers can do and how they relate to each when positioning the character.
Which foot is carrying more weight? Observing this helped with working out how the centre of gravity and balance are working.
The timing of the jump is different from the walk cycle we did previously, the walk cycle was blocked on every 3 frames and cycled. This jump has a different number of frames between the main poses and will be a single action, the jump. I’ve started with the timing between the key poses as it is in the reference, it is not flowing so well and adjustments need to be made for the timing and spacing of the animation. How does making it faster or slower change how the jump looks and feels?
My reference starts and stops from standing, I’ll start this way and see how the energy of the jump is working and how the poses are communicating what is happening?
Early Blocking Link: password blocking108
With the key poses I needed to work out which pose is out of balance and which pose is in balance, finding the centre of gravity by having a straight line with equal amounts of weight on both sides, even weight, was helpful. The ‘C’ and reverse ‘C’ will show balance and the energy in the jump. What and how is the character supported to stop the fall? The pose is out of balance when the pose is not carrying the entire weight, our instinct is not to fall and we use our legs, arms and shoulders to find balance. There is a point where the character will not fall and the body stops the fall.
I have gone back to the thumbnails and reference, having another look at how the key poses I have chosen can be adjusted or changed to improve the action in the next stage of blocking. Also working on how the step into and out of the jump is going to work.


Link to more detailed Video Jump Reference: password animJumpRef108
Helpful feedback for these poses and going into the next pass of animation.
•key posses can include straight legs, the highest and lowest position of the hips
•’C’ shape and reverse ‘C’ shape
•analysis the physics, the relationship and angles of the chest with the hips together with the rotations and twists
•work on the chest and spine
•add variation in the legs including how the feet take off and land as it does not need to be at the same time
•legs too stretched, too obvious, need to feel it not see and the spine looks to short, need to keep the spine in proportion with the legs
•how am I going to make the spine look natural, stretch the spine and look at the chest and hip
•adding shoulders, up and down, back and forward, to show the movement
•more of a dynamic camera view
•add more head, neck and arms to make it more dynamic
•push 50% more and not so much the same of both sides
•add the break downs, in-betweens, how the character gets from a to b
•timing, not like walk cycle, not about the frames, it is how it looks and feels, generally video reference looks slower
•timing is more about how long it takes to move, did it take longer here, was it faster there, was the arm movement faster there then push it in the animation
•to make the 150 frames think about anticipation, what is the character doing, settling down after the jump and put some of the bigger poses of this in the blocking, not the details


ideas for jumps
How is the character moving, starting the jump, there is a kick with a push of the weight forward to create the momentum to jump. Anticipation is creating this momentum, creates the energy and the body is changing when getting ready for the action.
In the next stage of the blocking I’m working on how the character moves into the jump and what happens after he lands.
These are the poses with the feet and hips before working more on the chest, arms and head.
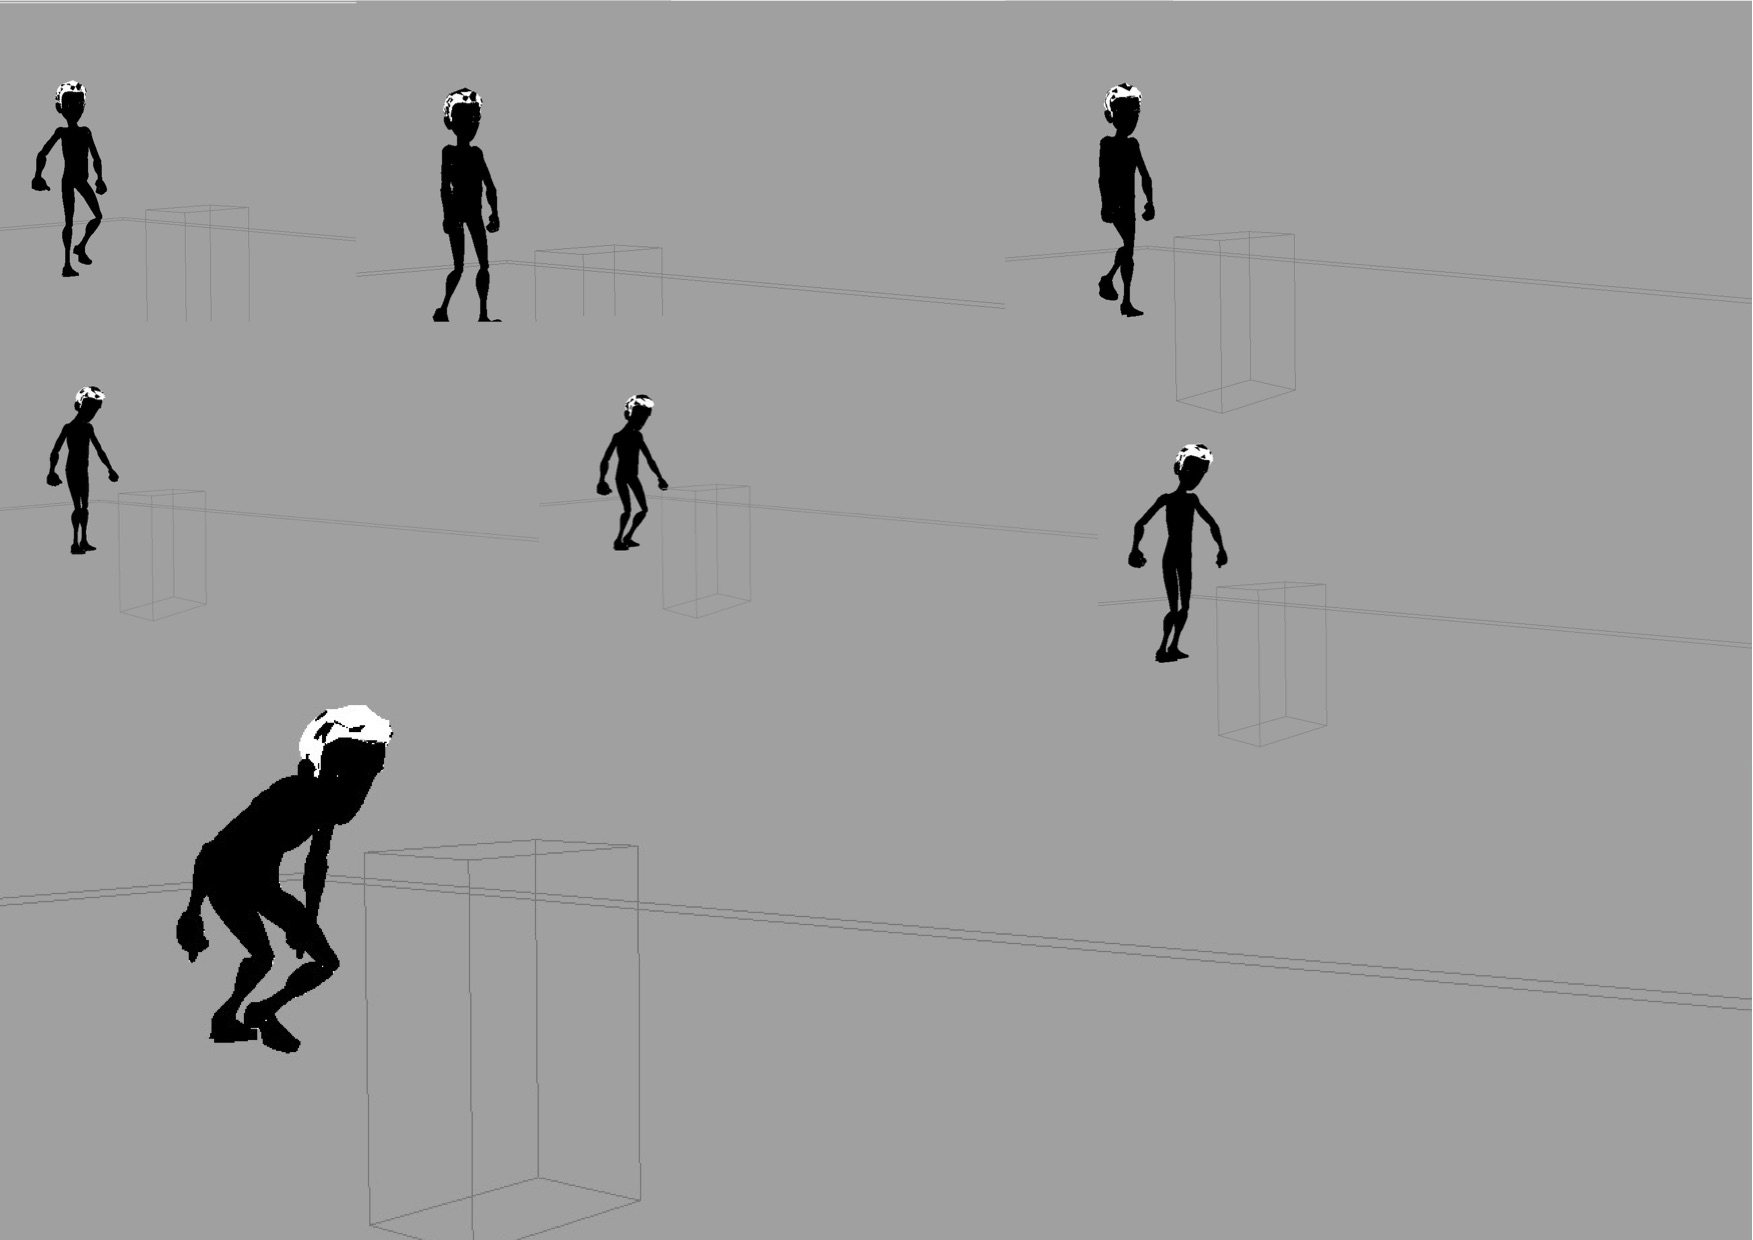
stepping up to the jump, working on the feet and hips

the jump and landing,working on the feet and hips
I have gone back to my video reference and looking at the different versions of the jump to see how the body moves and which combination to use while looking at the different references from different angles. Doing more drawings, thumbnails and looking at other video reference on youtube has helped understand how the body is positioned. Then acting out the jump over invisible objects and seeing how my body would be going into the jump and landing, how the hips are, how the shoulders balance my hips and what my arms and head are doing. Now I am thinking and looking at how far I could push the pose with the positions of the body to show the actions. When I first did the poses I thought they were exaggerated, then playing it they are not really looking exaggerated. I think this means I need to give more action into the movements they are making, the line of action the C and reverse ‘C’, the other problem is that I have not done enough key poses and in-betweens.
The distribution of weight needs more work as the limbs move at different times for the same pose, not sure how this is going to work. I’ve had problems with the placement of the feet causing sliding and not moving them around so much has helped the overall flow of the action.
Next pass of blocking: password blocking108
The timing is not right, some areas are taking too long and others are moving into the next pose too quickly. It has taken some back and forth, while observing, to adjust how long the actions are taking. It is not working by counting the frames between poses, I need to watch how it is working when I play the playblast and see how the changes affect the actions.
The other area I have needed to focus on is the landing, getting the balance working, settling after the jump before walking off confidently with the attitude that the character has done the jump and not fallen over. I’m considering a moment after the jump where the character looks like he might not regain his balance.
The start pose needs to be different, not such an unnatural start, adding more poses to the walk into the jump for it to flow more and look more natural. The feet are working better after adjusting the timing, the walk is faster there is less time between the steps. Another problem is that the head was not looking like it belonged on the body, especially during the jump, making it follow the spine has helped with that.
Blocking Work In Progress link – password: blocking108
Now, focusing more on the movement of the hips and shoulders, then the arms and how the balance of weight is being transferred before, during, landing and after the jump. There are different types of jumps, I have gone back to my video reference, acting it out and doing extra drawings to work out more details for the animation. The landing is not working, especially the placement of the hips.

working on the landing of the jump
I have had problems getting the right arm position, often needed to zero out the arm controllers and start again. Getting the arm position in place from the shoulder first then the elbow and wrist has made a big difference.
The shot camera needs to be repositioned to see the character, not so much of the environment and have the character walk out of the frame.
The swing of the arms is not working leading into the jump, during the jump and how they work with the position of the shoulders and head. As I work on the animation and something is not working I am going back to the stepped tangents and blocking to see the placement of the major body areas such as the feet, hips, shoulders and head. The other area I need to keep working on is the timing and pacing of the movements and how it changed the animation.
Moving from blocking to the first pass of animation I am not clear about how to make the adjustments for the timing, how the graph editor works and how I can use this to move the character.
I’m not happy with the feet and how they push off into the jump, it is not looking like there is any force with the push, too much like they are floating. This is where I have put in extra key frames and worked on the details of the feet. The movement of the toes and the feet together to have the push off from the ground. With the time I have before the assessment is due I’m focusing on this area, working on how the feet push into the jump and it is starting to look more like there is a push off into the jump. The arms are moving more during the jump.
The timing could be improved with learning more about how timing and spacing can work to create different speeds of action and give contrast to the movements. The spacing is the space between the poses in 3D space creating a smaller or larger gap between the poses, while the timing is where in time the action is happening. This will take time and experience to explore how they work together. If I want to make a movement faster, make a bigger gap and can also use a lower number between the keyframes.
Link to the start of the animation: password animationPhysics108
I’m working though some of the feedback, comments and details that will improve the animation.
- the first key needs to be kept in balance, the point where he is just about to have the foot off the ground, not the passing position where I was starting, the idea is to give a bit of a kick off the ground to start
- needs to be clearer with which arm is back and which arm is forward
- push the chest and spine more
- add extreme up and extreme down to the walks
- clearer silhouettes
- get the arms and body to support the movement more
- head is too straight
- need more poses
- bigger anticipation for such a big jump, think about the squash and stretch
- need air, bigger space and further up for the jump
- consider making the height of the object lower
- both feet do not necessarily move at the same time
- adjust the upper body more
- head feels like it is pinned in space and not on the body
- create a difference between the first and second walk, create some contrast
- look at how the hips are going up and down
- offset the spine, hips, spine, head
I have focused on some of these areas with the time that I have to submit the assessment.
I have adjusted the walk by adding more poses and have the character walking out of the frame. The timing is still not working along with the rotations of the body.
I have a problem with the feet going through the floor with the jump off the ground when I go from stepped tangents to auto tangents. Going back to my reference and adding key frames the jump as it leaves the ground is working better with the feet and toes pressing into the ground. What I did not realise is that I needed to focus more on what the toes are doing and add the keys between the key poses.
Jumping off from the ground is starting to have some force pushing off into the jump, more realistic. The energy of the jump, the poses, the gaps between the poses, the chest and arm movements are working better and I need to continue working on the landing as it is still too jerky. I have found the video reference invaluable when looking at these areas.
I would love to have had more time to work on the details of the animation and add some polish to areas such as the arcs for different parts of the body, using offset, the details of the hands, fingers and face to add personality to the jump. I also needed more time to go through my graph editor and check all the curves and tangents. I have realised that animation takes a lot of observation, time and experience.
LINK TO ANIMATION PHYSICS EXERCISE: password animationPhysics108
I would have found it helpful spending time in class, as a group, looking at one particular character and how the rig has been set up. Looking at what controllers there are, what they do, how they work, why they work that way and options for using them in a practical way when animating, from an animators point of view. Another area I would have liked to spend more time on in class would have been how to apply the theory in a practical way, not only when positioning poses also how it relates in the graph editor, an overview of what can be achieved when using the graph editor and dope sheet while animating. A thought would be to go through some exercises in class each week with everyone using the same character and seeing what can be done and how to do it including a walk cycle and an example of physics. Doing it together and following the lecturer, then applying what we have covered to our character and practical assessments.
Below are some helpful images we used during lectures.

HAROLD EDGERTON http://lumieregallery.net/wp/246/harold-edgerton/


Reference
Parkour for Beginners: 5 Moves You Can Master Quickly
‘Inspired 3D’: Blocking Your Animation — Part 1
PERFECT POSING – 1 – LISTEN TO THE CHARACTER… AND TO PHYSICS
AIM – Animation Notes #6 Pose to Pose Animation
Anticipation, Action, Reaction
Understanding Timing in Animation
animation workflow tips
The box – daniel gonzales
Evolution Reel
Avgerakis, George. Digital Animation Bible: Creating Professional Animation with 3ds Max, Light Wave, and Maya. New York: McGraw-Hill, 2004.
Blair, Preston. Cartoon Animation. Laguna Hills, Calif: Walter Foster, 1994.
Culhane, Shamus. Animation from Script to Screen. 1st pbk. ed. New York: St. Martin’s Press, 1990.
Derakhshani, Dariush J. Introducing Autodesk Maya. 1st ed. Indianapolis, IN: Wiley Pub., Inc, 2012.
Edgerton, Harold E., Estelle Jussim, Gus Kayafas, and Harold E. Edgerton, eds. Stopping Time: The Photographs of Harold Edgerton. New York: Harry N. Abrams, Inc., Publishers, 2000.
Gilbert, Wayne. Simplified Drawing for Planning Animation. San Rafael, CA: Anamie, 1999.
Nicolaïdes, Kimon. The Natural Way to Draw: A Working Plan for Art Study. S.l.: s.n., 2011.
Simplified Drawing for Planning Animation. San Rafael, CA: Anamie, 2013.
Kerlow, Isaac Victor. The Art of 3D Computer Animation and Effects. 3rd ed. Hoboken, N.J: John Wiley, 2004.
Maestri, George. Digital Character Animation 2. Indianapolis, Ind: New Riders, 1999.
Muybridge, Eadweard, and Robert Taft. The Human Figure in Motion. New York: Dover Publications, Inc., 1955.
Palamar, Todd. Mastering Autodesk Maya 2014: Autodesk Official Press. 1st ed. Indianapolis, IN: John Wiley & Sons, 2013.
Roberts, Steve. Character Animation in 3D Use Traditional Drawing Techniques to Produce Stunning CGI Animation. Oxford; Burlington, MA: Focal, 2004. http://search.ebscohost.com/login.aspx?direct=true&scope=site&db=nlebk&db=nlabk&AN=117195.
Rodriguez, David. Animation Methods: Rigging Made Easy : Rig Your First 3D Character in Maya. Lexington, KY: CreateSpace, 2013.
Thomas, Frank. The Illusion of Life: Disney Animation. 1st Hyperion ed. New York: Hyperion, 1995.
Whitaker, Harold, and John Halas. Timing for Animation. London; New York: Focal Press, 1981.
White, Tony. Animation from Pencils to Pixels: Classical Techniques for Digital Animators. Amsterdam ; Burlington, MA: Focal, 2006.
Tony White’s Animator’s Notebook Personal Observations on the Principles of Movement. Boston: Focal Press, 2011. http://www.sciencedirect.com/science/book/9780240813073.
Williams, Richard. The Animator’s Survival Kit. London: Faber, 2001.
MY FIRST WALK CYCLE
The use of timing, spacing, with, drag, overlap and using the Pose to Pose style which will focus on key poses then transitions between them.
This is the start of understand and planning for the walk cycle. During my research I have been thinking about different types of walk cycles and how this will affects the timing, placement of the feet, how the steps are taken, the up and down motion, the line of action of the body and the position of the limbs.
We are starting in layers, by blocking out the main poses, called key poses, breakdowns or passing position and the in-betweens. Blocking allows us to look at the timing and placement of the animation. Timing show us how long it takes to do something, with the movement showing how long it takes to go from one place to another. The placement will be the key poses, where the character is place. With Stepped Tangents the character is posed on each of the positions to show how it is working and how each pose relates to the others. The walk cycle is working on 25 frames per second with the blocking poses every 3 frames. Frame 1, 13 and 25 will be the contact position with 1 and 25 being exactly the same. Frame 7 and 19 will be the passing position with frames 4 and 16 being the extreme down and frames 10 and 22 being the extreme up.

Richard Williams ‘The Animator’s Survival Kit’
The first layer will include the movement of the hip and the feet, breaking the walk down into its parts or poses. Starting with the contact position or key pose, where the heel of the front foot is just touching the ground, the contact pose. Here the stride length is set and as the heal touches the ground and the controlled fall of the body is balanced, the back foot is still maintaining contact with the ground. I found it interesting doing a slow walk to get the feeling of how the walk moves. These two contact positions have a passing position or breakdown, which is the mid-point in the step, where the hips go up and forward in anticipation for the step and the back leg passes with an up and forward motion as well, the contact foot stays on the ground. The centre of gravity is above the contact foot when the other foot is off the ground. I followed this with the extreme down and up, using the basic controls and keeping it simple. Then building some layers adding other movements such as the body position for the line of action and centre of gravity with the hip.

It all happens so fast when we walk and looking at Richard Williams book, The Animators Survival Kit mades a difference when moving and visualising how the walk is broken down.
I had problems with the placement of the feet and how they rolled into each step. At first I did not understand this and the feet were all over the place. Once I started to understand more about how the weight is transferred with the hips and how the feet are positioned the walk started to look more like a step. Drawing out the steps and breaking down each movement made all the difference when considering this weight transfer of the the steps. I need to do more work with how the hips are working with the weight transfer while looking at the forward and back positions of the hips and how the legs work with both the hips and the feet.

Richard Williams ‘The Animator’s Survival Kit’ page 114
Between the first contact and the passing position is the extreme down where all the weight is down and ready to spring with the head at its lowest point. The foot is flat, the hip a bit forward and down with the back foot has some heel rotation. Then between the passing position and the second contact position is the up pose where the body is at the highest, straighter and ready to make the next contact pose. This is were the body is out of balance, forward falling with the back foot up. The body is moving forward while the feet are not always moving. Again here I need to work on how the centre of balance and weight is working with the step and the foot placements.
Thinking about my character, the Five W’s:
- Who is it about? Who are they.
- What happened? What are they doing.
- Where did it take place?
- When did it take place?
- Why did it happen? Why are they doing it, the motivation.
I’m using one of the rigs from the 11 Second Club, called Max with the permission from the original creator Peter Starostin and have decided on a happy, strut walk.
List of happy, strut walk cycle
Link to Walk Cycle Video Reference: password walkCycle108
The personality walk cycle needs to consider things such as the gender, age and the shape of the character as this determines the unique character of his walk. My character is male, 30, fit, average hight, slim, competitive, contented and having a good day in his successful business all of which I am thinking about as I start to add rotations to the hips.
Planning for the happy, strut what is happening to the character? My observations from the video reference, which is showing me the motion, is that the head has more side to side with a twist from the waist and shoulders, not so much twist in the hip. The opposite shoulder to the front foot is more up and forward with that arm swinging across the front of the body while the head is leaning towards the front foot and slightly back. Legs are straighter than the general walk references we have been looking at. For the Passing Position both arms are straighter, both shoulders levelling between the twist and a straighter body. There appears to be quicker out of this step with the front leg and foot, like a little kick into the next key pose.

Thumbnail drawings from references.
The drawings or thumbnails are helping to show me what each pose is going to look like including things like exaggeration, the arcs, line of action to see how this will look.

some fun with blocking, what happens to the foot with the weight on it from the contact position to the passing position
Thinking about all of this: chest is twisted, side to side of the body, delay in the passing position, spring in the step, strides light, shoulders rolling with the arms following with a slow swing and slower at the extremes, full of energy putting the excess into the legs of the walk, body leaning sideways, the speed of the walk. Consider delaying the passing leg, slower pick up, more dynamic and faster hit to the floor. The body up hight gives more bounce. The passing leg is lower to the ground with an emphasis on the ‘up’ and slow in/out for the in-betweens round the upper passing position. Wide on the arms with slow in/out at the top of the swing.
With all of this there is a lot to consider and by doing the blocking in passes hopefully I will be able to work out how to incorporate some of these qualities.

video reference and blocking the character
Feedback after First Pass of Blocking
The walk has a little bit of double bounce which can be added after the basic, finished animation. Would go frame by frame and look at the up and down of the hips. There is a bit of hitting with the hips and it goes with the head movement. The head has some side to side.
With my reference the feet are more on the ground, in real life the movement is more subtle. I have animated it with more movement and exaggeration, especially with the feet positions. With the walk he is kicking the feet a bit because he is happy this can be mimicked with some toe bend. The more of a kick the more it needs to be bent. On the extreme up push the toe forward and on the passing position the toe would be bent back. Also look at bending the ankle.
Need to pay attention to where the hip is, the forward position of the body, see where the centre of the hips are in relation to the position of the feet. For the extreme down push the hip forward and there is more room for the leg to come forward. The leg will then be straighter and more room to push the foot forward. The hip is usually up on the contact and on the passing position it comes down.
Focus on the rotation of the hips, the side to side to show the happy walk. Look at the video reference and see how much of the hip and chest can I see and see the rotations. When the right foot is front and the chest is twisted the other way, opposite. There is a stronger rotation in the chest and can see the line of the chest. Check the line of the cloths, if I can see the hips or chest it means it is rotation. The same with the back, use as a guide to what the rotation is and what it is doing. Look at the hip like the bouncing ball,
– Adjust the line of action for the body.
– Look at the toe kick to add personality to the movement.
– Adjust the up and down of the hips, then the rotations, side to side, back and forth.
– The chest, based on the hips, it is the opposite side to the hips, the spine, then do the head and neck, and lastly the arms

more fun with blocking, what are the arms and hands doing
Second Pass of Blocking
I have added some toe kick on the passing leg for the personality and adjusted the hip position. By adjusting the line of the hip, where it is placed over the feet it has enabled the legs of the character to be placed more in the position of the where they need to be for the walk. As the weight transfers for the step the foot that stays on the ground and rolls forward during the step is looking more like a walk. The body lean enables the body to move forward, the body is not right, the greater the lean the faster the walk and distance in the stride length. For the blocking the walk is on even timing, meaning that there are equal frames between each of the keyed positions.
Starting with how the hips twist, I’m continuing to look at how this fits with the line of action and how that expresses the personality of the walk. The silhouette of this position needs to also describe the character’s personality. With the movement the pose needs balance, it is not going to tip over or fall back and a sense weight, which foot is the weight on, not looking symmetrical. He looks stable as he walks and continuing the line of action.
Internal forces, muscles acting against gravity and motion act on the body differently to show the personality of the walk. The body wants to stay in place, when the walk starts there is a shift in the weight from one foot to the other with the different parts of the body such as the shoulders, arms and head moving at different rates. Initially there is a drop in the body, the weight goes down from the hips, and the side of the hip that is the same as the forward foot needs to follow. There is the squash to gain the momentum required to take a step. The body wants to keep its balance, the shoulder rotates opposite to the hips rotation and after the squash the body stretches as the step is taken. When all the weight is on one foot the spine compensates by twisting toward the foot with the weight on it to keep the bodies balance.
I’m not really understand enough of the hip rotation to transfer these concepts into the animated walk poses. I looked at bending the spine a bit forward and back to give a sense of weight and this is not working. I need to go back to the hip and get a sense of what happens. I have given the arms a basic movement with the strut and bending at the elbows to get movement and balance. Really not happy with how the hips and shoulders are working. The other issue is that I need to spend more time working out what the controllers are meant to do, how they work on the character and how to use them to create the poses for the walk.

Richard Williams ‘The Animator’s Survival Kit’ pages 152, 153
Feedback after Blocking
The personality is not clear, has a cartoon feeling with good bounce and the arms movement not so exaggerated. It is a good base and needs to be more exaggerated. Look at the chest and hip twisting with more head movement up depending on the personality and look at the line of action. The leg appears straight on the passing position because of the spacing because it is seen in this shape for 6 frames. Need to see everything moving. The left arm and check the keys and take out the ones that are not needed. Look at more reference, maybe more exaggerated happy strut and even if I do not use the exact movement it will help to inspire and give me a better understanding of what I need to animate. Make changes based on the personality, show the happy more. How do I want to make it more happy, maybe more open with the hands and push the chest more. The hip is the one of the most important parts, the base of the walk, the and down. The neck depends on the personality, do not squash. Need to fix the left arm, wrong keys and keys not on the main poses. Look at the shoulder and spine action. If there is a little movement consider deleting or putting on the blocking key. Acting out also helps with understanding the action, what I would like to see the character to do.
and more fun with blocking, where is that centre of gravity
I have deleted the keys for the hip rotations, shoulder and arms and have gone back to the video reference, acting of the walking of the steps myself, doing some more thumbnails for the rotations of the key poses and working out how the movements relate to the rotation X, Y, Z of the animated walk. It feels like it is better to start again then work though what is not working. I started breaking the movement done into the different rotations for each pose and found this easer to understand. Now animating each rotational movement separately, starting with the hip rotation rotate Y, animating that and seeing how the hips make this movement with the step and poses. After this I look at rotate X of the hips. I found this helped me to understand more about the shift of the bodies weight, the centre of gravity for the movement and how this worked with the positioning of the rotation of the hips. Looking at the different views, side and front for the same pose made a big difference, for some reason I have only been looking at the side view.

There needs to be more bend in the spine with the hip and shoulder rotations and unfortunately I have not been able to work out how to get the controllers to work and do the spine rotations. After spending quite a bit of time looking at this for this rig I’m not understand what the options mean in the Channel Box, what the controllers are meant to do and have not worked out how to use it for posing and animating the character.
After redoing the hip rotations and the upper body I am not sure it has improved the amount I would have liked. The great thing for me is now that I am getting a better understanding about how the poses are working with the bodies movements and how to transfer this to the rotations options for the characters animation. The hips are rolling more like a character’s walk, the shoulders feel more like they related to the hip movement and the other parts of the body such as the arms and head. It is looking more like they belong that my previous blocking of the walks, the arms have a better rhythm and not jumping in odd places. I have left the fingers and other details out of the blocking. I have been confused with the line of action and the balance of the character and this is clearer for me now.
It is exciting to see the cycle the blocking working.
Link to early blocking of the walk cycle – Password wCycleBlocking108
Looking at having the walk a bit more out there like the chest being more pronounced and the shoulders back a bit. I’m still having some issues with the centre line, the weight transfer and the centre of graving as the walk moves from foot to foot. The head is rotation for the front and back, and the side to side and I need to introduce some up and down as all parts are affected by gravity. Acting it our more is helping with the feel of the movements.
I was going to move onto the first pass of animation, now I realise there needs to be more work on my blocking. I need to revisit the weight transfer between the poses with the hip movements and how the feet are going to take the weight. How is the centre of gravity working with the weight transfer for each step? The extreme down and up movements have been a bit forgotten with these movement. How are the adjusting with the shifting weight? Then I need to readjust the shoulder movement, leaning into the pose and look at the hand positions with some wrist rotation. How are the feet are going to take the weight, it rotates with the weight. We do not walk with a straight foot, it moves out when it lifts to make the next step. Still lots to think about. Also look at how the poses work with each other and from different views.

All of the controllers selected and keyed for each pose using Stepped Tangents.
I’m adjusting the Rotate Y on the hips a bit more, for the front hip come forward as the front leg steps forward and up a bit on the Z. Needed to change the head with rotate Z tilting to the front foot and rotate Y moving to the back foot. Still thinking about the rotate X of the head and chest which is the forward and backward movement. I’ve added some rotate X and translate Z on the chest’s passing position to give more movement and weight. Have added some rotate Z in the fingers and some arc on the arm when it comes around the body in the passing position. With the feet they do not step with the weight evenly over the bottom of the foot. Not sure how to make it roll and the foot goes down into the step, have added some roll with rotate Z on the foot as it goes from contact into the extreme down. Have also turned them out a bit. My reference has quite a straight foot. Also putting some translate X on the passing position of the passing foot to show some more of the character stunning.

Interesting information on the centre of balance. Article in Snow Action magazine, Volume 10, No 1, page 24.
Link to video of the next pass of blocking – password wCycleBlocking108
My next challenge is moving on to the first pass of animation. I need to key everything with auto key on, change the stepped tangents to spline animation for everything except the feet, put the feet on either flat or plateau, I’ve selected plateau. Now interpolation between keyframes has been introduced, maya and the computer are doing some of the work in figuring out what the motion is going to be between the key frames. It is the animation that is happening between the keys, the key poses that I have created. Maya is interpreting the information and constructing new data points with in the range of a discrete set of known data points. The animated movement and it is broken down into graph-like mathematical interpretations. Now a whole new adventure begins, what to do with all of this information in the Graph Editor. I started looking at offsetting keys and that was not the way to go at this point. What I need to be doing is looking at all the curves and getting a fruit movement.
Now what to do with all of those curves in the Graph Editor.
With the animation I’m aiming to make the walk more fluid, going through frame by frame, adjusting keys and fixing the curves. The rigid movements need to be smoothed out, looking at the feet, hips, shoulders, arms, head and how they work together. Not every key frame needs to be kept, working though, seeing what is happening, continuing to break it down and cleaning up the actions to making them smoother. I need to keep working on how the weight is shifting, the arc of the body, the line of action and how is the walk showing the personality.

The top left is how the keys and curve are after blocking and the bottom one is with a more fluid movement.
I need the weight forward more in the up position as the body leans forward into the next step. This is where I can bring the chest and shoulders froward. The hands are rotating back a bit and following the arm and walk with the arms going around the body on the passing position. The hand is following the arm and shoulder.

The top left is how the keys and curve are after blocking and the bottom one is with a more fluid movement.
I think the walk is still too stiff, I would like to have more movement in the chest and make it a bit different on one side, especially the head movement. Areas that I would look at if taking this walk further would be where can I use movements such as drag, follow-through, overlapping action, anticipation, weight, squash and stretch, distorted shapes, exaggeration with the action while continuing to build more layers of animations as I go. There are other factors to ponder about for the personality, how to show weight, perceived mass, the character’s movement, gravity, inertia and how different parts of the character react to motion. The timing is different for each of the parts of the body, such as continuing some movements after or before others parts of the character have taken the next moment, pose and step. The walk could be a bit different for each side for the one step. The foot could be taken further by looking at the thrust of what pushes the foot off the ground, the hang time in the passing position, more movement with the toe, some overshoot in the heal and the foot and the arc of the foot. Also the hand and the arms on my reference have more movement as they move around the body.
I would like to understand more about how the Graph Editor works in conjunction with the character and how the movements are being made.
Link to my first walk cycle, happy strut: password walkCycle108

Some things to consider in my next walk cycle. Williams, Richard. The Animator’s Survival Kit. London: Faber, 2001. Page 163
Overlapping Action Demonstration Animation
Animation Reference – Female Standard Walk – Grid Overlay
Reference:
Walk Cycle – Preston Blair
Walk Cycle – Dermot O Connor
Walk Cycle – posted by Erik Westlund
Walk Cycle – Tony White
http://minyos.its.rmit.edu.au/aim/a_notes/04_walkcycle_project.html
http://minyos.its.rmit.edu.au/aim/a_notes/walk_reference_01.html
http://www.ideepix.nl/aril/3D/?show=21
http://blog.11secondclub.com/p/walk-cycles.html
http://blog.digitaltutors.com/12-steps-to-a-great-walk-cycle/
The Animator’s Survival Kit Logo!!
Walk Cycles Compilation
Little girl walking on rocks animation
Girl walk (Animation Test 004)
Female Walk Cycle Animation with Mery Rig in Maya
spline doctors walk challenge 2010
Animation Mentor – Watch the hips
Walk Cycles by Art Babbitt
More Babbitt Walk-Cycle Animation
How To Animate a Horse Run By Richard Williams
Ken Harris Dance Animation Pencil Test
The Thief Walk Cycle Animation 3
The Animator’s Survival Kit: 5. Building Walks
The Animator’s Survival Kit: 6. Flexibility in a Walk
Walk Cycles of Preston Blair
Preston Blair walk cycles using puppet animation
TRIBUTE TO CHARLIE CHAPLIN – The Tramp Takes A Walk
Animating Horse Walk Cycle
Тем временем где-то на дороге.
BOUNCING BALL
How do I imagine my ball bouncing in an animated sequence?
How does the force of gravity and momentum from the bounces affect the action and timing of the bouncing ball?
How does the ball itself affect how it bounces, its weight and material?
How does the timing and spacing change for different balls and their animation?
How much time will it take to convey the emotion and the action taking place?
Heavy and light ball bounce, then with life and emotion.

In the class exercise we looked at different balls bouncing and how that is animated.
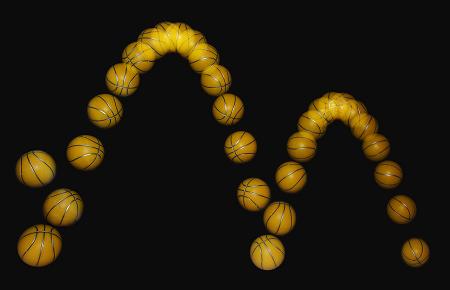
The spacing or gaps changes the feeling of speed and size of the ball while creating the illusion of weight. Bigger gaps for lighter balls and smaller gaps for heavier balls. with the spacing increases as the ball accelerates under gravity.
Timing also reflects the type of ball, what is the hanging time at the top of the arc telling us?
When the ball hits the ground there is a squash of the volume before it bounces back and then the stretch, which is more obvious when the ball is moving faster. This change in shape reflects the action of what is happening as well as the weight and speed.
Research for animating my bouncing ball using video reference, thumbnails, imagination and observation.

Drawing from my video reference.
Research Video – password: bBall108
The first two bounces were the highest with the height dropping for the third and fourth bounce. After that the height lowered a lot for the last couple of bounces as the ball started to roll. These bounces were so low the ball’s bounces were almost on the surface.

Ideas for how the tale moves as it follows the balls movements.

Starting to block out the timing of the bounces. Looking at the distance travelled and the change in momentum.
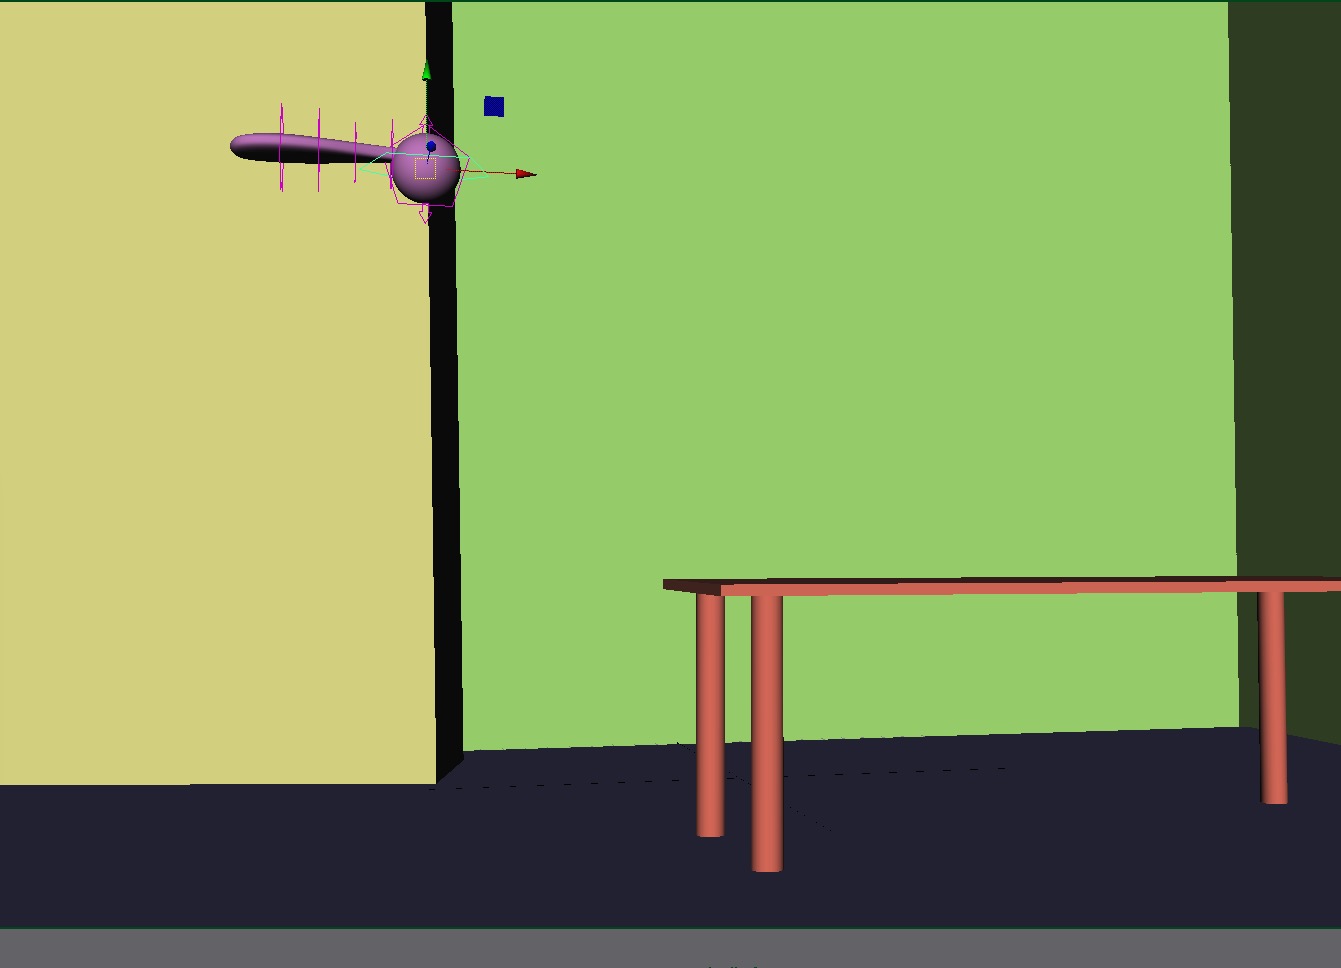
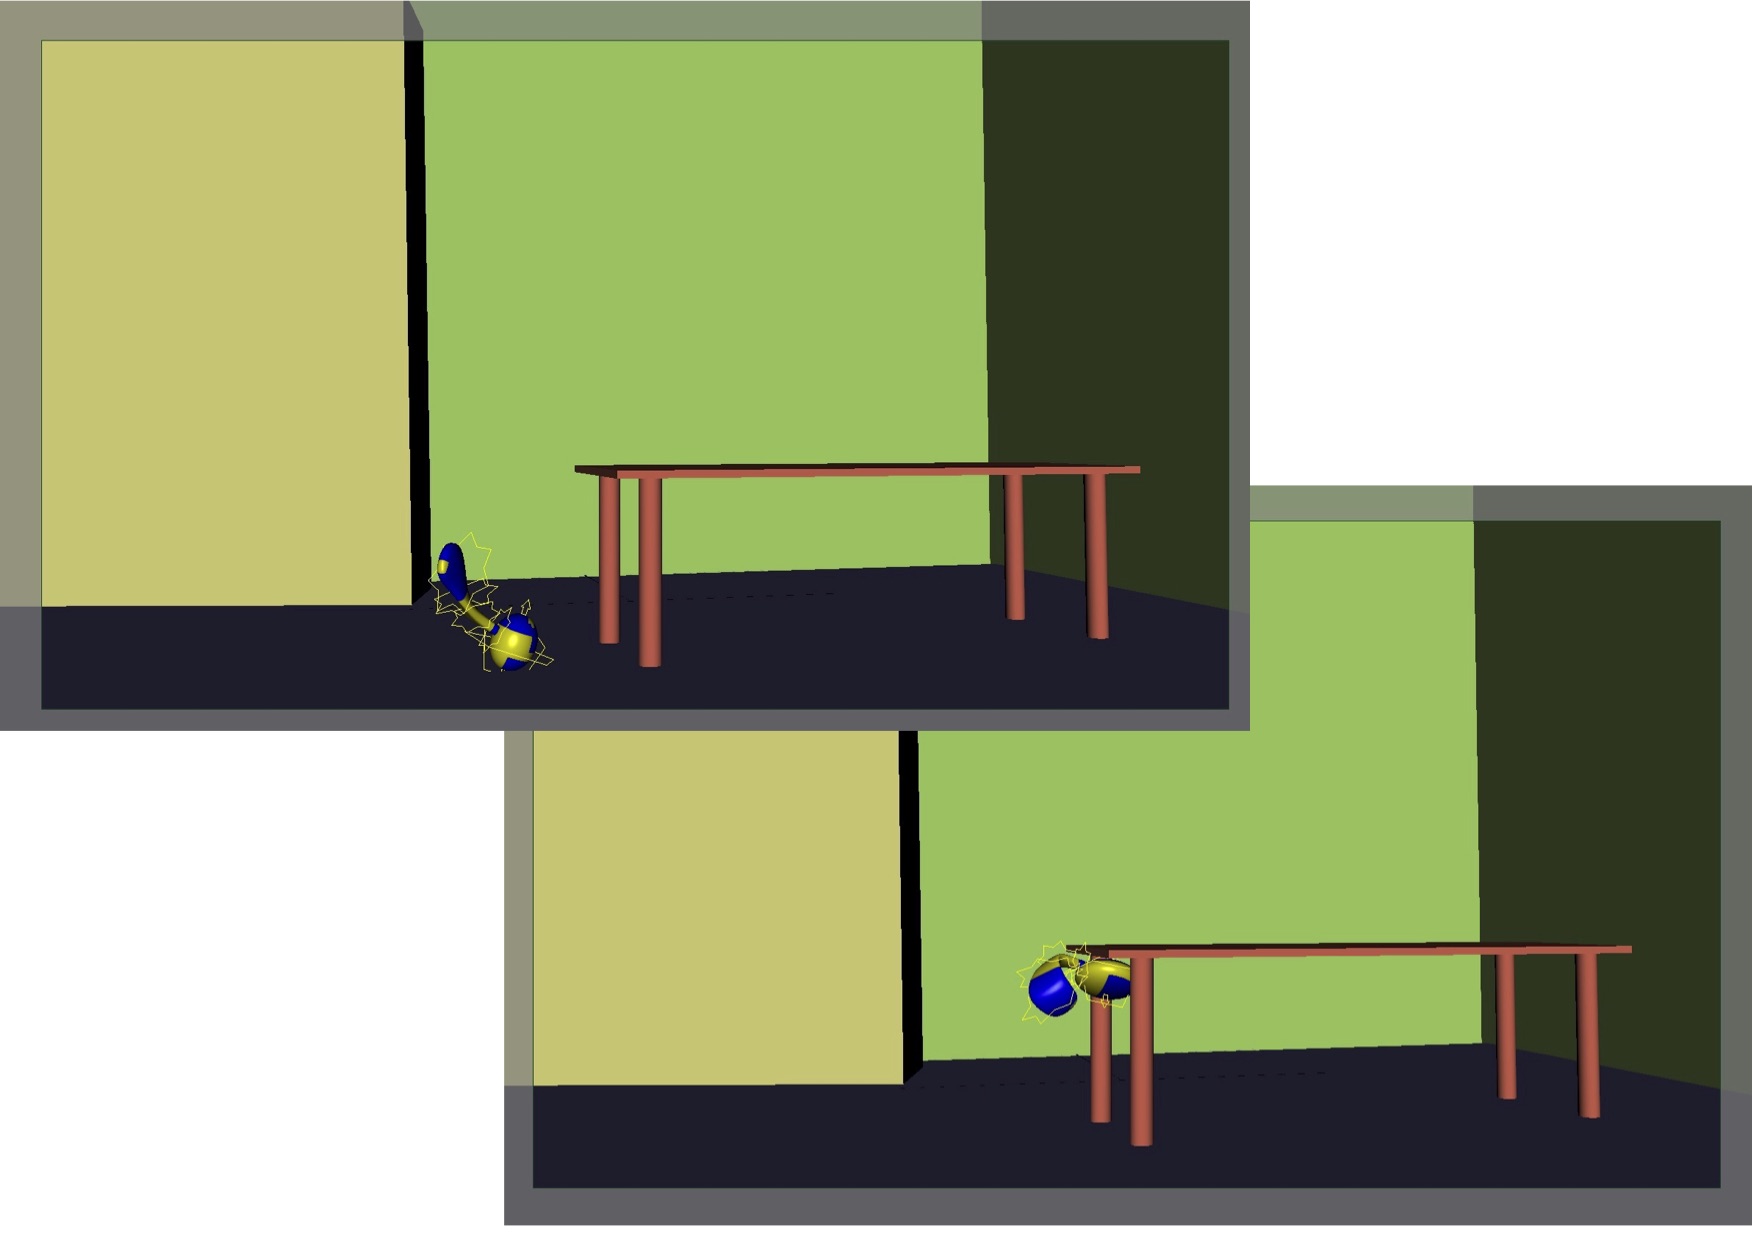
The ball is a soft, light rubber about 7 cm in diameter falling into a room where it bounces under the table, hitting the under-surface, slowing down and rolling out of the shot. Initially the ball’s action going under the table and hitting the surface was not easily seen and understood by the audience. Using a different angle and having the ball going behind the leg and hitting closer to the edge it is giving the audience clearer information about what might happen. I have changed the perspective give more depth and interest during the action.
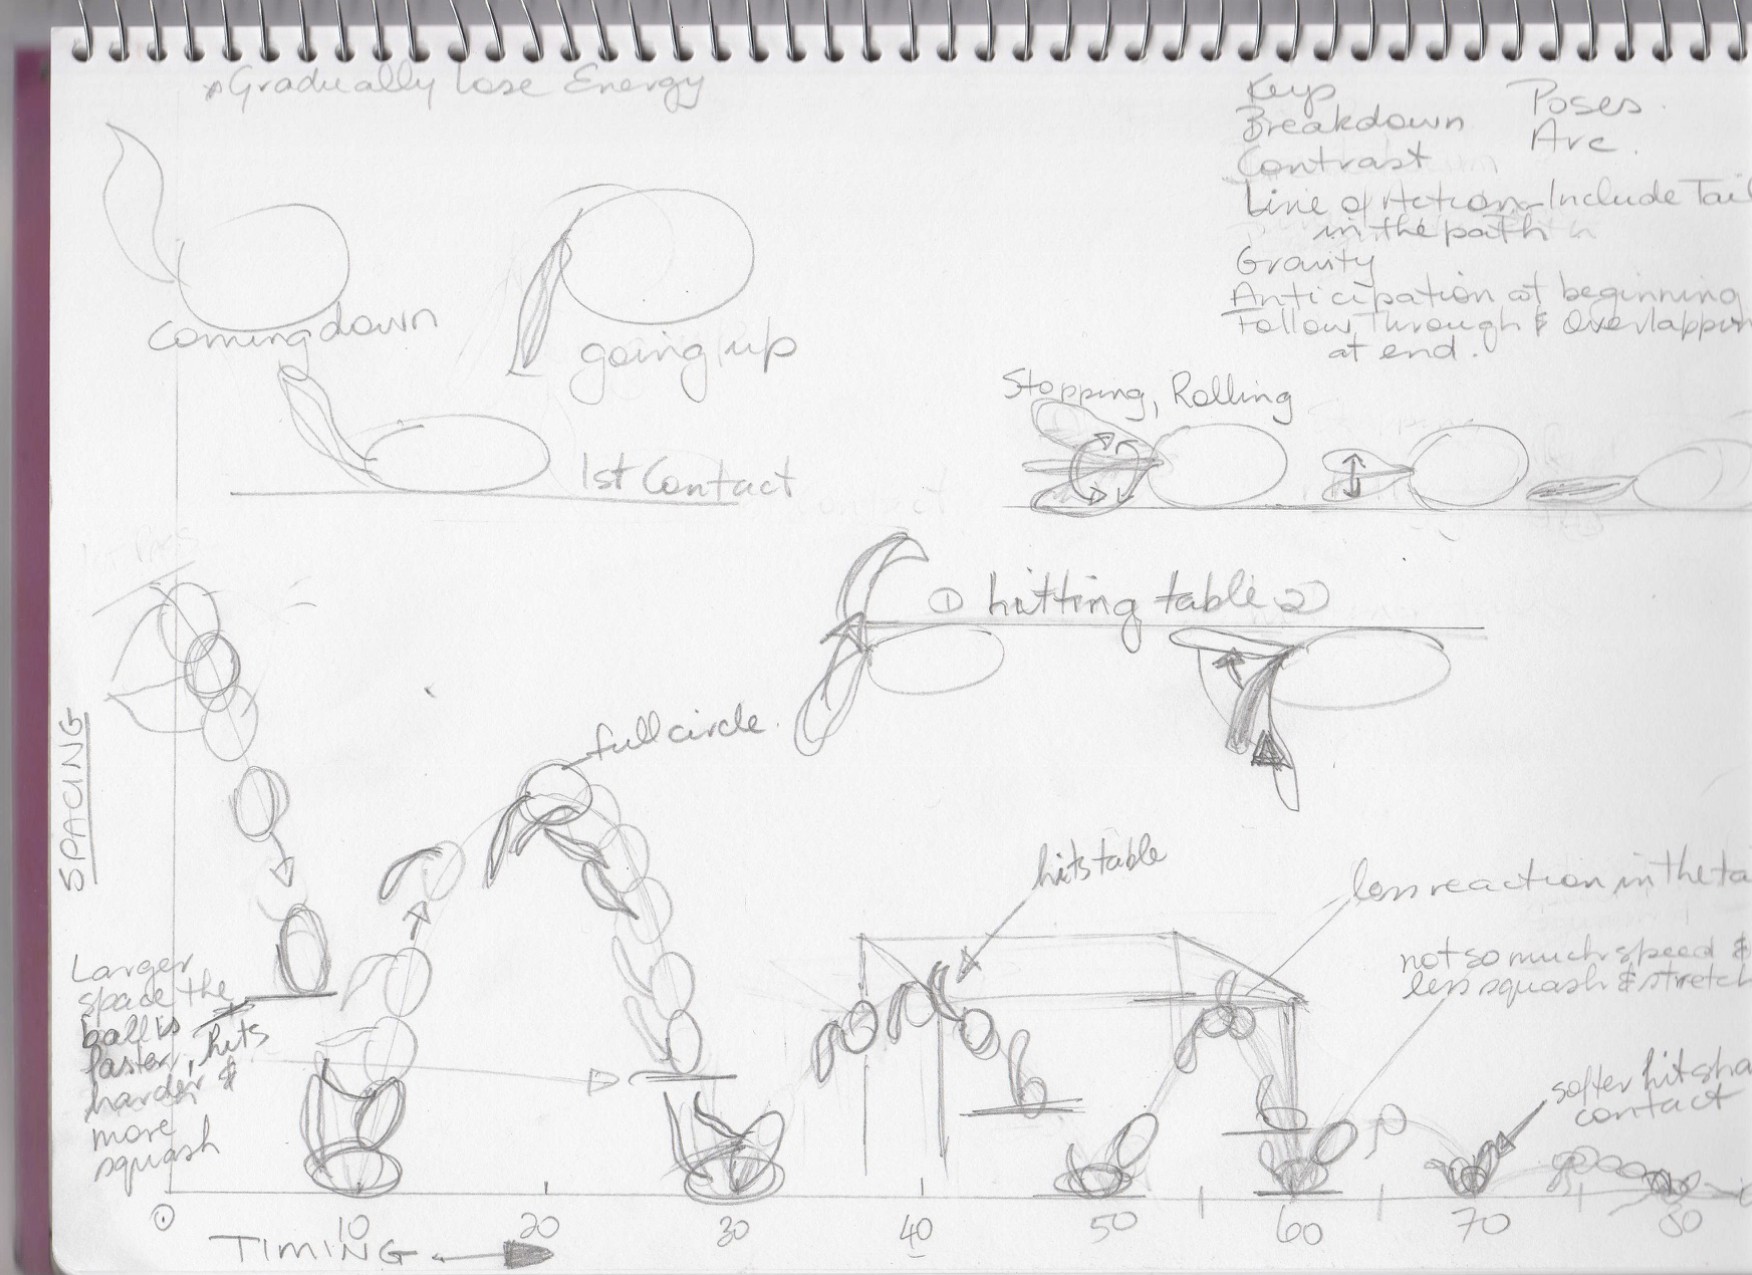
Refining my bouncing ball animation.
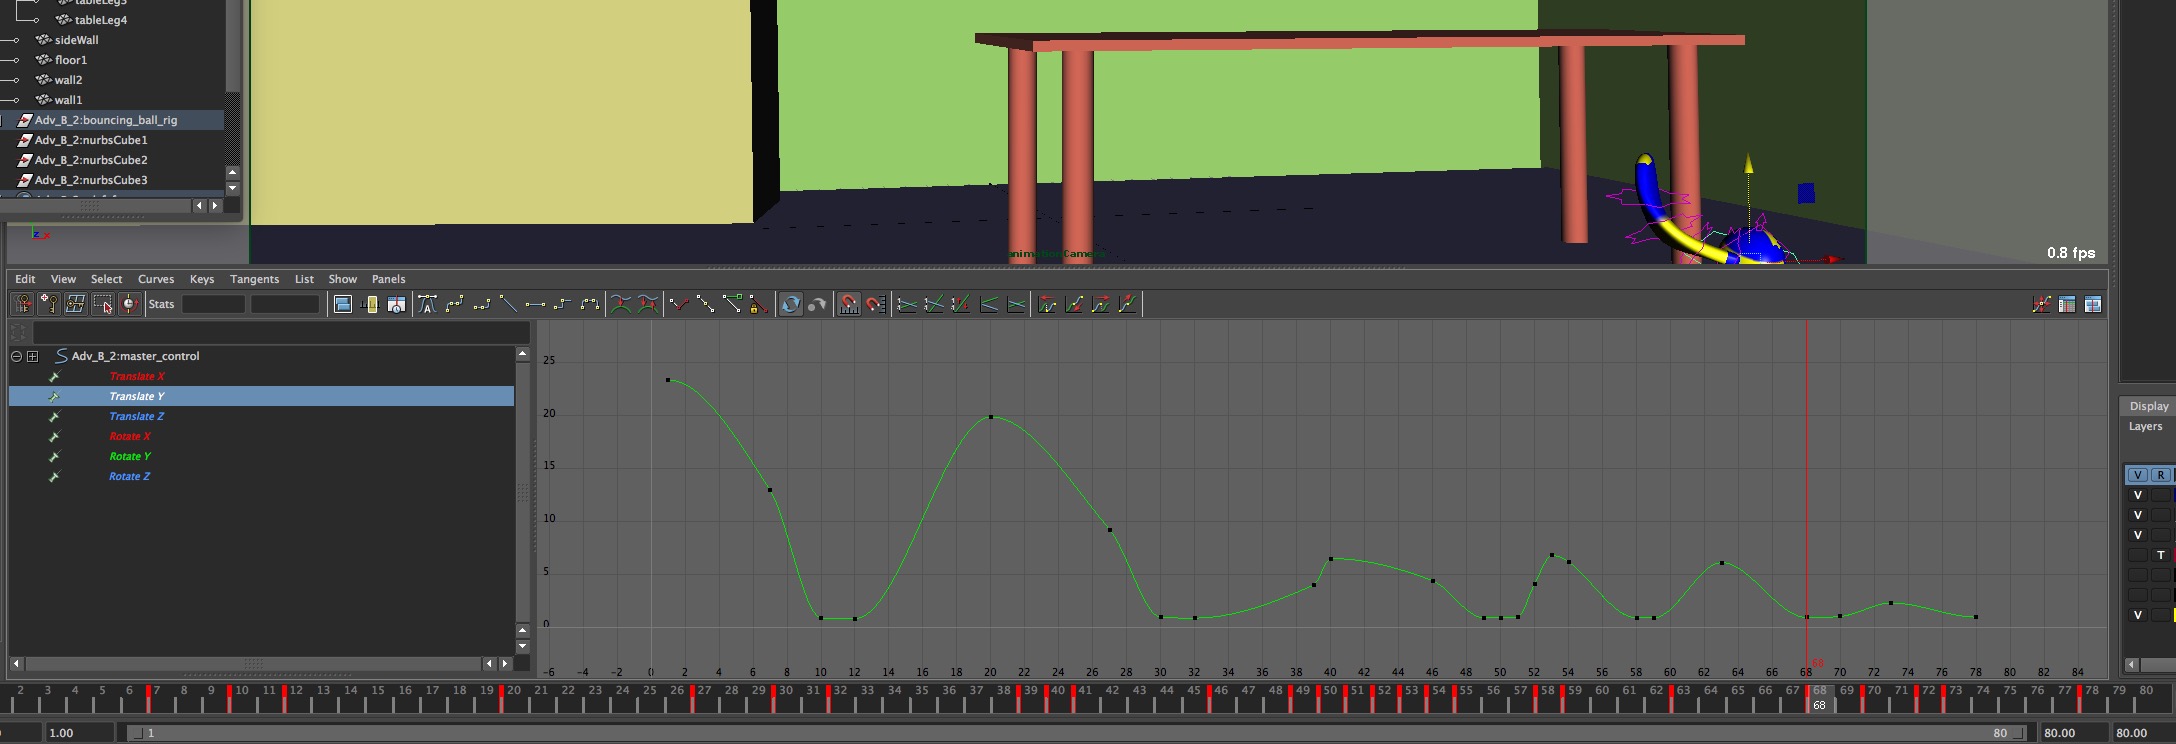
We are starting the animation of the ball by using the concept of layering. The first pass or blocking is setting the key frames for the translations only, giving the up and down and how far the ball will travel over time with each bounce. This will give me the beginnings of spacing to show the weight and timing for the bounces?
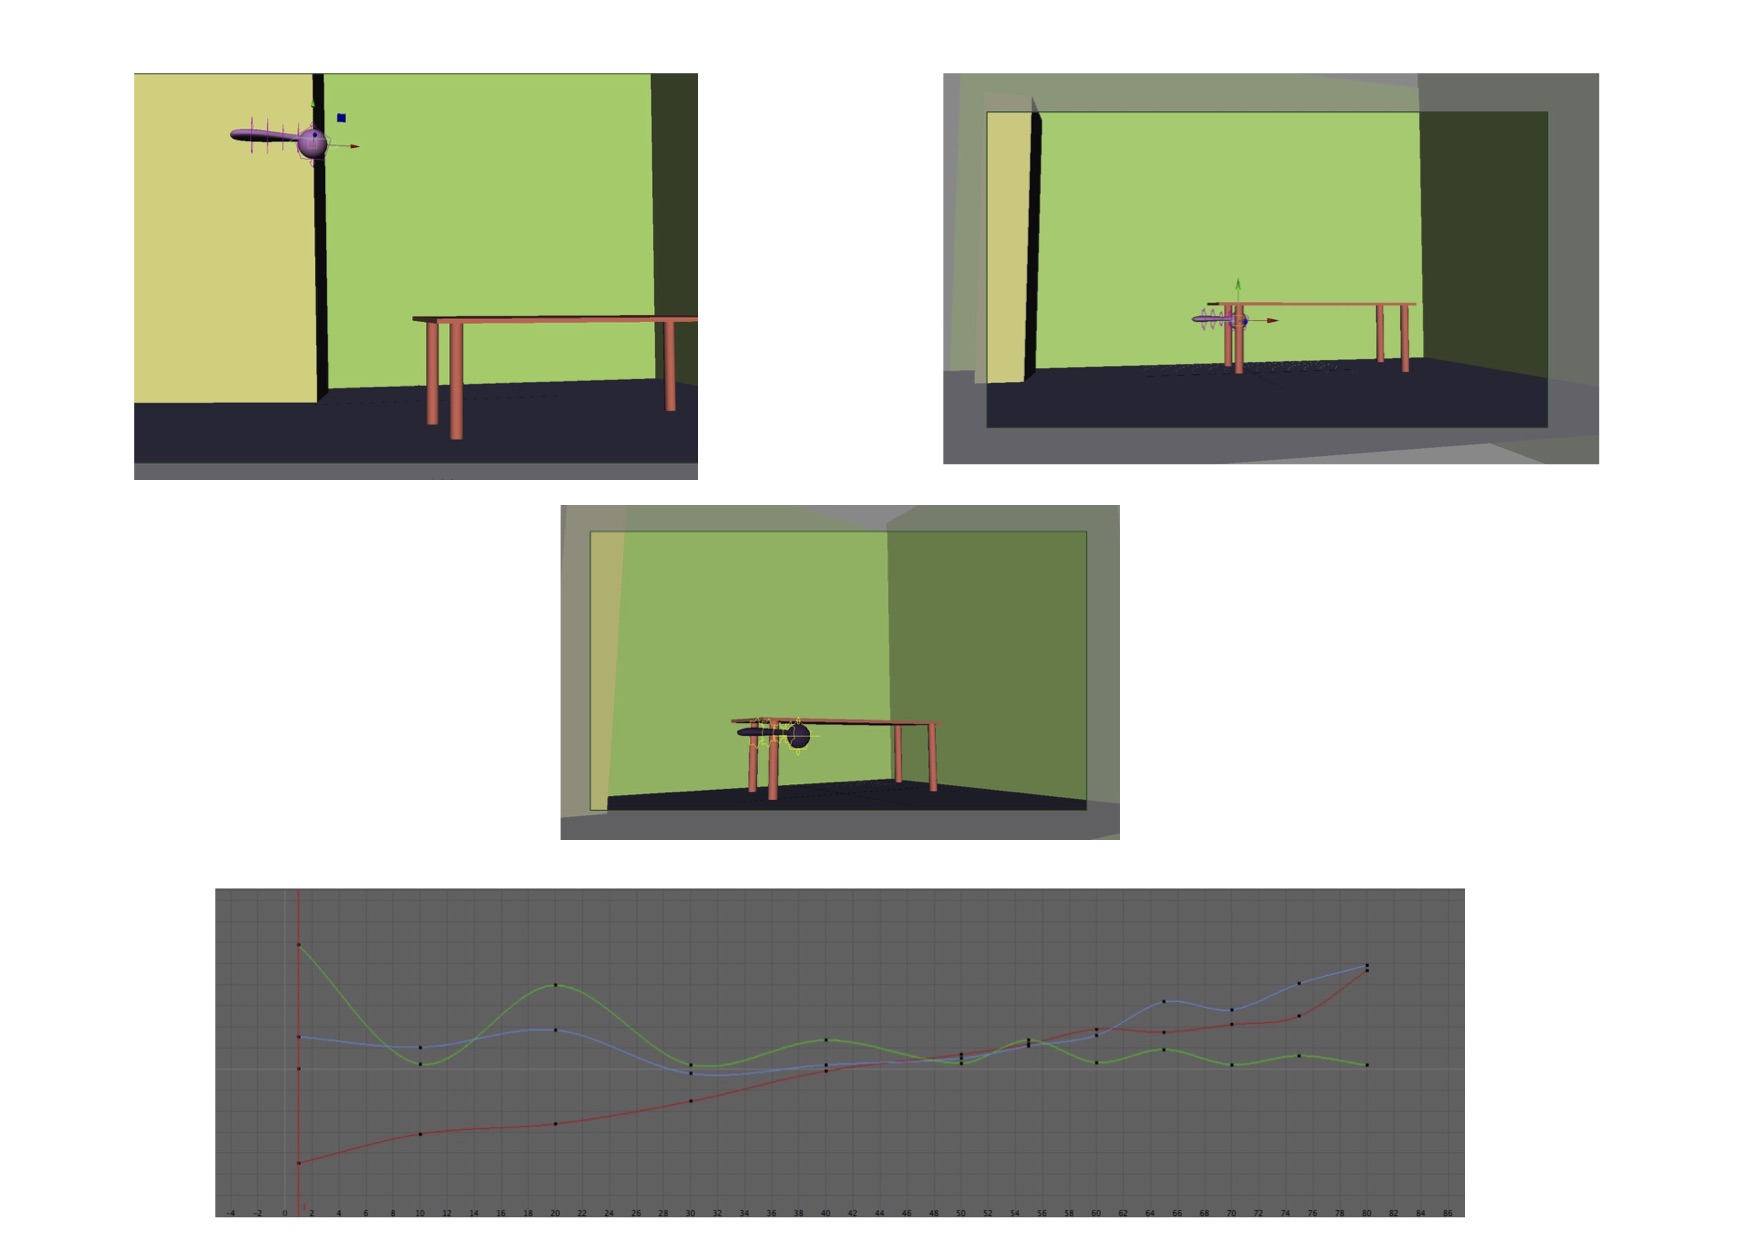
I looked at the timing and spacing: the frames for the bounce to give the timing and the size of the gaps when falling and bouncing back. It did give me the idea of travelling over time though the distance between the bounces did not look right.
After the first pass there were problems with the direction of the bounce. I was not moving forward in the right direction, some of the bounces were going backwards and it was not clear from the shot camera view. The Z direction was not working, I had not looked at this and changing to the top view helped sort this out. Changing to step tangents in the graph editor I was able to adjust the direction and have the ball moving forward with the bounces.
The timing and spacing needs more work, for the timing I looked at moving the keys in the Graph Editor. Then with the spacing (poses), which reflects the speed, I looked at moving the object. For faster movement the spacing is longer, for slower I needed to look at less spacing and for holding the pose it will make the movement even slower. I thought about how many frames the ball would be on the ground for and as it bounces back quickly I have made the initial bounces two frames, 4 is considered fast.
The ball is round at the top.
The second pass introduces the squash and stretch. The speed of the movement, the kind of ball, the type of surface it is bouncing on, internal and external force all affect the squash and stretch.

Fully squashed when it hits the ground.

The frame before the ball bounces back up.
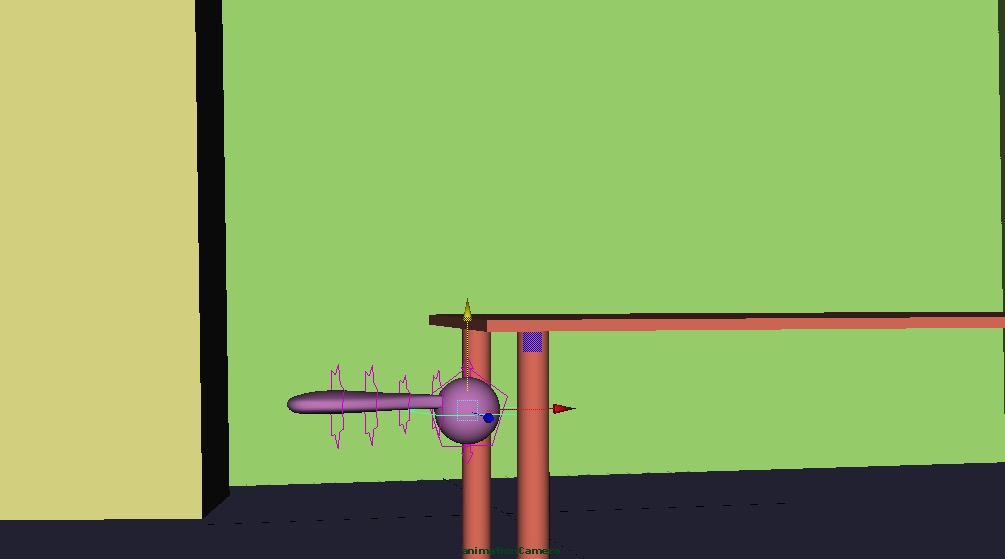
When the ball hits the table it is not the usual round shape for the top of the bounce. I have put another squash and stretch here, with the second hit on the table not having so much squash and stretch.

In the third pass I started looking at rotations. I have not done any rotations leading into the first bounce and have added some coloured shapes to help see what it looks like.
Reference for rotations
For the rotation because of the tail I’ve looked at rotate Z first with gravity pulling the rotation down and the bounce turning the rotation the other way. This shows the ball facing the ground on the down and the ball looking up on the up motion. Then I looked at rotate X which is more of a rolling over motion though not going all the way because the tail is there. Lastly I looked at the rotate Y, which is the side to side and I used this more when the ball is attempting to roll along the ground. There is not a complete roll in any of the directions because of the tail. As I image it the roll will follow the up and down with gravity and momentum.
For the fourth pass I have introduce the tail motion with the first controller.

I am imagining the tail will add to the sense of rotation, speed and character of the bounce. I’m not sure about how the rotation will work on the tail for the different poses. I imagine depending on how the ball is rotation the tail will either go with the rotation or if there is a change in direction of the bounce the tail will change direction after the ball. More like following it with the rolling action like it does for the bounces.
Feedback: First Pass Animation
The second bounce needs some thought, loses energy and then regains energy, needs more flow, look at where it is coming from. Consider some rotations at the end where the ball is comes out from under the table. Needs some more squash with the force of landing after hitting the table. The use of internal and external forces with the drop, gravity and the table.
At the beginning of the first drop down we need to see the tail up, it is a big fall creating a massive momentum for the second big bounce up. Losing momentum on the third bounce, suddenly it is moving less, then hits the table, consider the impact on the table otherwise make the drop less.
In the Graph Editor look at translate Y, see where the ball is losing momentum, on the down bounce. Need some hanging time, look at Auto Tangent at the top and bottom, and overall more squash and stretch. Move where the bounces hits the table and floor afterwards and hold for only one frame. Create the impact on the table, the tail needs to keep going up, it does not know what has happened, it is following the ball. Then push to go down, needs to be fast and look at rotating the tail. The next time it hits the ground, push back, rotate and hold the key, giving 2 frames and make the gap on the ground less, moving further back to the previous hit on the ground. Adjust the animation for this. Sliding is looking good.
Need to be clear about what happens when the ball hits the table and consider animating the table, do not know this is going to happen. Need to show off the forces dropping from the height and the massive momentum, think about the height the ball is falling from.
I started with the bounces under the table. I changed the distance between the bounces, making them closer to give the action more momentum with the external force of the table affecting the action. The gap in the keyframes between hitting the table and the floor is now bigger. The bounces under the table were looking too sharp and not showing enough of the impact from hitting the table and I think this has helped.
With this I have changed the hanging time under the table giving the ball two frames on the squash with a little more squash in the second frame before the stretch and then the ball bounces back. I did look at the angle of the bounce in the Graph Editor and not sure what works best here.
The initial distance where the ball falls from the top of the screen has been changed to lower down. This has changed the timing of the ball’s bounces with different types of bounces and changes the perception of the ball hitting the table.
Starting with the key poses I adjusted the squash and stretch to match more with the balls motion, the faster the ball the more the squash and stretch.
When there is more momentum I have introduced more roll and then spent more time on the tail. With the rotation of the ball I have looked at including the tail in the direction of the bounce and as part of the arc. The tail is follows the ball up and down becoming part of the line of action. It looks more like follow through and overlapping action as the tail catches up on the action of the ball. There is also some movement of the tail forward and backwards from the camera giving some third dimension to the action.

In the previous passes I felt there was not enough contrast in the ball’s bounces. The external force of hitting of the table works better now and having the ball go above the table after hitting it gives more of a variety to the changes in speed. The changes in the rotations of the tail and the squash and stretch of the ball are reflecting the changes in momentum more now which was not working before.
The table moves as a result of the ball hitting it and for the bounce when the ball come out from under the table I have taken it higher, above the table.
I did not consider how the volume of the ball reflects the changes in the action with the hanging time at the top and the squash and stretch. The timing in the air needs to reflect the speed and force of the action more, needs work here.
Putting the animation back on stepped tangents helped to see what was happening with the poses. Checking the over shoots by changing spline to auto tangents also helped, splines will create overshoots. Select everything and choose auto tangents. The tangents need more work on how to follow the arc of the action.

Looking at it I would have liked to have more rotation in the balls movements and not so jumpy at the end after it hits the table the final time. More understanding of the curves in the Graph Editor and how they relate to the balls movements would help. The table also needs more follow through after the final hit from the ball.
Key Poses, Add Weight with tangent handles, Movement from let to right, Adding rotation, Adding squash and stretch. Less squash on each bounce, Stretch when coming down to make contact with the ground and when the ball bounces up again decreasing on each bounce, Stretching into the arc, Apex of each arc no squash or stretch, Speed on the down and the up.
Bouncing Ball Animation: https://vimeo.com/124041847
Password: bouncingBall108

Animation curves of a dynamically created bouncing ball.
References:
Bouncing ball – Dermot O Connor
Brendan’s Bounding Ball Lecture
The Illusion of Life link to animations
Avgerakis, George. Digital Animation Bible: Creating Professional Animation with 3ds Max, Light Wave, and Maya. New York: McGraw-Hill, 2004.
Derakhshani, Dariush J. Introducing Autodesk Maya. 1st ed. Indianapolis, IN: Wiley Pub., Inc, 2012.
Gilbert, Wayne. Simplified Drawing for Planning Animation. San Rafael, CA: Anamie, 1999.
Kerlow, Isaac Victor. The Art of 3D Computer Animation and Effects. 3rd ed. Hoboken, N.J: John Wiley, 2004.
Maestri, George. Digital Character Animation 2. Indianapolis, Ind: New Riders, 1999.
Muybridge, Eadweard, and Robert Taft. The Human Figure in Motion. New York: Dover Publications, Inc., 1955.
Palamar, Todd. Mastering Autodesk Maya 2014: Autodesk Official Press. 1st ed. Indianapolis, IN: John Wiley & Sons, 2013.
Roberts, Steve. Character Animation in 3D Use Traditional Drawing Techniques to Produce Stunning CGI Animation. Oxford; Burlington, MA: Focal, 2004. http://search.ebscohost.com/login.aspx?direct=true&scope=site&db=nlebk&db=nlabk&AN=117195.
Rodriguez, David. Animation Methods: Rigging Made Easy : Rig Your First 3D Character in Maya. Lexington, KY: CreateSpace, 2013.
Thomas, Frank. The Illusion of Life: Disney Animation. 1st Hyperion ed. New York: Hyperion, 1995.
Williams, Richard. The Animator’s Survival Kit. London: Faber, 2001.
Starting out, discovering different types of rigs for the ball and characters and how they can be brought to life.
CLASS EXERCISE – week one
Class Exercises – password: classExercise108
THE CHARACTER POSE
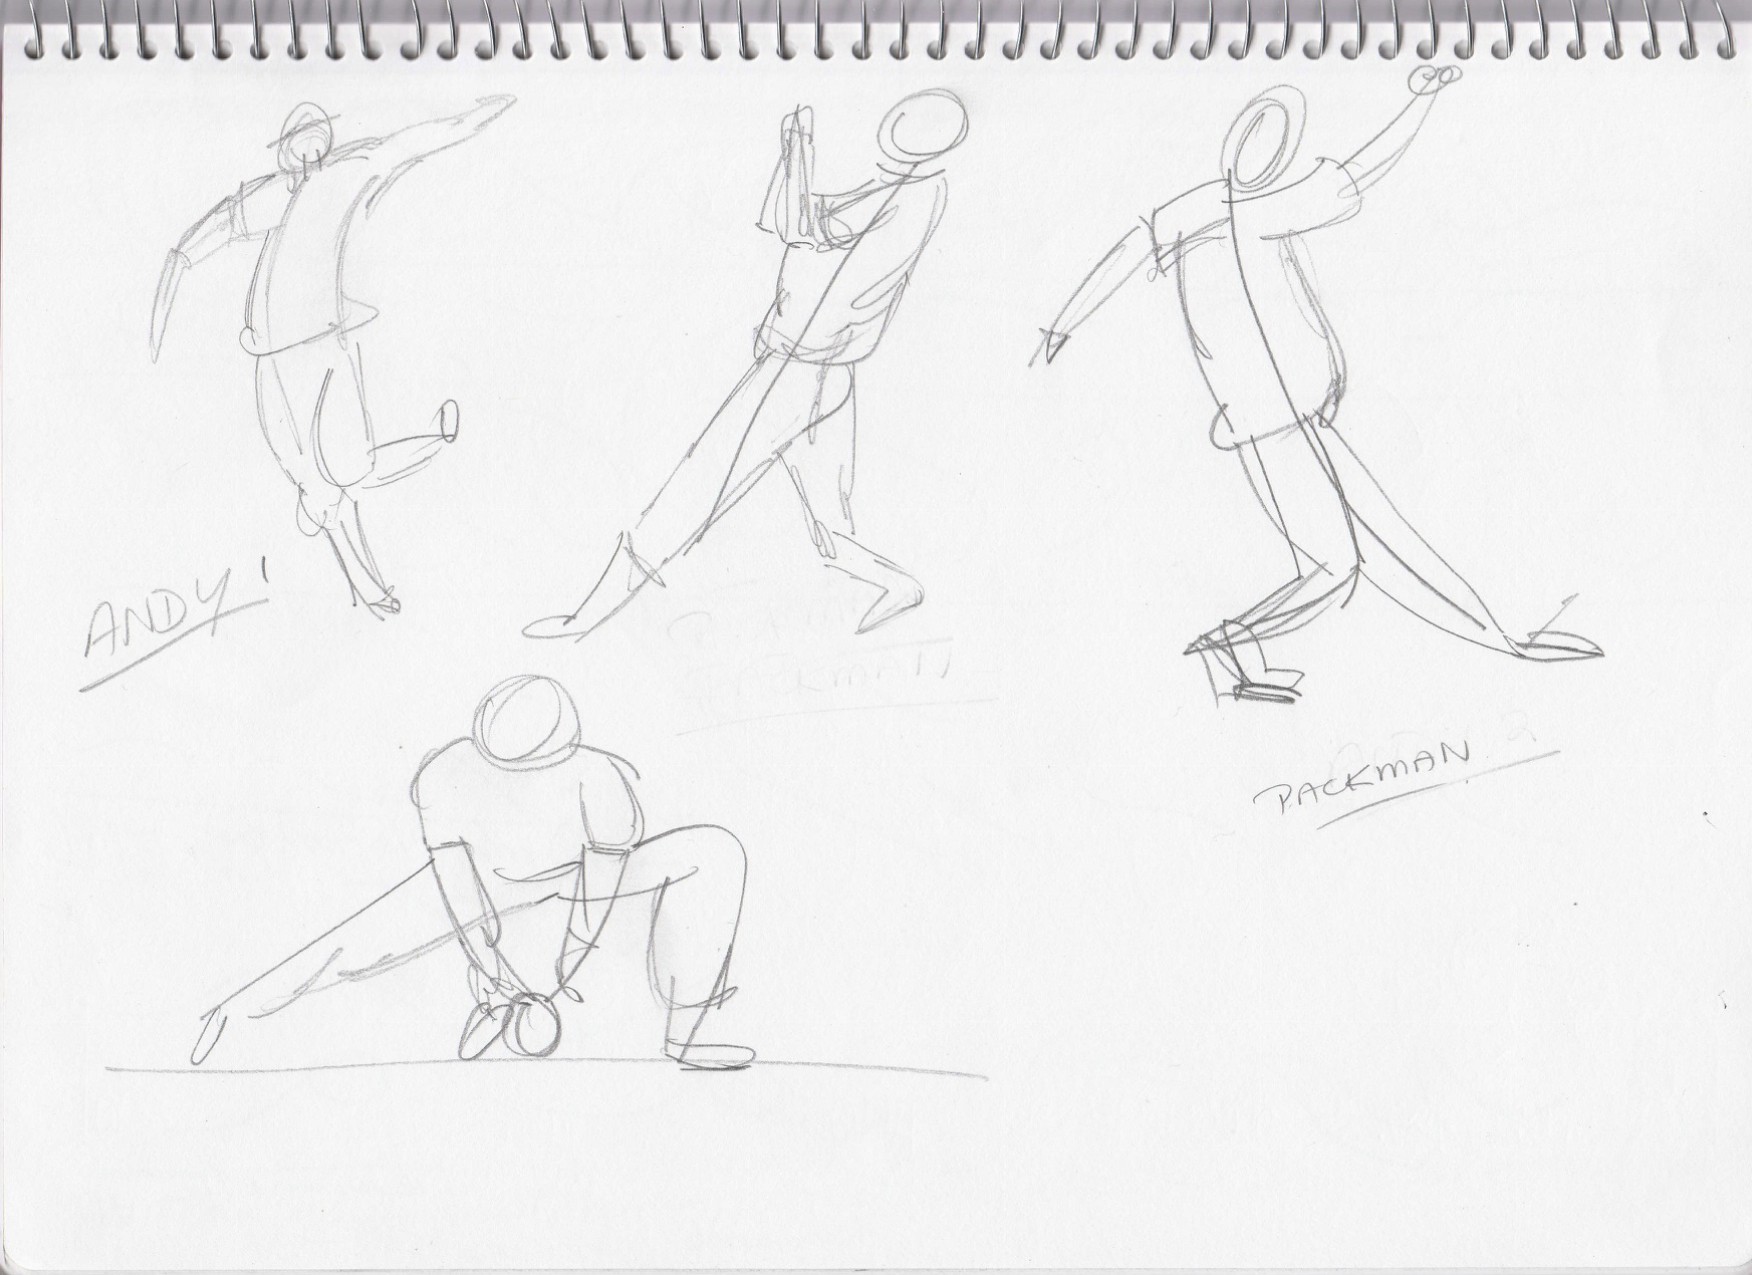
Sketches for different options for the character pose – playing baseball.


Feedback: For the first one, I need to thinking more about the camera angle, the position of the knees and feet to show more of the pose to showing the line of action. The placing of the hands where I could have each hand in a different positions making the action more interesting.
Other things to consider: IK when contact with the ground, resolution gate, safe action, choose what to see such as only polygons, base the pose on real life and is it being communicating enough e.g. sad or thinking. Create contrast between the left and right sides of the body including the face, needs some gaps for the silhouette, contrasting different hand gestures, use a ground plain, consider the weight and the arc of the body with the angle of the neck possibly following through on the arc of the body.
History of Russian and Eastern European Animation
Web Links:
Video:
The Iron Giant (9/10) Movie CLIP – Superman (1999) HD
Charlie And The Chocolate Factory Swedish sub ( full movie )
The Evolution of Mickey Mouse
The History of Mickey Mouse
The Evolution of Mickey Mouse
Fantasia Hippo Squashes Croc Scene
Who Framed Roger Rabbit | Trail Mix Up and Tummy Trouble | Back to Back | FreeTVvids
Alice In Wonderland test footage – Unbirthday Mad Tea Party – Disney
Presto Pixar Full
Disney’s Frank Thomas & Ollie Johnston interview
Spotlight: Mark Henn (Disney Animator)
Slice of Like: Milt Kahl’s Character-Animation for Madame Medusa
Chuck Jones: Extremes and in Betweens – A Life in Animation
Chuck Jones: Extremes and in Betweens – A Life in Animation (Full) (2000)
Animating Art (Art Babbitt, Richard Williams)
1981 Disney Animation Special! – The Illusion of Life -Part2
Harold Edgerton – Hummingbirds in Action
The Incredibles (Thomas O’Malley’s Style) Trailer
Jungle Book
Coyote catches Road Runner
Madagascar – Funniest Moments
Wall-E – Wall-e in space
Anna Bella – Borge Ring (1984)
YouTube Walt Disney Fantasia Mickey The Sorcerer’s Apprentice
Charlie Chaplin “The Kid” 1921 – Full Movie – HD
Bill Tytla – Stromboli Pencil Test
Bill Tytla – Drunk Gaucho
Animating Art 1
Tarzan & Kerchak vs Sabor
Road Runner Cartoon
Roger Rabbit Short #2 – “Roller Coaster Rabbit”
Sisyphus Pannonia Filmstudio Marcell Jankovics, 1974
The Cat Came Back!
The Legend of Sleepy Hollow part 2 of 4
Fallen Art 2004
What’s Opera, Doc
Emile Cohl – Fantasmagorie 1908
Winsor McCay – How a Mosquito Operates [1912]
1911 Winsor McCay – “Little Nemo” (full animation in color)
Silent Fleischer Bros 1 – Modeling (1921) Koko The Clown
L’Illusionista Sylvain Chomet 2010 (film completo) ITa
Thaumatropes
Tony White ~ ‘Endangered Species’
DIGITAL MEDIA 2D and 3D ANIMATION
WinstonChurchillQuote
bouncingBalls
Easy Ease Quick Tip Tutorial – After Effects CS5/CS6
What is Animation? British animator Bob Godfrey (1921-2013)
Road Runner & Coyote – Little Go Beep + Deutscher Untertitel
FROM DIGITAL MEDIA COURSE
2D ANIMATION
Links for audio clips for Kinetic Typography.
People (Actors, Celebrities, Historical Figures) Sound Clips
Top Ten Reviews Best Websites for Free Sound Clips
Famous Audio Recordings in Science
Audio: Top 100 Speeches From Famous People in MP3 Form
5 Great Sources For Free-To-Use Audio Clips & Sound Effects
I have chosen:
http://www.freeinfosociety.com/media.php?id=2960
http://www.freeinfosociety.com/media/sounds/2960.mp3
Churchill, Winston: Iron Curtain
“Last time I saw it all coming and I cried aloud to my own fellow countrymen and to the world but, but no one paid any attention.”
