High Dynamic Range Images – HDRI
HDRI (High Dynamic Range Imaging) is a technology that expands the dynamic range of an image and shows details in both shadows and highlights. Dynamic Range is a range of brightness values that can be recorded on media (film, photographic plate, photographic paper) or on the matrix of a digital camera.
Are 32-bit float images with photos taken at different levels of light using various exposures during photography. The series of images range from dark (fast exposure) to normal to blown-out (overexposure) that are combined into a single HDR file format . hdr that represents a wider range of light and dark than a typical photo. Traditionally used a slighting setups, especially in scenes in which CG is integrated with a live-action background using image-based lighting (IBL).
WHAT IS A HIGH-DYNAMIC RANGE (HDR) IMAGE? from HDR SHOP
The “dynamic range” of a scene is the contast ratio between its brightest and darkest parts. A plate of evenly-lit mashed potatoes outside on a cloudy day is low-dynamic range. The interior of an ornate cathedral with light streaming in through its stained-glass windows is high dynamic range. In fact, any scene in which the light sources can be seen directly is high dynamic range.
A High-Dynamic Range image is an image that has a greater dynamic range than can be shown on a standard display device, or that can be captured with a standard camera with just a single exposure.
HDR images also have the important property that their pixel values are proportional to the amount of light in the world corresponding to that pixel, unlike most regular images whose pixel values are nonlinearly encoded.
HDR Images are typically generated by combining multiple normal images of the same scene taken with different intensity levels, or as the result of creating a global illumination rendering. In practice, high dynamic range pixels use floating-point numbers, capable of representing light quantities of one to a million and beyond. Low-dynamic range images usually represent pixels using eight bits per channel, with pixel values ranging as integers between 0 and 255.
Some food for thought:
- from the perspective of a camera manufacturer
- a format independent native HDR live production workflow
- signalling, metadata and chroma. Downconversion: Key additions to a UHD Workflow
- production from top to bottom , shooting, lighting came capabilities
- evaluation of inverse tone mapping operators
- virtualised 4K_HDR video soloutions
- What is HDR?
- How do I shoot HDR?
- How do I edit HDR?
- How do I view HDR?
- What’s the future of HDR?
MR HDRI For me, HDRIs are about the artistic aspect first. In addition to capture the full dynamic range of each scenes, I make sure that my HDRIs are shot in locations which gives unique reflections, lighting and colors to your 3D scenes.
 How HDR works on Vimeo
 All Vimeo members who shoot or master HDR footage can upload those videos to Vimeo. And your viewers can now watch your color-optimized videos on the latest HDR displays. That includes support across Apple’s latest devices — including the iPhone X and Apple TV 4K — and we’re proud to be the only video-hosting platform available in HDR on these platforms right now.
CommonPoint – Lesson 12 – Overcast I Relighting, HDRI
HIGH DYNAMIC RANGE IMAGING FOR VFX with PHIL HOLLAND
Light Probe Image Gallery Paul Debevec, Dan Lemmon, and colleagues taught a half-day course on Image-Based Lighting at SIGGRAPH 2001 and 2003. The course covered both the theory and practice of using light probe images to illuminate computer-generated objects.
Recovering High Dynamic Range Radiance Maps from Photographs Film cameras were developed in order to record light so that it could be reproduced on photographic paper; digital cameras so that it could be reproduced on a computer screen. Neither computer screens nor paper can display nearly the dynamic range (ratio between dark and bright regions) as what is present in the real world, and as a result cameras are not designed to capture even close to such a range. However, by taking a series of pictures with different exposure settings the range can be covered. With this technique such a series of images can be combined into a single high dynamic range image called a radiance map. Radiance maps are useful for representing true illumination values in image-based rendering applications, and are useful for recording incident illumination and using this light to illuminate CG objects for realistic compositing.
HDRI IMAGES:
- BOCO STUDIO Download 18 free HDRIs from BoCo Studio
- CanStock PHOTO
- CG Skies
- CG Industrial Environments
- CG Interior
- CG Environments from Texturify
- CG NoEmotion’s HDRs
- CG Exterior
- CGI BACKGROUNDS
- DOSCH DESIGN
- EPISCURA
- HDRI Hub
- HDRLabs and archive
- HDR Sets
- HDR SHOP
- Paul Debevec
- RenderRam – Vermeer, the next generation of HDRIs
- HDRI Hub
- HDRLabs and archive
- HDR Sets
- HDR VAULT
- LIGHT MAP
- NOAH WITCHELL
- MOOF
- NO EMOTIONS
- Panocapture

OTHER RESOURCES:
PTgui – Create high quality panoramic images
Vittorio Giovara – Color Me Intrigued: A Jaunt Through Color Technology in Video
Class with Emiliano Vergara-Richards
How to set up equipment, shoot and get into a spherical environment format in order to use as a lighting solution for CG. The use of HDR in the effects pipeline and workflow.
What is a HDRI, why we shoot them and how they are used in the CG pipeline.
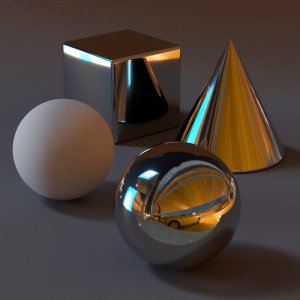
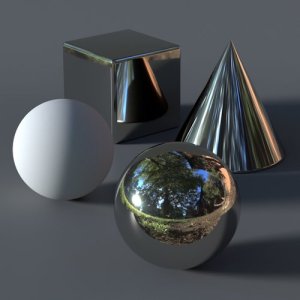
Within the image there is a lot of information including luminance and colour. The images are used to match CG to the real world, more specifically used as a lighting source and lighting solution including the reflection and refraction for the CG. The reflective surfaces.
Going to use the HDRI Image when there is a CG, 3D character that has been modelled and textured beautifully and it needs to fit within the environment being shot in order to convince the viewer that it all belongs together. Specifically for when shooting live plates, an actual environment and then wanting to include and superimpose a CG element within that environment.
When the CG character has reflective surfaces, how do we get all the environmental information bouncing off the CG character? Take the HDR Image from the position and point where we want the CG element.
The HDR Image needs to be shot from where the CG character is going to be, its position and point in the scene. When the spherical environment is created the centre point need to be where the CG element is going to be. When the CG element moves over a distance, from A to B, then consider shooting multiple images and doing a blend between one and the other and the movement transfers thought between the images. If there is not such a big change in positions then an average might work. The position of the HDR Image is always going to be shot from the CG element’s position not from where it is being filmed. Always related to where the CG character is, the character’s relationship to the environment that we want to capture.
In the past HDR Images were created using a shinny, chrome ball at the location where the CG element was. From the position of where the scene was shot a close up photographic image was shot of the sphere, the relative angle. This was taken into an application like photoshop, the image stretched and flattened and then the flattened image was re-morphed around the spherical object.
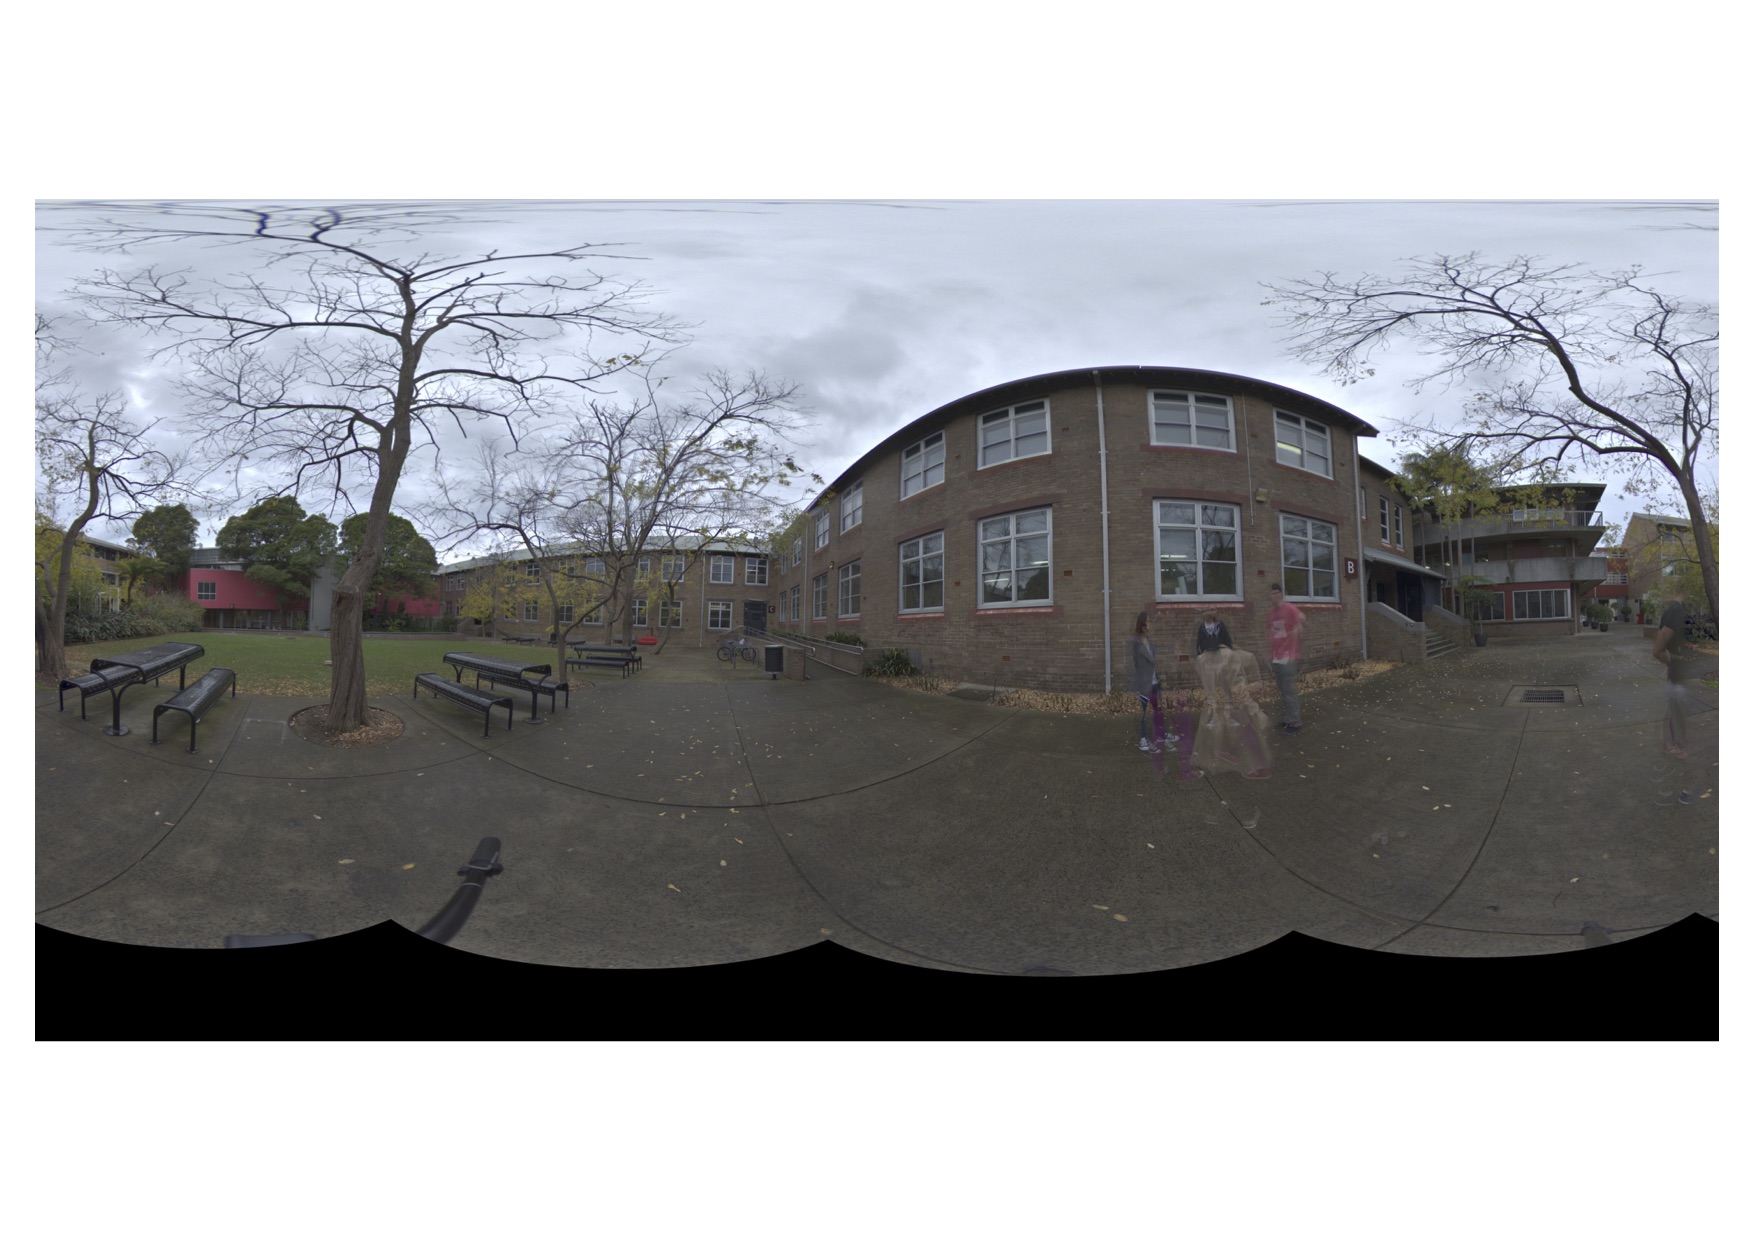
Take multiple images from multiple angles that will be stitched together to create the HDR.
Used a manfrotto tripod because the plate on the tripod has an option for a thicker pin which is needed for Nodal Ninja. An extension for the tripod that locks the camera into the positions that we want.
Using the tripod, unlock the handle first, loosen the locks for the legs, open the tripod and have the main leg facing directly to the front and the other two are lined up where the photographer stands. Get the height, turn the middle release to lift and all the legs will move then customise each legs with each individual release. Next to the centre level adjust the individual releases and centre the bubble and lock off. Have a base, a rough height and put the height slightly under what is being shot.
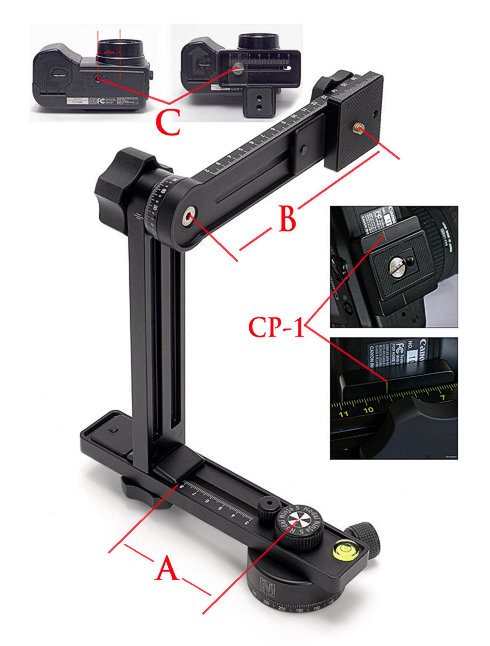
The Nodal Ninja (NN) locks the camera into the different positions. When fastening onto the stitch plate, it has a release on one side, can slide it and will not come off. Need to press the safety button to move out. Remember the 10 cent coin to fasten the stitch the plate to the Nodal Ninja, centre it and lock it off. Use the levelling bubble on the top, the bottom one could be used for lighting rigs and other things depending on where different equipment is attached to the tripod.
The stitch plate is locked onto the NN with zero facing the front of the tripod. The blue knobs will tell the increments it will lock of at, set the angles, 60, 90 etc. The fish eye is 90 deg.
“N” and “0”, zero, face the front.
Setting up the camera, add the stitch plate to the base of the camera and attach the camera to the top arm. The camera is mounted length ways on the NN, perpendicular.
The centre of the camera lens needs to line up with the centre of the black and white star that is on the first NN arm. The front of the camera, lens is flush and centre with the centre line. Look to the side and the lens, there is a golden line, this line needs to match up with the centre line of the back plate of the Nodal Ninja, which is the middle arm. The centre of the lens over the 0, zero, the second arm moves this and the third arm does the golden line.
Use the third arm dial to adjust the angle of the camera, 10 deg down for the side shots and up for the sky.
Nodal Ninja setting and tutorials – DCE has the Nodal Ninja 5 w/RD16
NN5 / NN5L – Putting it Together
To create the HDR Image shoot the image at different exposures, multiple exposures, then a combination of the different exposure information into the one HDR file that gives the HDR Image. File format is RAW
Auto bracketing feature, can be limited to 3 exposures on some cameras. For special effects need a wider range and work with 7 to 9 exposures. To do manually in a simple way?
Need to look at the relationships between manual setting when using the camera.
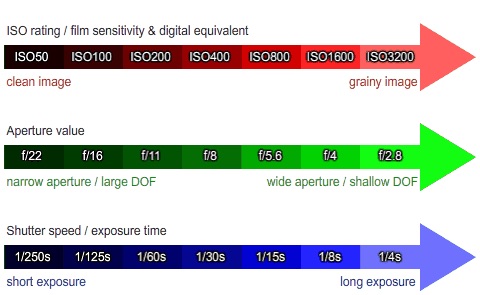
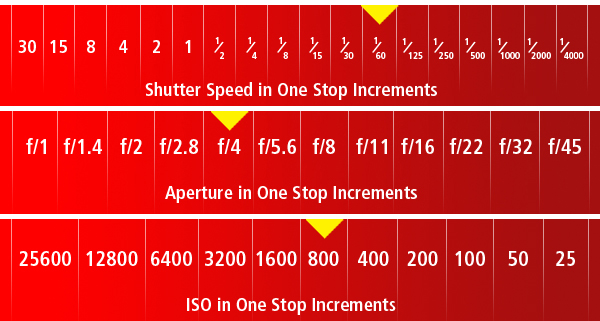
The ISO, aperture and shutter speed all influence and control the degree to which and shot is being exposed.
ISO – the films sensitivity to light, low light conditions. In low light conditions will need to shoot at a higher sensitivity and a higher iso. High would be something like 25600, low would be 100. The higher the iso the more noise there will be in the photographic image and want the images at the lowest possible iso.
APERTURE – is the size of the camera’s iris, it is the opening that is controlling the amount of light that hits the back plate or film. The higher the aperture number e.g. f22, the smaller the iris, the lower the number such as f2, the more open the iris will be, a wider aperture is letting more light in.
SHUTTER SPEED – is the exposure time the camera will give for the light to hit the film stock or the sensor. Larger shutter times will give more time, fast or sharp shutter speeds will be quick.
It is a balancing act between all three. What does this mean under specific conditions? If someone is moving really fast in day light, and do not want to show any motion any motion blur, what would the setting be and why – fast shutter speed, high aperture and high iso.
The depth of field, regions of focus is determined by the aperture. For this exercise we are going to let the camera do the work for the light, metering and measuring the light, the perfect exposure and we are going to set the aperture. To set up for using the manual settings, initially take the levels and settings using the APERTURE PRIORITY MODE or ‘A’. The camera will automatically determine the iso and shutter speed and the operator will control the aperture so there is control over the depth of field.
To shoot multiple exposures and bracketing we are starting will this process, controlling the exposure with the shutter speed.
The aperture has been locked off, decided on the depth of field and do not want to change the exposures of the images by changing the exposure for the depth of field. Lock off the depth of field and this rules out the aperture. If the iso is changed there will be a variation in the noise of the image. This leaves the shutter speed to maintain the consistency of the depth of field and noise in the image. This approach is one way to shoot multiple exposures and bracketing with the camera. Another option to bring into the equation to minimise the noise level as much as possible with in the image is not have the camera determine the iso point and lock the iso off to the lowest possible for the light conditions.
Here we are using aperture priority, locking off the depth of field and letting the camera determine the shutter speed and iso and then manipulating the shutter speed.
On the nodal ninja angle the camera 10 deg down because the ground is not being captured, angle the camera down to give more ground information and is ok that it captures some of the tripod information.
Taking the shots: consider using a shot release cable or setting the timer on the camera, take your time when taking the shot. The shots will be in 90 deg increments, sequence in one direction rotating 90 deg and another sequence of shots looking up. Seven bracket shots from and each location.
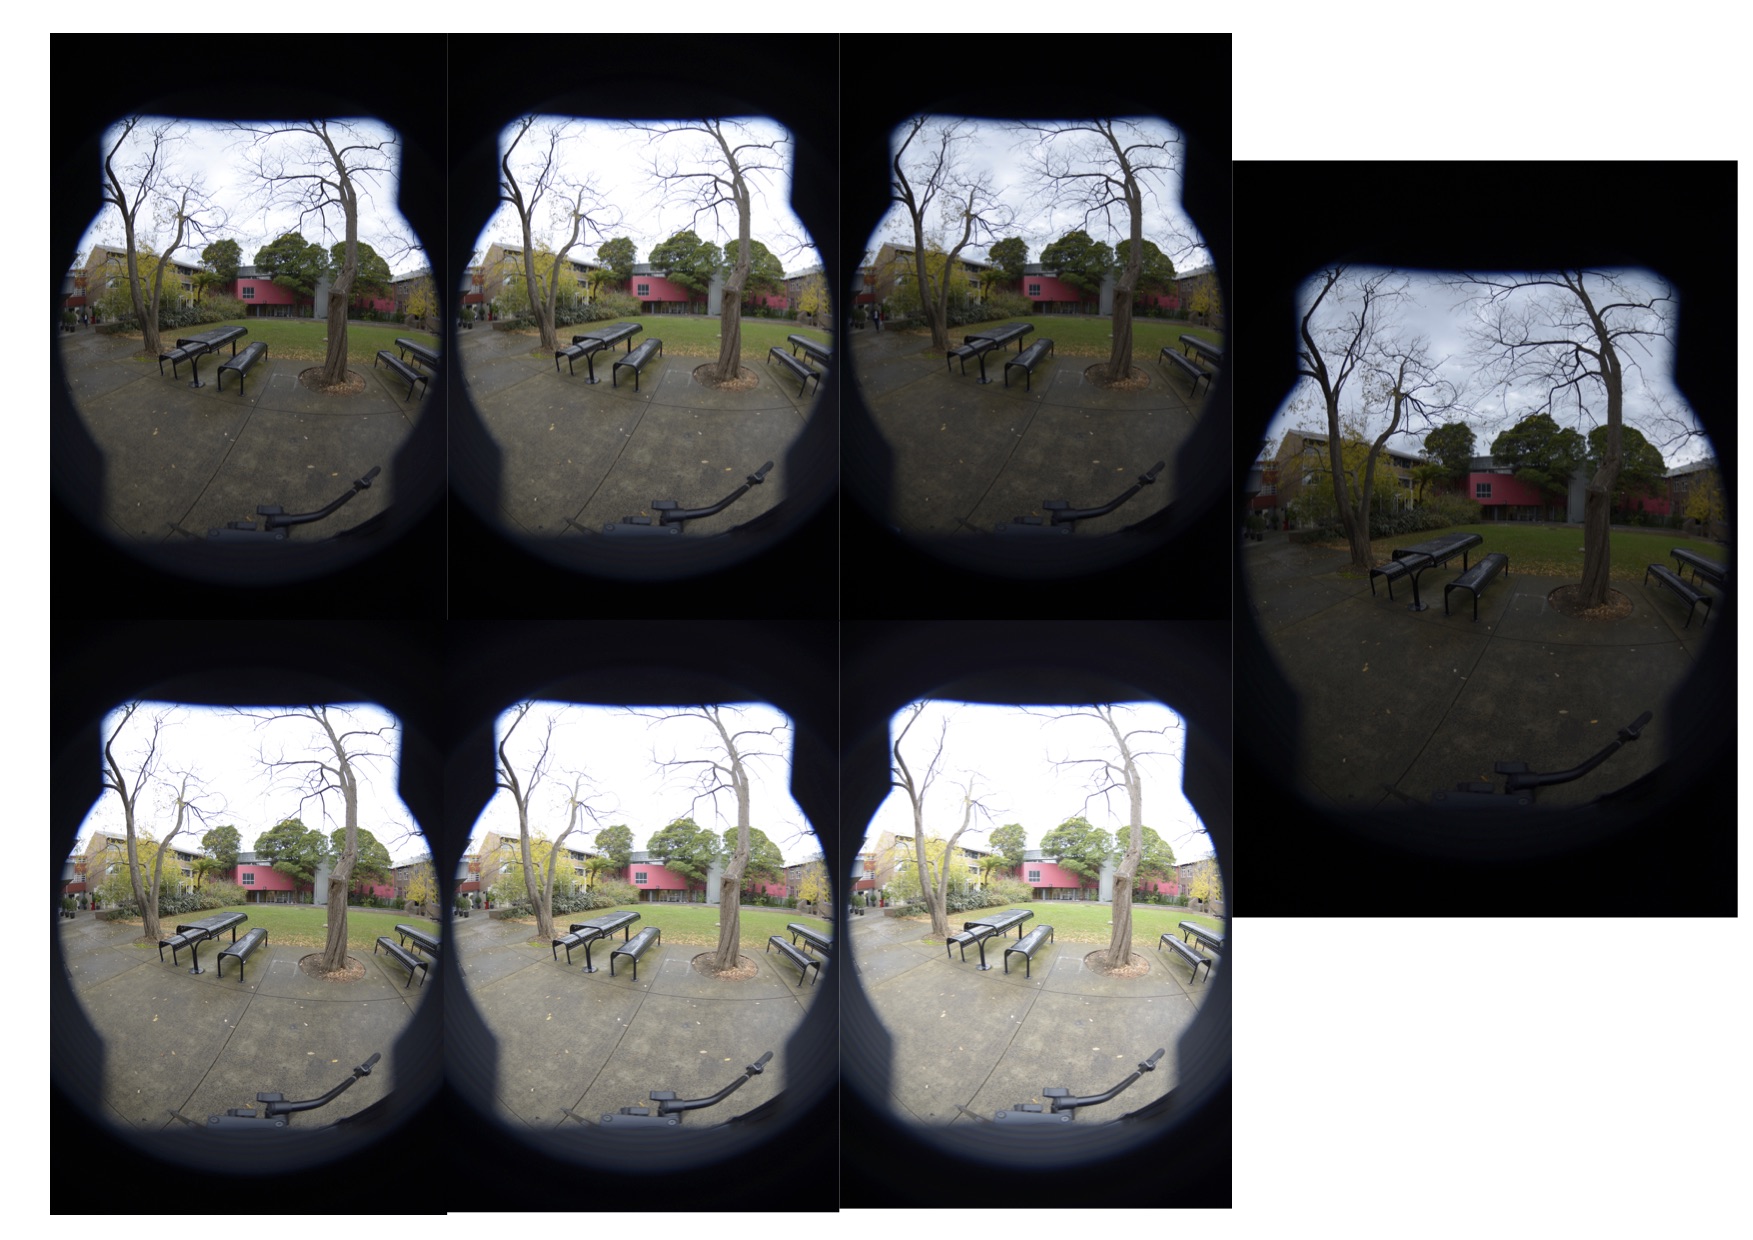
- the fish eye lens, 10 to 17 m is set to the widest possible angle – set to 10 m.
- set to aperture priority mode and half press, take a shot and get the readings. The iso is 60 and aperture is f5. Take not of where the shutter information is.
- set camera to manual mode and change the shutter speed, make sure the settings are the same as when in aperture priority mode and move two stops, two clicks. This depends on the environment, the general rule is that the spacing of the number of stops is uniform, the same in each direction, needs to be kept consistent. If well lit situation then can extend the number of shots between each exposure, in low light situation maybe consider one or two.
- shooting 7 images, the first is the perfect balanced shot determined by the aperture priority shot then three over exposure shots and three under exposed shots.
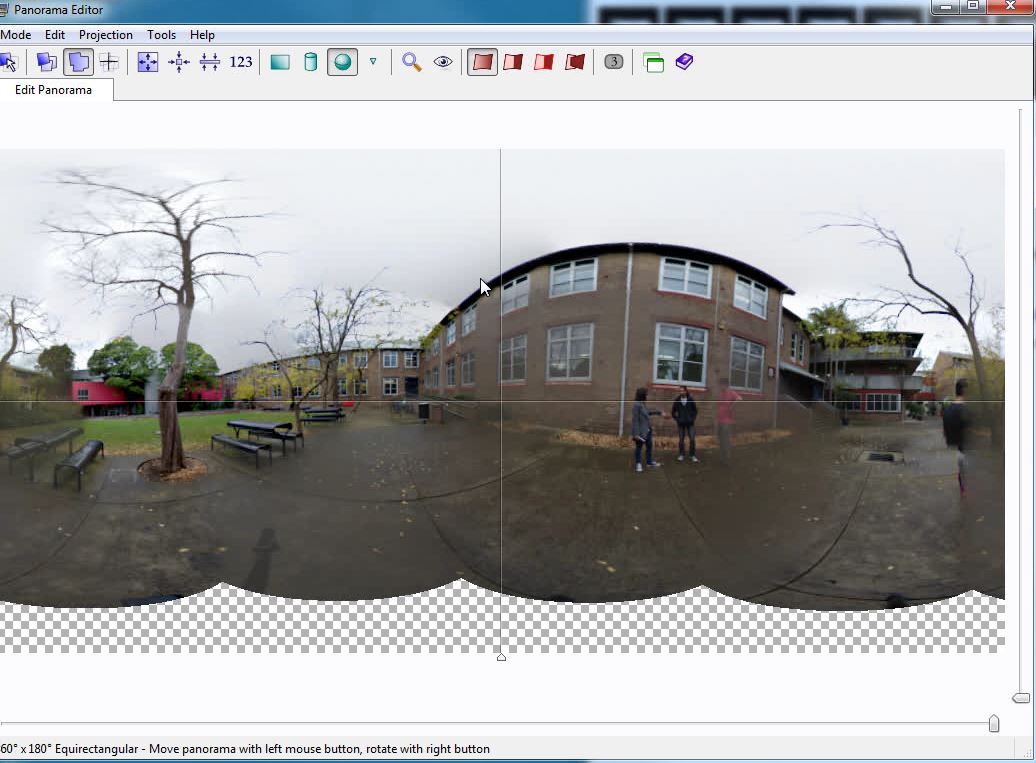
Sticking the images together using PTgui
The Panorama Editor is the main editor for splicing together and ensuring there is a preview and the other window is the images are loaded and housed. 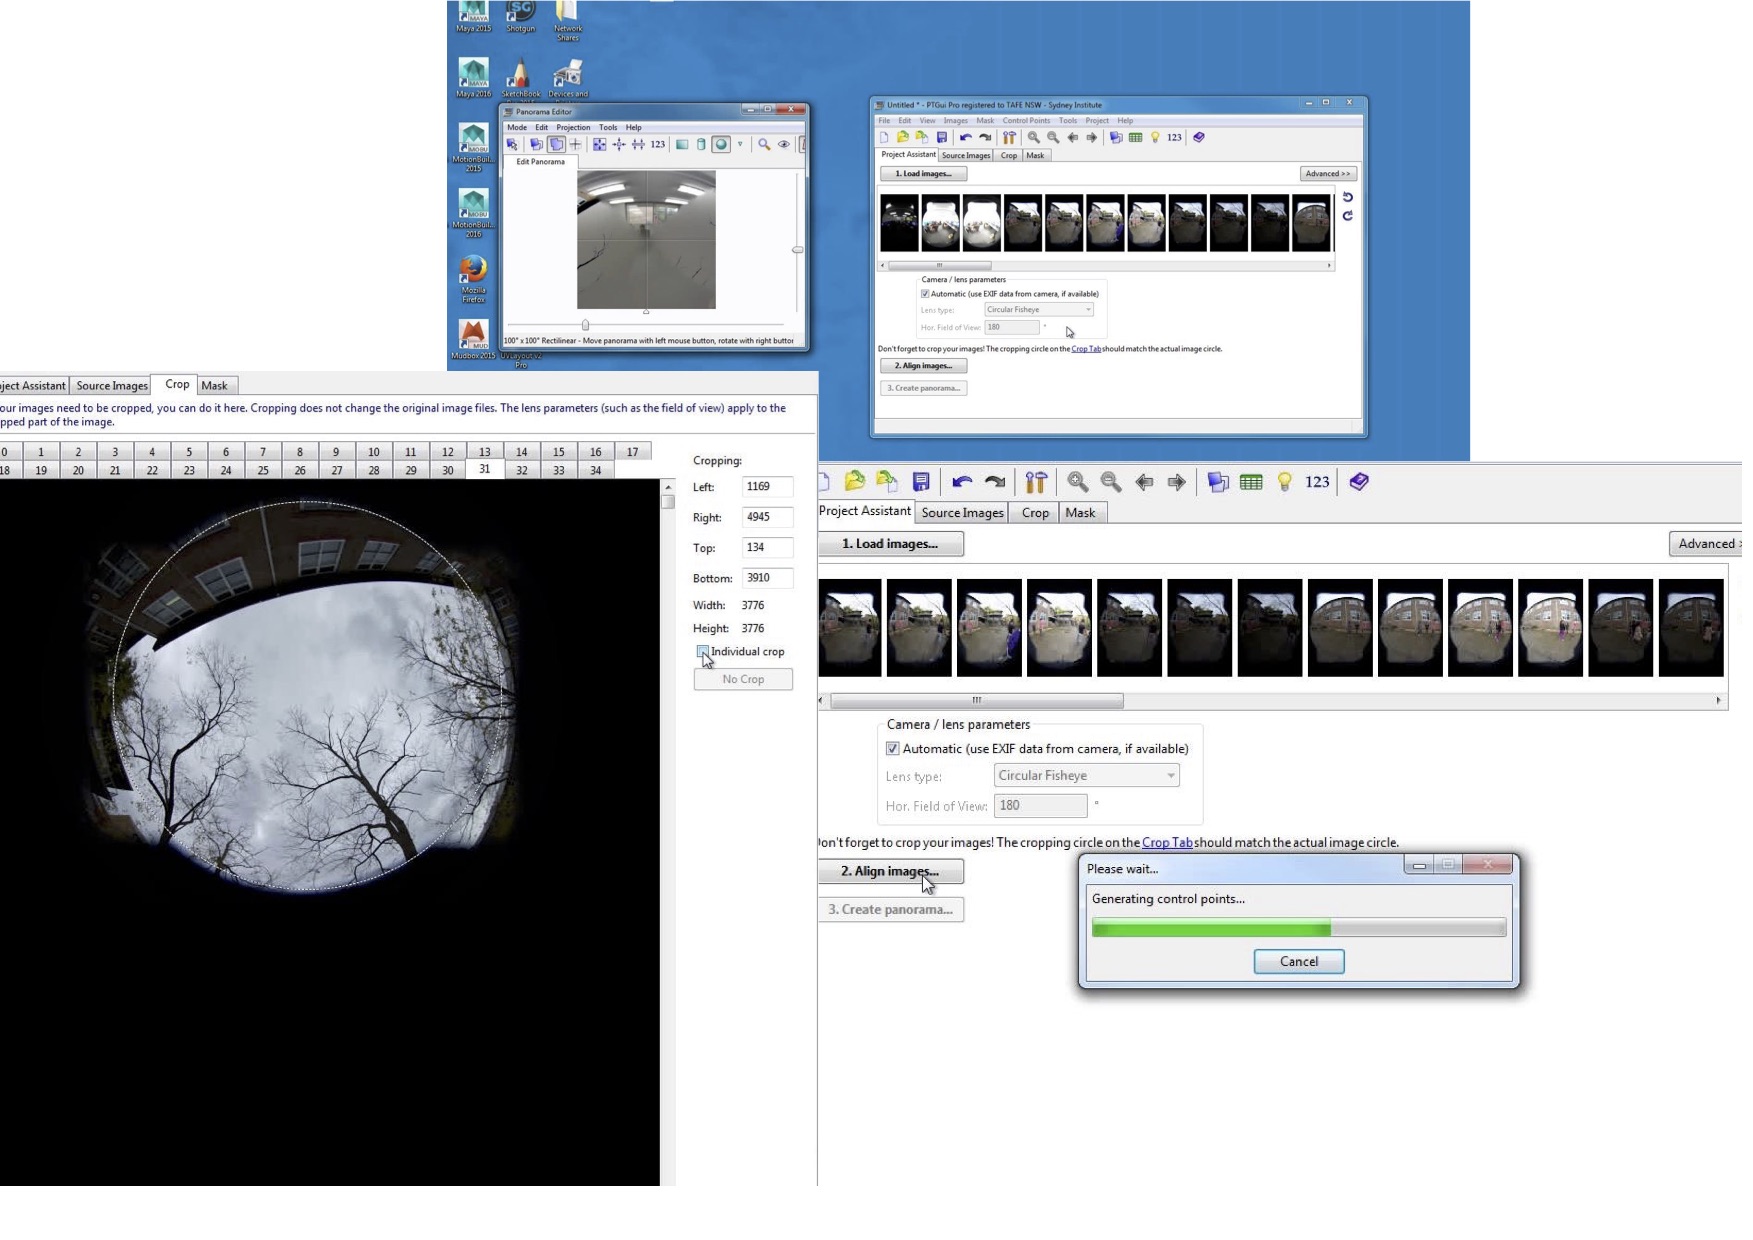
The project assistant will take you through the steps :
- Load Images
- Organise Source Image
- Crop the Image
- Align the Images
- Create panorama
- load images > select images > open
- camera lens parameters has automatically recognised it is a fish eye lens, 180 deg lens
- panorama editor is set to spherical
- source images tab and organise the images, check they are the required ones such as duplicates. Have 7 frames for each angle, shot 5 angles so have 35 shots, shot hero shot first
- crop, isolating the area that is going to be used, capturing as much of the image as possible without going into the black
- check the crop is going to work, can select the individual crop on a single image to adjust that image
- can select the individual crop on a single image to adjust that image
- align images, will take a bit of time and is automatically running the splicing tool
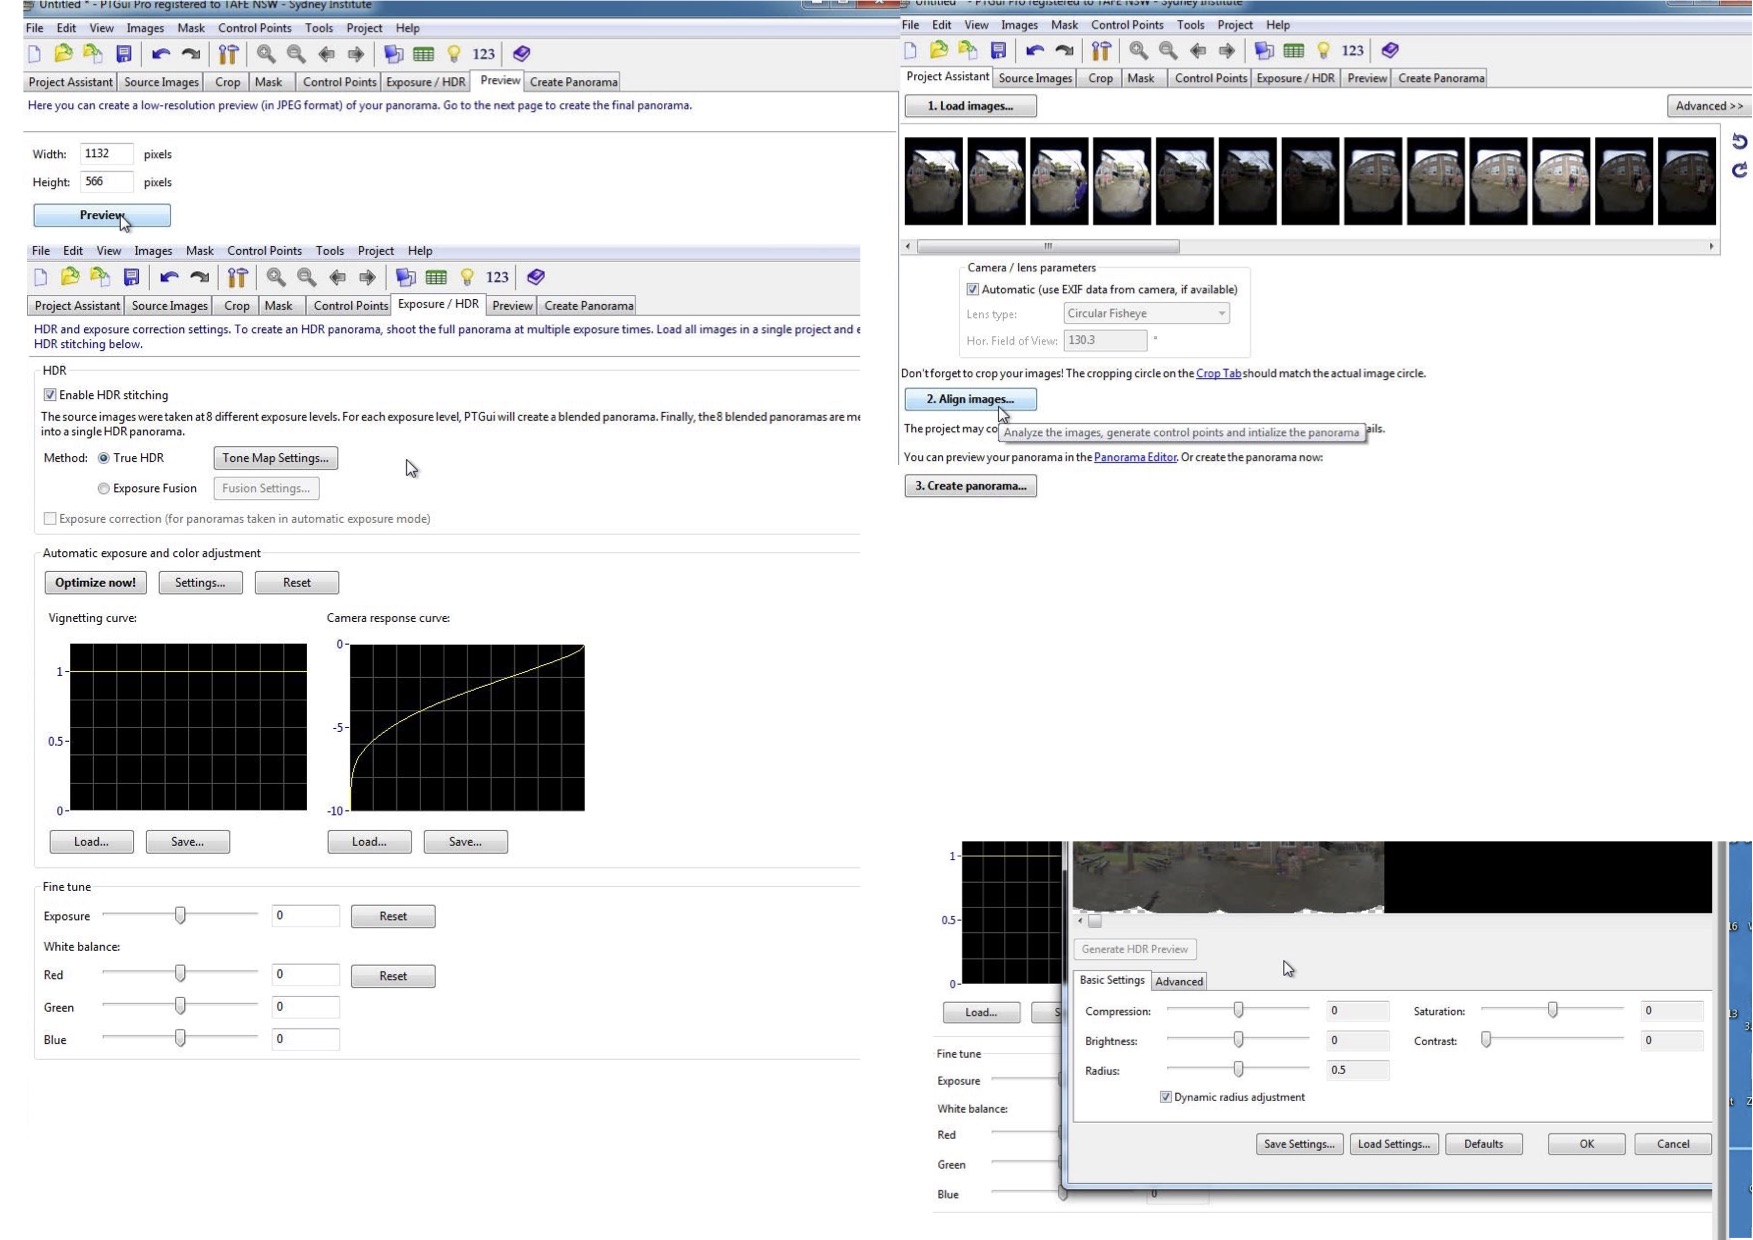
- preview to see in the 3D environment to see what it looks like
- can reposition the orientation of the images. For a large project, where going to put the split and will not affect the overall image, with multiple HDRI to look at the preview image quickly and what part of the set as a visual part of a set to help key in
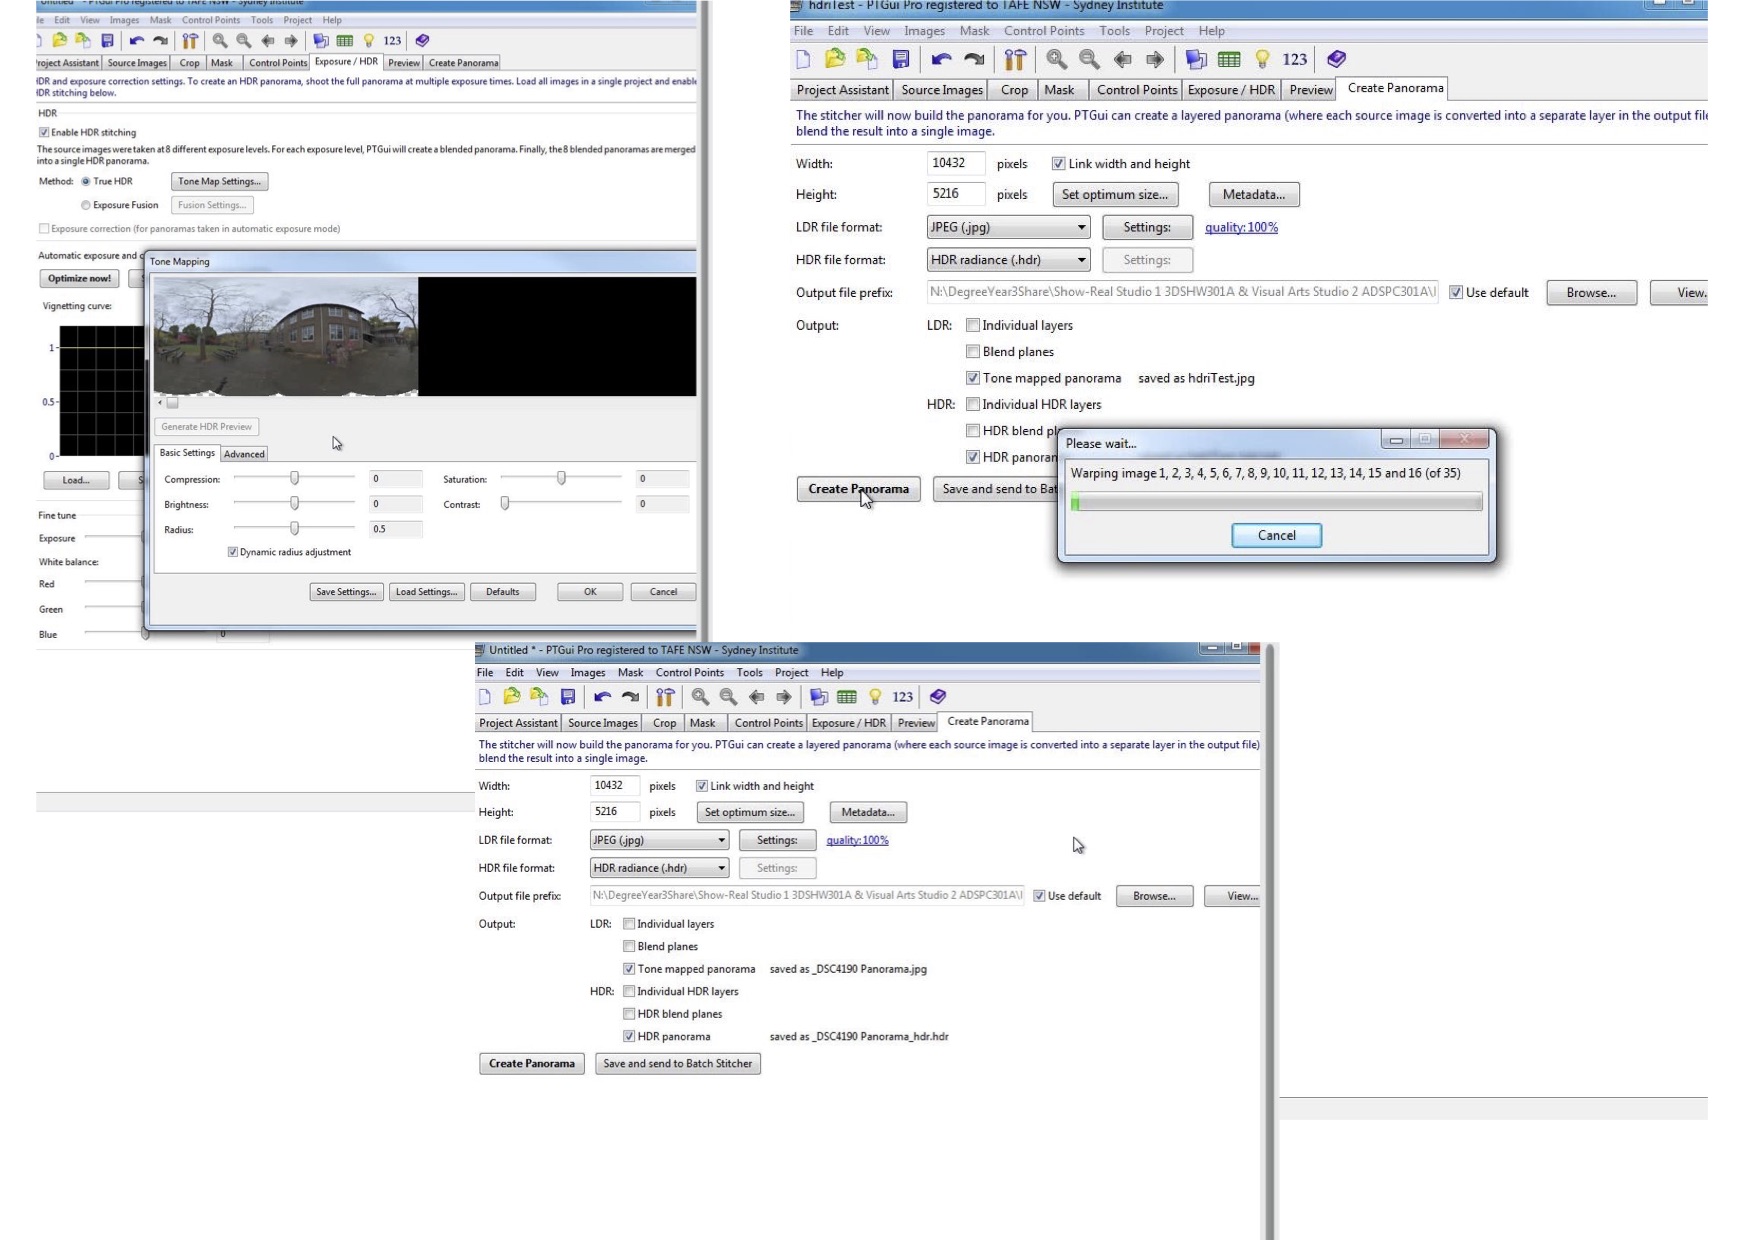
- exposure and enable HDR sticking and select true hdr, enabling the capability, layering the exposures into one. Can look at tone map settings, can inherently control and manipulate the brightness, saturation and contrast as the base image comes out, usually is ok because of the setting and how the shots have been taken
- the Panorama Editor does not necessarily looking correct though the tone map needs to be consistent
- project assist, create panorama and is creating two files, the jpeg and the hdr file and will go to the folder where the source images were sourced from
Bloch, Christian. The HDRI Handbook: High Dynamic Range Imaging for Photographers and CG Artists. 1st ed. Santa Barbara, CA: Rocky Nook, 2007.

Nice little tutorial! Well detailed. I’m sure I’ll be able to create a good HDR now 🙂
Thanks Brody, did you see the link at the end for the download?