WORLD VFX DAY 2026
VFX in 2021: What Works, Who Works & What’s Changing Forever
Creating a High Quality VFX Sequence on a Budget
Tutorial – Creating a Stylized CG Scene
In this tutorial, I walk through the process of creating a stylized CG scene from scratch. I cover:
- The order of steps I took to create the image
- The most important phases in each step
- The techniques and software I use
- Tips for how to balance realism and stylization
- Research I uncovered on techniques used by top animation companies
- bitmap-based or raster images, creates an image as a mosaic of pixels filled in one at a time. Changes affect pixels directly with the resolution defined by the number of pixels in the horizontal and vertical directions
- vector-based software creates an image as a series of mathematical instructions, algorithms from one graphed point to another. A vector image uses coordinates and geometric formulas to plot points that define areas, volumes and shapes. Vector images can be scaled with no loss of quality
- 3D graphic tools add the calculation of depth being defined in the tree-dimensional space instead of on a flat plane
- define objects, set colours and textures and position lights
- render the scene calculates such things as lights, shadows, the placement of textures and colours on models, the movement of animated objects converting it to a 2D image or scene.
3D Production Pipeline
- modelling is usually the first step and knowing how an object is used in a scene gives its criteria for modelling
- texturing and shading to apply colours and textures to make the object renderable
- rigging attaching a skeleton to an object to manipulate, animate
- animation and how physics applies to objects, how people and animals move
- lighting greatly affects the believability affecting every part of the CG creation
- rendering takes the scene created in the computer software, makes all the computations to create a raster (bitmapped) image, called rasterisation rendering into a file sequence of movie file.
MAYA NODES
Each node has a group of attributes, combined together they define an object and how it animates.
Creation or Shape Nodes include the information that defines how the object is created, they are low on the hierarchy and are always the child of the Transform Nodes. This means that Maya listens to the creation node attributes first, then moving down the chain to the other attributes including position, rotation and scale. When History is turned OFF the primitive is created without a Shape Node.
Transform Nodes (DAG) are the values for translation (position), rotation and scale and they hold hierarchy information about any other children or parent nodes to which they are attached. The tabs of the Attribute Editor show the nodes that are attached to the object.
Parent and Child Relationships the Parent Node passes information down the hierarchy chain to its children. Children inherit transforms of all the parents above. Child nodes have their own nodes that affect them and any of their children down the line. The Outliner and Hypergraph show and give access to the hierarchy.
Group Node or Null Node for storing data. Any transformation or movement applied to the parent or Group Node will be inherited by the child Node, all child Nodes.
Parenting nodes together places the first selected node (child) under the second node (parent).
SELECTION MASKS which objects can and can’t be selected, enabling work on certain parts of a complex model without accidentally selecting other objects.
SELECTION MODE select different levels of an object’s hierarchy such as an entire group, one of the objects or points on the surface – Hierarchy Mode, Object Mode, Component Mode.
SHADERS are assigned to objects to give them their visual appearance.
RENDER NODES define the characteristics of shaders.
SHADER NETWORKS are complex shaders that rely on a network of render nodes to achieve special rendering or texturing effects. The Shading Group is a collection of materials, textures, and lights that efficiently describe all the necessary attributes required to shade or render an image. All of the nodes connected upstream of the shading group contribute to the final look of surfaces in the scene.
FILE REFERENCING
Like many concepts in Maya I needed some practical experience to start understanding how the File Referencing workflow works. I was so excited the first time I saw my Maya ASCII formate file loaded in TextEdit.
File Referencing makes it possible to access objects, shading materials and animation in a parent scene without importing the files directly into the parent scene including having multiple users to share various assets. This eliminated the need to duplicate accessories, backgrounds and characters in a project, using up unnecessary disk space and unnecessary work.
The parent scene references files lower in the hierarchy known as referenced child scenes which remain separate from the currently open parent scene. When the parent scene is saved all the connections to the child scene are saved with any referenced scene data not being saved with it eg when a character is animated only the animation data is saved with the parent scene.
Temporary reference files can be created to create a scene with the parent scene only saving the names and attribute connections. When updating a reference, it is important to keep the names and attributes of the reference identical for Maya to be able to make the connections with nodes and attributes to connect the related data.
Using Maya ASCII format saves the scene in plain text and can replace the current low resolution using a Text Editor. Locate the reference lines at the top of the file content.
file -rdi 1 -rpr “filename” -rfn “filenameRN” “./scene/filename._hires.ma”;
file -r -rpr “filename” -dr 1 -rfn “filenameRN” “./scene/filename_hires.ma”;
The path might be different, needs to point to your file. Replace the reference lines.
file -rdi 1 -rpr “filename” -rfn “filenameRN” “./scenes/filename_lores.ma”;
file -r -rpr “filename” -dr 1 -rfn “filenameRN” “./scene/filename_lores.ma”;
“Assemble multiple objects, such as modeled polygons, shading materials, and animated characters, without importing the files or objects into a scene. The contents of referenced files appear in the scene, but the data for the objects is read or referenced from pre-existing files that remain separate and unopened.
File referencing lets you use Maya objects and scenes in collaborative production situations where multiple users need to work concurrently and share various scene assets in complex scenes.
A scene file that references other files is known as a parent scene to indicate its position within the file referencing hierarchy. A parent scene reads or references other files called child scenes. Even though the referenced child scenes appear in the parent scene, the child scene data remain separate from the parent scene at all times.
A reference node is created for each child scene when it is referenced into a parent scene. The Outliner displays reference nodes with an  icon and referenced objects with an
  icon. The reference node maintains the link between parent scene and child scene, so that when the parent scene is saved and reopened, the references are retained in the parent scene. When a referenced object is modified in the parent scene, the reference node stores these edits.”
3D PROCESS
MODELLING > SCULPTING > UV LAYOUT > TEXTURING > RIGGING > ANIMATION > GAME ENGINE
- Autodesk options: Maya, Mudbox, Substance Painter, Sketch Fab
Build Stronger VFX Breakdowns for Your Portfolio
How to Model and Light a Detailed 3D Scene
Ofir Tal Buchris is studying 3D animation for her second year at IAC (Israeli Animation College) in Tel Aviv. She has also studied painting and drawing at Frame By Frame with Ben Ozeri and recently participated in a workshop led by Adam Goldstein (lead texture artist at Framestore).
Becoming a Technical Director at Pixar
Exclusive Interview: How redchillies.vfx and SRK brought ZERO to Life
Liquid symphony: Exploring directed velocities in Chaos Phoenix
This is Halloween: How Frame48 designed a Muse video built for horror fans
Approaches to Fluid Simulation in Visual Effects Using Nuke
Beginner’s Guide to Creating a Game-Ready 3D Creature from Scratch
VFX’s Julius Lechner about creating truly immersive environments The Batman
Embark on a Journey into the Exciting World of VFX
VFX
GDC Talk – “Art Directing VFX for Stylized Games”
Tips from the world of VFX
Meet the company transforming real-time content creation
UK-based VFX company On-set Facilities has developed an impressive, and apparently unique, system that creates visually stunning live VFX from green-screen shoots. The system uses a VR games engine, which combines the foreground image, the CG background, the matte and the camera tracking data and feeds it to Nuke where the final composition is output.
My name is Sterling Osment, I am a self taught VFX artist – with a innate passion for creating visual effects in CG, it all started a long time ago when I was involved with a small startup studio in Brisbane Australia, we were using SGI’s, Lightwave and Softimage. I was exposed to the high end pipeline very early and immediately was interested in the media creation of this style. I attended a Alias Maya 1.0 and Max function / presentation – I was blown away.
Would you give us a little “top 5” list of tools?
- Houdini
- Maya
- Zbrush
- A big brain with octopus arms ( for multitasking )
- A heap of patience mixed with connections and friends that share the same kind of CG interests.
Art of VFX News
Vivid Festival Transforms Sydney with Light and Motion
Beyond The Wall: The Story of Six VFX Studios Behind the Epic “Game of Thrones”
17 favorite movies before and after visual effects
The 10 best visual effects breakdowns of 2016
Blade Runner 2049: Art of VFX Interview
Art of VFX interviews VFX producer, Karen Murphy, on her role on Blade Runner 2049. “Blade Runner is the holy grail of SCI FI and you have to have a lot of guts to even sign up for the task”. Karen Murphy began her career in the visual effects almost 25 years ago. She has produced the effects of many films such as TITANIC, WILD WILD WEST, HUGO and FURIOUS 7.
This is What Home Movies Look Like When Your Parent is a VFX Artist
The 5 Miserable VFX Jobs That Make Movies Possible
CREATING THE ICONIC STAR WARS LOOK: Exclusive Interview with Christian Alzmann, ILM’s Senior Art Director
25 Great CGI movie moments of all time – link
Animal Logic: The Lego Movie – link
Mike Green Lightwave to Zbrush and Back Again
Want a job in VFX? Take notes from these 5 pros
VFX veterans look back on their early careers and share their most important lessons. Visual effects (VFX) encompasses many different interests and skill sets. That variety is exactly what makes working in this industry so attractive, but it also raises a lot of questions when you’re starting out and looking for your first real gig: How should I approach potential employers? What exactly do they look for? How will I differentiate myself? What qualities will make me successful? To get some answers, we spoke to five CG pros about their earliest days in the business and asked them to share the most important lessons they learned with us.

Click on Autodesk Digital Magazine for the link
Autodesk Digital Magazine
AEAF Animation and Effects Awards Festival
VFX Artists Touch Heaven and Earth for ‘Thor: Ragnarok’ Teams at Rising Sun Pictures and Fin Design + Effects created exciting sequences, VFX and animation for Marvel’s ‘Thor: Ragnarok’, spanning heaven and earth, distant planets and dream worlds.
CELEBRATING CREATIVITY: Issue Two
CG SOCIETY
- A DAY IN THE LIFE OF A VFX SUPERVISOR, WITH GLENN MELENHORST
- Mies van der Rohe Farnsworth House by Alessandro Prodan
- HAMMERING OUT VISUAL EFFECTS FOR MARVEL STUDIOS’ THOR: RAGNAROK
- DNEG | BEHIND THE VFX: JAEGERS VS KAIJU
- ARTIST INSIGHT: STEVEN DUPUY
- CREATING VFX FOR GAMES, WITH HOUDINI ARTIST ANDREAS GLAD
- FEATURED STORIES
- Cinematic Director employs Character Creator, iClone & Blender in Epic Ancient Greece Film
- Cool Tutorial on 3ds Max’s Retopology Modifier
- DI4D introduces PURE4D, the world’s most precise pipeline for digital double facial animation
- VFX Breakdown by Industrial Light & Magic for The Mandalorian – Season 2
- Cinematic Director employs Character Creator, iClone & Blender in Epic Ancient Greece Film
- Passion Pictures Scales Animation with AWS
- Autodesk Accelerates Workflows Across Creative Tools
Create 3d Characters web site link and facebook
CREATIVE CRASH
DUNCAN BRINSMEAD
Creating a sizzling showreel sting
VFX Blog link
PULLDOWN IT
Pulldownit is a brand new dynamics solver which allows for the creation of fractures as well as massive rigid bodies simulations. By using its technology digital artists are able to simulate fast and easily the collapse of buildings, cracking surfaces or fracturing any kind of brittle material.
Douglas Trumbull
John Whitney
MAXON CINEMA 4D FIRES-UP CANTINA CREATIVE VFX WORKFLOW -THE HUNGER GAMES: MOCKINGJAY PART 2
EXCLUSIVE INTERVIEW WITH CHRISTOPHER NICHOLS (DIRECTOR OF CHAOS GROUP LABS)
Interview with Lillian Paterson: VFX attachment on Pacific Rim: Uprising.
3D / VR / AR / XR – Khronos Sydney Chapter
‘Data-Driven Real-Time Crowd Simulation’ Rowan Hughes
Visualisation of data in 3D, design and aesthetics based how that impacts through good design. How can we impact on processes through better visualisation, VR, design building from personal experience outwards to the design process. How data structures are being deal with including narrative structures and visual impact. In 2018, we are going to start our meetup with invited speakers, talking about WebGL, Cinematic VR, Collaborative AR/VR and beyond.
In order to create plausible virtual humans it is important to model their movement and interactions with their environment in an accurate and realistic manner. A lot of time and effort is spent by artists and engineers modelling user interactions with virtual agents with which the user acts directly. Virtual crowds, however, form an important component of virtual worlds. It is generally not feasible to author scripted behaviours and interactions for individual members large virtual crowds, and it typical to rely on systems that allow for autonomous navigation and behaviour. In this talk, we look at some solutions developed over the course of Rowan’s research.
 Masters looking at real time rendering, skin. This talk is looking at Crowd Simulation in VR, improved behaviours inluding pedestrian steering.
Rowan’s research included creating models from Captured Data, the use of Particle Systems, Holonomic Collisions Avoidance for Virtual Crowds, the use of Mocap (the process of recording the movement of objects or people) on the shoulders for shoulder orientation.
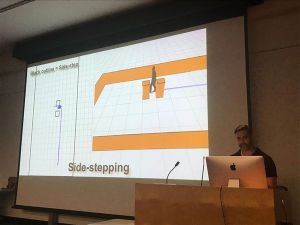
Holonomic Locomotion: Holonomic robots are omnidirectional robots that can move in any direction from any orientation, creating an incredibly mobile robot. So, it’s easy to move the robot in a congested area. A four wheel drive (4WD) omnidirectional robot can be built using either mecanum wheels or omniwheels. Both wheel types are similar in that they have rollers mounted around the wheel’s circumference allowing for sideways movement of the robot. The difference between the two types is the angle at which the rollers are mounted at. This article looks at omnidirectional robots constructed with both types of wheels and includes software code for providing this control. The robots are constructed using the VEX Robotics building system.
Previous models turned like cars, holonomic models, side and back stepping. How close do you need to be, how to turn and when to turn for an animation database. If have a bunch of obstacles, know when they are going to hit based on the orientation and know how to orient the character. Looking for less collisions and better behaviour.
Geometric models are efficient, solving in 2D space with circles and boxes with maths equations. Went with a synthetic vision, each agent in the simulation renders the scene from their point of view. The scene is rendered for every character, if there are 2000 characters then rendered for all of the characters and this data, the visual perception data is used to solve the collision problems.
Prioritise non-collision at all cost. Two parameters to consider are the time to collision (TTC) and rate of change of bearing angle. Fragment shader gives the time to collision – ttc, if I’m going this way and your going that way, how soon are we going to collide.
Rate of change of bearing angle is not changing we are going to crash into each other. Increasing will pass in front of you, decreasing will pass behind you. Time to interaction.
Two ways to avoid, decelerate and turn. Looked at left and right avoidance angle, turning angles, velocity, current density for all the characters. As density increases, slow down and take bigger turning angles.
Parallel reduction, CUDA will sample every pixel and decide which is the worst one, that is the one to react to. Dealing with the most dangerous pixel in real time.
Do some calculations on the CPU and works out the goal velocity.
Humans are rendered as cones, which works well because can see over the shoulders with boxes and spheres cannot see over and do not work so well.
Track algorithm RVO Tracking Algorithm, ORCA. Reciprocal Velocity Obstacles, Optimal Reciprocal Collision Avoidance
Studies for virtual crowns. Work on Crowd phobia, older people and how crowds affect their spatial memory, how people navigate such as how big and how dense does it need to be before you go all the way around.
A Creative Flight plan……and how 99% of the time we’re off course
Paul is going to finish up the Sydney ACM SIGGRAPH events for 2017 with a talk about projects, research, and planning. You’re probably very familiar with his work on Guardians of the Galaxy vol. 2, Avengers: Age of Ultron, Allegiant, Insurgent, Iron Man Three, Prometheus, and so many others. He’s an engaging and entertaining speaker, you should come listen to him talk and look at his pictures.
Incredible Visual Effects of Prometheus
The Divergent Series: Allegiant – Animal Logic designs over 250 shots on Allegiant
Hologram Table Effect
Attempting to make something photo real and at the same time come up some ideas for the problems which could be a director saying ‘I do not really know what I want to do’. Had discussions around what to do, a new exploration and exploring shapes.
Holographic table – blend between organic and high teck. How much to give the audience and how much to tease them. Holding a cloud of light. Test on a black screen then have their own problems when put into a set.
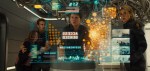 Working on the UI elements – when there is a frame work sent to the art department to design the graphic and then animate all the elements as motion sequences. They were not all flat cards, giving them volumetric space.
When all the elements are put on top of each other they accumulate in light and gets flat very quickly. The use of back face culling for graphics such as culling out the landscape behind giving a sense of volume, cheating the depth of field and relighting the characters. Giving it a sense of shape and volume, designed as a volume, not for one camera and can then move cameras around, rendering any angle and giving reflections. Grading down the objects beside the holograms to give them a sense of shape.
Constantly roughing out the graphics and going back and forward between graphics and the editor.
GUARDIANS OF THE GALAXY
GUARDIANS OF THE GALAXY VOL. 2: PAUL BUTTERWORTH – VFX SUPERVISOR – ANIMAL LOGIC
The fractal nature of Guardians of the Galaxy Vol. 2 By Mike Seymour
Matt Ebb – Guardians of the Galaxy 2
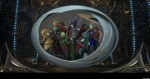
 The Palace Interior
Using crazy fractals, thinking about how can we light it to make it different and a bit interesting. Fractals give fine detail and are uncontrollable, need to be able to manipulate them to find the structure you want. Selected pieces, carved that section out and use it. Instead of using the houdini cloud and typologies it, they took the point cloud information using lidar scans and were able to build up the set quickly.
cineSync to link up quicktime and can draw on pictures
Light studies, change the time of day and put a light sky around it and remapped it. Relighting and regrading.
Simple geo structures with complex fractals, instanced it with spheres usually giving a rough surface then worked out how to take the normals off the fractals and bent the surface, manipulating the surface to appear smooth.
 Cosmic Catch Effect
Real hands replaced by DG hands with fluid effect simulation with pulses running up the hands and seeing through the hands.
 Alien Garden
With Matte Paintings you can get a lot of detail in very quickly and is harder to change. Decided to build the garden with assets that can be generated and used the fractal generator that was being used. Made the garden realistic, to look like plants and when signed off shifted the colours about 10% to gave it a bit of an alien look.
Original set with actors on it then a background plate as a layout, tree assets and sky plates with the ground plates being replaced and rototed off. Needed to shoot some more plates, the lighting did not match so well with what had already been comped, then needed to relight some of the actors, 3D light, 3D pull down exposures on some things. Removal of elements because the sound had already been done. The matching up and pulling together of shots from different times.
Colour cast has to be fine tuned and colour graded.
 FAMILY MOMENTS – Diorama Creation
From concept art to taking the live action, track it, take out the vectors and put through Houdini and scatter particles with the live action colours.
 How are they transitioning between all the story parts, where is it coming from and how is it shaped.
Took the basic ideas and started shaping the characters and built up the detail.
Rendered everything at 4K, the camera was so sharp when CG was rendered out at the resolution of the film it was looking softer against the actors. Scaled down the CG to match the same kind of sharpness of the camera.
If you were to add up all the hours that were applied to the show it would take you about 37 years, not including rendering.
SOME OTHER INTERESTING POINTS
In camera is always better, production design, liaising with crew and matching and choose elements with the camera, know how the camera would resolve it and it is invaluable.
The more set the better, for the actors who are not staring blindly into a scene. This works well in a film that is well written and well planned for production design, now the turn around is getting quicker and there is going to be a lot of change. A director that is good with scripts and writing, does not do vfx and can run on the fly with it and shape the film in the last 2 or 3 months with running cuts and marketing testing. The stress is on the post production companies.
Tend to design a team that is gorilla based, multiple talents and plan for expanding at the end when you can thrown a lot of fire power at it. Design in such a way, need an asset set up where you can reshape and get a result quickly which is probably not matte painting. People tend not to shoot movies very well, lack of structure, proper script, inventing the story and use move multi camera set ups.
Not too many options, people get confused, gave three ideas with options they really liked and take out the one they like least. Not ‘no’, offer options, cannot do this, we can do this. Not tell all the problems, say this is the problem. Job is to offer solutions. Towards the end of the film, everyone want to get to the end, just like everyone else. Do you like a, b or c.
Movies that explore new territory, not cover areas that the audience already knows, as an audience were ahead of the story and knew what was going to happen. Lacked mystery and twists with an inability to connect with the key characters, not believing the journey they are going to go on. The story rushed and disjointed. Have been there so why are we making this.
Ant-Man | VFX Breakdown | DNEG
‘Outlaw King’ Method Studios Breakdown Reel
Projection-mapping on moving surfaces
Incredible Visual Effects of Prometheus
Opel Ampera-e – Maybugs – VFX breakdown
Game of Thrones: The Frozen Lake (HBO)
‘Game of Thrones’ Visual Effects – Inside ‘Battle of the Bastards’
The Best CGI Movies In 2016
The Mill BLACKBIRD
HBO’s “The Newsroom” – Intro Sequence
The Visual Effects Of Iron Man[Full Documentary]
Sense of Presence: The Future of Virtual Reality
Autodesk Maya Special Features by Duncan Brinsmead – Part 1
Autodesk Maya Special Features by Duncan Brinsmead – Part 2
These ARE the Droids You Are Looking For… wireframe
Spoil Boy (test render)
Alias|Wavefront – The Making of Maya Fluid Effects
Exclusive Interview with Dennis Muren, ILM Special Effects master talks about his creative journey and multi-award winning work on movies like Star Wars, Terminator 2, and Jurassic Park
Why CG Sucks (Except It Doesn’t)
Kung Fury VFX Breakdown – “Great balls of fire”
Kung Fury VFX Breakdown – “Miniature Madness”
DAWN OF THE..STUFF. FULL LENGTH TRAILER
The Hobbit: The Desolation of Smaug – Bringing Smaug to life
Top 10 Landmark CGI Movie Effects
3ds Max 2015 extension 1 – Working with Alembic
https://www.youtube.com/user/pjacksonwingnutfilms/playlists
The History and Science of the Slit Scan Effect used in Stanley Kubrick’s 2001: A Space Odyssey
The WETA Effect, or, Why Special Effects Peaked in the 90’s. – StoryBrain
Pixels: Taj Mahal sequence – VFX breakdowns
Steven Dupuy FX Show Reel 2015
VFX Before and After Star Wars The Force Awakens PART 1
VFX Before and After Star Wars The Force Awakens PART 2
VFX Before and After Star Wars The Force Awakens PART 3
VFX Before and After Star Wars The Force Awakens PART 4
Star Wars: The Force Awakens – Comic-Con 2015 Reel
JURASSIC WORLD BREAKDOWN REEL
