This post is made up of information that I have collected and continually adding to along my journey about lighting, shaders, rendering.
Top 10 reasons to take part in student rendering challenges
What judges look for in winning student rendering challenge entries
3drender.com – Three D lighting and rendering including challenges
The Science of Rendering Photorealistic CGI
Disney’s Practical Guide to Path Tracing
CG Channel.com
MAXDEPTH Resolution Revolution Redux: Setting up multi-tile uv shader networks in Arnold for Maya
LIGHTING
Lighting creates a visual mood, atmosphere, perception of colour, to distinguish shapes and form, a sense of meaning and depth for the audience, letting the audience know where to look, showing us what we see. Objects and characters look like they fit and live in their surroundings. Learning to see light and the amazing effects it creates influences us in how we light our scenes, how we notice the bumps and curves, the light and dark, the brightness of highlights, rich blacks and bright whites, shadows and diffused light. Why do things look the way they do? Where is the light coming from. What is the range of qualities from soft and diffuse to harsh and intense? Looking at sharp and soft edged light, different angles, intensities and shadows. Consider lighter and darker areas while guiding the eye towards certain objects and actions.
For subtlety, for authenticity, add little movements to the lights, even subtle changes in colour, or even obstructions out of view of the camera, which move around randomly, to cause differences in your indirect lighting. Consider choosing to have your frame render steps happening at twice as often as your main character animation steps, but still have the lighting effects happen in the extra steps. Think about a 1 hour shot taking one frame every minute then the same animation scaled to 60 frames long if you turn off motion blur.
When a character is moving towards or away from a light source, the intensity of the light cast onto the character needs to simulate what it would be in real life to be believable.
A Surface Normal is an imaginary perpendicular tangent line that emanates fro all surfaces to give the surface a direction. All objects have the ability to cast and receive shadows.
Attributes of lights can be animated such as intensity, penumbra angle, colour, translated, scaled and rotated for lights turning on and off, candles, campfires, emergency lights, decorative lights, flickering, Christmas lights etc.
SHADOWS
Shadows are an important part of creating mood and atmosphere in a scene.
Our world is made up of direct lighting, cast shadows, indirect lighting and ambient occlusion working together. In reality, shadows become gradually softer as the distance increases between the cast shadow and the shadow-casting object. A balance of light and dark is important. High-Dynamic range images (HDRI) are often used to create more realistic lighting. To add to the realism and depth of a shot or scene consider if the shadows soften or diffuse as they shadow falls from its casting object, softening more towards the edge of the shadow.
The effects of shadows are part of creating atmosphere and mood helping to define the look and feel of the scene. Consider the type of shadow, the elevation and direction of a light are important influences on the amount and shape of the shadow areas. Generally the shadows become more dominant as the angle of light incidence increases and as the lighting moves from front to back. A dark, gloomy scene may require the lights behind the objects so the shadows are being cast into the frame. Cross lighting to maximise textures creating long shadows and to minimise textures use frontal light giving a flat look.
SHADOW ATTRIBUTES Maya calculates the distance from the light to the nearest shadow casting surface and the distance from the light to the next nearest shadow casting surface and averages them. If the distance from the light to another shadow casting surface is greater than the depth map distance, that surface is in shadow.
DEPTH MAP SHADOWS renders from the point of view of the light source. Records distances between the lights and objects in the scene. The bias is a value by which the camera ray’s intersection point is moved closer to the light source to avoid incorrect self-shadowing.
RAYTRACE SHADOWS can be used to render transparency mapped shadows to see details in the shadow, coloured transparent shadows when there is colour on the transparency channel, shadow dissipates as it gets further away from the shadow casting object or attenuation, render motion blurred shadows.
DIRECT ILLUMINATION, light source directly illuminates an object.
INDIRECT ILLUMINATION, light illuminates objects by reflection or transmission by other objects.
GLOBAL ILLUMINATION, describes indirect illumination which includes Caustics, Final Gather and effects such as Caustics.
Imagine a shaft of yellow sunlight beaming through a window. According to quantum physics that beam is made of zillions of tiny packets of light, called photons, streaming through the air. But what exactly is a photon? A photon is the smallest discrete amount or quantum of electromagnetic radiation. It is the basic unit of all light.
Light is emitted from the source in the form of energy, called photons which are followed as they bounce around a scene until they are either absorbed or escape to infinity. The absorbed photons are stored in a Photon Map and used at render time to calculate illumination in a scene.
STARTING OUT LIGHTING 3D
Lighting is important for highlights, diffused light, shadows, light and dark to create an interesting image and scene, create a sense of detail from blacks to whites. It is shot specific. The nodes have attributes the govern how they function.
Three point lighting is the traditional approach
- primary or key light: is the principal light giving primary shadows, placed to the front and off centre and an important sense of lighting direction
- fill light: softer light to fill the scene, is diffused light that softens shadows and illuminates the dark areas, placed in the front and opposite side to key light to target the dark side and could be a different tint
- back light or rim light: to give depth, bring the subject out from the background it can highlight the edges and is not a background light, placed behind the subject and could create a bit of a halo giving the subject more of a presence against the background. This is not the same as the background light which lights the environment
Other lighting could include
- practical: not to interfere with the main lighting unless the the main light is coming from this source such as a candle
- background light: consider matching the direction of the key light
Lights
- directional: evenly across the scene, sunlight or general indoor, gives an accurate sense of direction without emanating from a specific source, no scattering of light or scale, parallel rays even over distance, no decay rate. The shadows are parallel, parallel rays, illuminating objects from the same angle, a harsher light with harder edges. Do not factor in their position in the scene when calculating shadows, only the orientation. Are not the best lights for detailed shadow-map shadows, have good raytraced shadows.
- spot: cone of influence in a specific direction, can be used for keys, fills rims and cast light in specific areas, emit from a specific point and radiate out of a cone shape, spread rays, can create a circular focus of light such as flashlight, directionals spread the light evenly. Consider decay rate, cone angle, penumbra angle, negative – softens the light into the width of the cone, decreasing the size of the focus, positive – softens away from the cone, drop off softens from the centre, link a target to the light, shadows diverge at different angles. The size of the viewable area, from the light’s point of view is restricted by the cone angle and the distance between the light and the subject. Create shadow maps with greater accuracy at lower depth-map resolution.
- point: casts light from a specific point, spread evenly in all directions, omni directional, decay rate adjusts intensity over distance, candlelight, light bulb, setting a mood, shadows radiate out in all directions, a more subtle light with richer shading on the surfaces.
- area: computation reflects the size and orientation, a larger light emits more light, the further away from the object the less light is cast onto the object, array, collection of spot lights from a rectangular shape, criss-crossing rays, most realistic, scaleable and affects intensity, default decay rate, creates shadows, larger the light the brighter eg through a window, specific area of an object, sliver of light or large diffused lighting in an environment, if you close the window shade the amount of light is reduced. It is difficult to create straight, long, specular highlights such as neons, soft lighting distribution and realistic shadows that vary from hard to soft.
- ambient: usually used as a non-directional light to simulate the diffused scattered or reflected light, even light across entire scene can be flat, no decay, no specular highlights, does not show bump maps, adjust ambient shader slider. The Ambient Shade attribute if set to 0, 0 acts like an RGB multiplier affecting the contrast levels, 1 is fully directional.
- volume: illuminates within a given volume, can blend colours, control the direction
- IBL: image based lighting, environment sphere with an image assigned that uses the brightness to cast light
- HDRI: several photos at varying exposures from very dark (low exposure) to highlight the brightest parts to very bright (overexposed) to capture the darkest parts giving a range of bright to dark, rotation. It involves taking several shots of the same subject matter with bracketed f stops and assembling the images into a floating pint tiff HDRI. An HDRI has an extra floating point value that is used to describe the exponent or persistence of light at any given point. Pixels that have a high floating point value (exponential value), are not affected very much by a darkening of the overall image. Pixels that have a lower persistence of light would be affected more by this same darkening operations. Contributes to crating photorealistic images.
When using Global Illumination and Final Gather use quadratic decay rate, ensuring the light levels decrease in intensity based on the inverse square law.
Attributes
- colour: the darker the colour the dimmer the light, controlling the colour cast and can affect brightness
- intensity: how much light is cast, higher intensity gives brighter illumination, brightness of the light. Negative values will subtract light eg produce dark spots instead of hot spots on specular shading.
- cone angle: width of the cone
- penumbra angle: intensity at the edges of the cone, negative value softens into the width, positive softens away from the cone. An area of diminishing intensity rimming the edge of the cone of light. The intensity of the light falls off linearly between the cone angle and cone angle + penumbra angle. Negative numbers will create a softening effect inwards from the edge of the cone of influence.
- drop off: is how much light is delayed along the distance of the cone, similar to decay except that its function is to cause the light to diminish in intensity perpendicular to the light axis instead of along the light axis. Cosine raised to the power of dropoff (where Cos is the dot product of the light axis and the lighting direction vector).
- illuminates: by default is related to light linking of specific objects, usually keep checked
- emit diffuse and emit specular: not for ambient light, ability to cast diffuse lighting or specular highlights on an object which can create special effects such as turning off to reduce shininess and reduce glare
- illuminates by default: the light will not illuminate all objects, look at light linking to illuminate specific objects
- decay rate: how light diminishes with distance, adjust intensity level exponentially, the rate at which the intensity falls off with distance. Linear intensity decreases in direction proportion to distance (l = 1/d). Quadratic is how light decays in real lift (l = 1/d*d). Cubic decays faster than real life (l = 1/d*d).
- decay regions: allows regions to be lit or non-lit within the same cone of light
- intensity curve: controls the exact intensity of a light at a given distance from the light source, in the graph editor vertical and horizontal axes represent intensity and distance
- colour curve: control the red, green and blue values of the light over distance, to take out any colour component set the intensity value to 0.0
LIGHT LINKING a new light source illuminates all surfaces in the scene by default, linked lights light (or group of lights) to illuminates a specific surface (or group of surfaces) or object (or group of objects).
INTENSITY CURVE of the Spot Light. An intensity curve or an expression can be used to control decay. You can also create a custom brightness decay rate using an intensity curve. You can edit curves in the Expression or Graph editors.
9 steps to achieving stunning interior lighting in V-Ray for 3ds Max
FOUNDRY
- Foundry Live: Look Development and Lighting Meet-Up
- Katana Lighting and Rendering Masterclass
- Taking on sequence lighting and B*Bots with Foundry’s Katana
- Foundry’s Look Dev and Lighting Update Oct 2022
 Lighting the way: these top artists share their approach to illumination
Lighting designers share their perspectives on their craft. Great lighting design has the power to grab the eye, weave emotion throughout a scene and build atmospheric tension that sparks viewers’ imaginations. Using proper lighting design to tell a story with your work is essential in VFX, animation and design. For many projects, lighting is everything, which is why it’s worth seeking out great examples of how top artists are putting it to best use.
Hunting for inspiration for your next project? Here’s a look at the unique visual treatments of three artists from our community and how they approach lighting in their work.
Dr Karl from great moments in science – Why the sky is blue?
Subsurface Scattering Shaders and Tools
Subsurface scattering explained
Dystopic Factory – Personal Project
Ashes of the Moon at a Dark street
When Light Tells a Story: Creating the Atmosphere of S.O.U.R.C.E
The Art of 3D Lighting: Conveying Emotions Through Artistic Direction
Understanding Gobo Lighting Techniques
Lighting a Stylised Animated Shot With Iconic Characters
Lighting: A Peek into the Look Development Process for a Short Film
JEREMY BIRN Dec 17, 2013 Top Ten Tips for More Convincing Lighting and Rendering
Creating Compelling Storytelling Through Lighting
The Making of ‘Studio Lighting’ by Amir Nabavi
10 key tips for lighting and look development
CommonPoint – Lesson 12 – Overcast I Relighting, HDRI
Mastering artistic lighting by 3dtotal staff
Video lighting tips and tricks for your next at-home shoot
Lighting Tutorials and the Book by Gleb Alexandrov
Lighting: A Peek into the Look Development Process for a Short Film
5 lighting tips for photorealistic renders
SHINING A LIGHT ON ‘WHAT WE DO IN THE SHADOWS’
How to optimize your home lighting design based on color temperature
ARNOLD GALLARDO: 3D Lighting, Concepts and Techniques
LIGHT AND RENDER DAY AND NIGHT SCENES IN V-RAY FOR CINEMA 4D
HOW TO LIGHT AND RENDER INTERIORS WITH V-RAY FOR CINEMA 4D
Gleb Alexandrov
Volumetrics III – Procedural Maps 3D exterior lighting
COLOUR MANAGEMENT
COLOUR SPACE notes from Lanier, L., 2011. Maya studio projects. Texturing and lighting. Sybex, Indianapolis, Ind. pp 112 – 115.
Gamut: all the colours a device can produce
Colour Space: gamut that utilises a particular model
Colour Model: establishes primary colours, cominationsof which form all other visible colours e.g. RYB, RGB.
Monitor: brightness, contrast, gamma correction, colour temperature
Gamma Correction: applies a specific curve to neutralise a monitor’s non linear voltage-to-brightness relationship. If gamma correction is not applied, displayed images receive additional contrast through their mid tomes, lose details in shadows and dark areas. The result is inaccurate and usually unaesthetic.
Colour Temperature: colour of light measured in Kelvin, determines the white point of the hardware
White Point: is a coordinate in colour space that defines what is ‘white’
LUT: is an array used to remap a range of input values, the systems graphic cars is able to extract gamma correction curves from LUTs
Chip Chart: is either a grey scale rectangles lined up in a row or a continuous grey scale gradient.
The Image displayed is loaded into a frame buffer (portion of RAM storage), each pixel is remapped through the LUTs before its value is sent to the monitor. The original pixel values are temporarily changed and the original file remains unchanged.
The colour space of various output devices are different.
[DLF] Maya 2017:
Maya’s color management isn’t new. Same as 2016 yeah?
Maya exports linear by default. exr, if not set it to exr, 16 bit (half) is usually fine. Nuke AE will auto srgb them. In AE you have just to manually match bit depth. It displays all images and the viewport to srgb automatically. Does the conversion for you for the display.
Recreating real-world color: the promise of Hybrid Log Gamma. There’s lots of excitement around the potential of immersive volumetric content to transform viewing experiences. In the past, we’ve pointed to the enterprise applications of VR, as well as some of the amazing progress being made in the development of AR and MR devices. But, despite this progress, immersive content has yet to fully enter people’s homes and become a staple of mainstream consumption. To reach that stage, immersive content will have to be – at a minimum – as good as what’s already captured by traditional devices. Advancements in both capture and display tech are needed, because the central conceit of immersive content is how closely it mimics our real-life perceptions.
RENDERING
The surface properties, lighting, shadows, movement and shape of objects are calculated by the computer and saved as a sequence of images. Plug-in Manager under Settings/Preferences Window.
- Maya Software: raytracing, reflections, refractions, shadows, motion blur, transparency, batch render
- Maya Hardware or Hardware 2.0: faster render times, lacking some of the features, shadows, specular highlights, bump maps, reflections, motion blur, particles
- Mental Ray: raytracing, reflections, refractions, physical sun and sky, photon maps, caustics, global illumination, final gather, batch render
- Maya Vector: has an illustrated or cartoon look with black outlines over flat-colour passes, outputs as Adobe Illustrator files
- Arnold
- V-Ray
- Vector Render: cartoon style images and animation, vector content for a web site
- Maxwell
- Renderman
BITMAP IMAGES
File Size of an Image, can carry the necessary information to display photorealistic content being largely used to display photographs, textures or computer generated images. Scaling has an impact on the image quality with large quality bitmaps requiring a lot of memory:
- Resolution, the number of pixels in the X and Y directions
- Bits per pixel defines how much information can be stored per pixel
32 bit with 24 bits for the colour information (red, green, blue) and 8 bits for the alpha channel. 24 bits of colour information per pixel = 2 to the exponent 24 = 16,777,216 colours. The alpha channel contains an additional 8 bits used for compositing.
VECTOR IMAGES
Described by two colour properties with a mathematical description for the shape and colour making the quality independent of the resolution. Generally used for print publishing, web formats, small file size and scalable, handles curves and closed shapes that can be filled with solid colours and colour ramps:
- Outline
- Fill
Some vector formats:
- Macromedia Flash .swf
- Swift 3D Importer .swift
- encapsulated postscript .eps
- Adobe Illustrator .ai
- SVG scalable vector graphics .svg
RENDER SETTINGS
- File Name – file name, frame number, extension
- Image Format (TIFF, Targa, IFF, OpenEXR)
- Frame Padding – inserting leading zeros in the frame number for numerical order
- Frame Range
- Renderable Camera
- Alpha Channel (Mask), White is opaque
- Depth Channel, distance of an object from the camera, Z Depth
- Image Size
- Resolution, width and height set the pixel size
- Quality Settings
- Raytracing Settings
- Sampling Mode is the number of times the renderer reads and compares the colour values of adjacent pixels in order to smooth the resulting render to avoid jagged lines
- Min and Max Sample Levels sets the number of times the renderer samples a pixel to determine how best to anti-alias the result, is dependent on the Colour and Alpha Contrast Thresholds.
- Anti-alias is the effect produced when pixels appear to blur together to soften a jagged edge on an angled line, a visual stair-stepping of edges that occurs in an image when the resolution is too low. Anti-aliasing is the smoothing of jagged edges in digital images by averaging the colors of the pixels at a boundary.
- Anti-aliasing Contrast values determine when the renderer turns up the number of samples in a particular region of the frame, between neighbouring pixels when below the threshold value the sample rate is higher. Lower thresholds force the renderer to sample difficult areas closer to or at the max value.
- Multi-Pixel Filtering Handle when the Max Sample Level attribute is set to a value higher than 9 filtering is done on the results of the sampling of pixels to blend the pixels of a region together to form a coherent image, Box, Gauss, Mitchell, Triangle, Lanczos
- Sample Options Heading turning on the Sample Lock and Jitter attributes reduces noise and artefacts in rendered sequences with lots of movement.
- Motion Blur
- Passes, separating different elements of a scene into separate renders
- Ambient Occlusion, adds depth and reality reducing the amount of light when two objects or surfaces are close to each other improving contact shadows and improving definition in surface creases and corners
- Lighting Settings and Options
- Features
SOFTWARE RENDER
3D Motion Blur, Reflections, Refractions, Shadows.
HARDWARE RENDER
Limitations including shadows, reflections and glow. Particles can be rendered for their position, matte and alpha information with colour, shadows, reflections , environment lighting being added at the compositing stage.
MENTAL RAY
- Caustics is the scattering of light reflections off and through semitransparent objects simulating the way light reflects and refracts through objects and surfaces, concentrating onto a small area. Surface caustics only show up on objects surfaces, while volume caustics are visible as they pass through 3D space.
- Global Illumination is the effect of light reflected from one object to another simulating real world lighting by reflecting light off surfaces to illuminate other surfaces. Photon Mapping where photons bounce around many times.
- Final Gather relies on direct and indirect light, diffuse reflections of light, tracing light as it reflects off surfaces to illuminate the scene taking into account colour bleed of light from one surface to another. Illuminating the scene from lights as well as objects taking including the brightness of objects. Every object in a scene is, in effect, a light source. A ray contacts a surface to determine if there is a diffuse light contribution to the emitting surface points colour value calculating from the first surface. Helpful in rendering very diffuse scenes where indirect illumination changes slowly, elimination of low frequency noise, for finer detailed resolutions, combined with GI more physically accurate is possible, convincing soft shadows, helps to eliminate dark corners. Contributes to creating photorealistic images.
- Depth Map Shadows represents the distance from a specific light to the surfaces the light illuminates
- Ray Trace Shadows tracing paths of light from the camera and simulating the effects, reflections, refractions and shadows. The lower of the limits will determine the limit for each surface. Recursion Depth, Subdivision Power
- Image-Based lighting uses an image to illuminate a scene, typically a High Dynamic Range Image HDRI
- Physical Sun and Sky simulates open-air sunlight, adjust Reflectivity, Multiplier, Direction (rotation affecting the time of day) and the default turns on Final Gather
- Light Fog light fog attribute on the light attribute, Depth Map Shadows
- Lens Flare and Lens Glow lens flare and light glow attribute, consider putting the glow on the shader
- Optical FX Attributes
DIFFERENCE BETWEEN SCANLINE and RAYTRACING RENDERING
A scanline renderer calculates shadow information using pre-computed depth maps. These shadow depth maps describe whether a given point is in shadow.
The raytracing algorithm sends rays into the scene from the position of the render camera. The rays with either hit an object or go through an empty space. If a ray hits an object, the corresponding material shader is referenced or called. If the material shader is reflective or refractive, secondary rays will subsequently be sent into the scene. These secondary rays are used to calculate reflections and refractions.
REFLECTIVITY, TOTAL INTERNAL REFLECTIONS, REFLECTION SPECULARITY
Depends on the angle the object is viewed with reflections more pronounced from an angle.
REFRACTIONS
Refraction Index is the ratio of teh speed at which light is travelling in the object versus in a vacuum. When it is 1.0 there is no distortion or bending.
LIGHT ABSORBANCE
Transparent materials usually absorb an amount of light that passes through them, the thicker the material the less light gets through.
IRRADIANCE
The total incoming illumination, the amount of light that is incident upon a surface.
INCANDESCENCE
Is the emission of electromagnetic radiation (including visible light) from a hot body as a result of its high temperature.
SURFACE THICKNESS
Consider when the surfaces are not visible.
SHADERS
A computer program that calculates the appropriate levels of light, darkness, and colour during the rendering of a 3D scene allowing for various kinds of rendering effect to rendering output. Shaders apply a renderable colour, surface bump, transparency, reflection, shine or similar attribute to an object.
MENTAL RAY BASE SHADER LIBRARY
CONTOUR SHADERS
PHENOMENON
CAMERA
Cinematography describes the process of making decisions about factors that communicate a meaning in your 3d animation/ film. The camera angle, action and direction, lens type, camera motion, and lighting all affect the meaning of your work.
Focal Length of 24 places a 24mm lens on the camera
Depth of Field adds blur to the render for the areas of the image that may be out of the lens’s focal depth. The F Stop setting sets how much is in focus around the focal distance, higher value the focus runs deeper than a low F Stop value.
Render Time Calculator – Simon Reeves
Render Calculator – JokerMartini
What Is PBR (Physically-Based Rendering)? A complete guide
What is the Best External Render Engine of 2024: A Comprehensive Overview
Subsurface Scattering Shaders and Tools
How To Optimize Your Project For Online Cloud Rendering
Nuno Silva – Realistic Car Animation That Works With Every Renderer
Learn Corona Renderer – Corona Tile Map
RenderRam – Brain hacks for viewing images differently
MEL COMMANDS FOR SETTING RENDER GLOBAL VALUES?
Writing OSL Shaders 2: Data Types and Globals
SHPERE VFX
RefractiveIndex.INFO – Refractive index database
Renderman vs. Vray vs. Arnold
Octane vs Arnold vs Physical – What Renderer is Right for You?
Rendering with Pablo
UV LAYOUT
3delight
AUTOMATE MULTIPLE CAMERA RENDERING?
How to build your best rendering machine ever
INNOBRIGHTTechnologies has released Altus 1.5, the latest update to its standalone tool for denoising images generated in a range of common renderers, including Arnold, Redshift and Maxwell Render.
GTA V: Graphics Study Nov 2 2015 – Adrian Courrèges
LEE GRIGGS
Luxpop 3D Print Files for lab and workshop. Index of Refraction, Thin film, Optomechanics for all.
Rooster Teeth Tutorial #7: Environment Lighting
CYLINDRICAL IMAGES
In order to render three-dimensional virtual scenes more realistically, One often needs to draw images of objects which are reflected by the cylindrical surface mirror. Doing so, we first define the cylindrical image model as the set of image points, in which each element is the image of vertex in original model, reflected by the cylindrical surface mirror, also with the same connectivity as the original model. We determine the reflective point for corresponding vertex by the ray tracing method, which is the key step for generating the image model. In order to accelerate the generation and rendering processes, we conduct visibility test, computing only the part of image model visible for current viewpoint. We also provide the experimental results that validate the algorithm and show timing statistics of the algorthm.
RENDERING A 3-MINUTE ANIMATED MUSIC VIDEO FOR RON ARTIS II In My Heart
How Pedro Conti and Fernando Peque rendered a 3D short for Ron Artis II using V-Ray. Go behind the scenes and learn about their first experience with Phoenix FD.
Star Citizen Gas Station made with Unreal Engine
We asked Julian Rabe, a 22 year old from Germany, to share with us how he created an environment for games, in Unreal Engine. With a passion for drawing and playing video games, Julian got into the world of 3D by way of a Maya modeling class at university at the end of 2017. He then started learning more and more about 3D modeling on his own, but his training was lacking in structure. After searching for a course in 3D Computer Graphics, Julian found himself at Think Tank, graduating in 2019. This is a breakdown of his project he created during the Mentorship Term.
Instant Meshes algorithm – an interview with Dr. Wenzel Jakob
Foundry Trends recently caught up with Wenzel Jakob, creator of the Mitsuba renderer, for a deep dive into the powerful auto-retopology Instant Meshes algorithm he co-developed. An assistant professor leading the Realistic Graphics Lab at EPFL in Lausanne, Switzerland, Wenzel’s research revolves around rendering, appearance modeling, and geometry processing. Here’s what he had to say.
Path Tracing 3D Fractals
In some ways path tracing is one of the simplest and most intuitive ways to do ray tracing. Imagine you want to simulate how the photons from one or more light sources bounce around a scene before reaching a camera. Each time a photon hits a surface, we choose a new randomly reflected direction and continue, adjusting the intensity according to how likely the chosen reflection is. Though this approach works, only a very tiny fraction of paths would terminate at the camera.
REAL TIME GRAPHICS
Could you introduce yourself? I’m Matt Swoboda, the founder and director of Notch, a visual creation tool that works entirely in real-time. Notch technology powers visuals for acts from U2 to Beyoncé and Ed Sheeran, Eurovision, The Brits and numerous music festivals worldwide. Notch is a solution for artists and producers working in live events, interactive installations, mixed reality production, virtual reality, and motion graphics. Real-time isn’t just about pumping out frames faster, it changes the creative process completely. If a creative can see the full and final result of a render in real-time it changes the way they think when creating content. The iteration cycle moves to zero.
What is 3D rendering — a guide to 3D visualization
3D imagery has the power to bring cinematic visions to life and help accurately plan tomorrow’s cityscapes. Here, 3D expert Ricardo Ortiz explains how it works.
Since its breakthrough work on Toy Story more than 22 years ago, Disney’s Pixar has been a mainstay and leading light in the world of CGI. Producing blockbuster after blockbuster, the California-based studio has consistently redefined and pushed the boundaries of computer animation.
One such success was Coco, Pixar’s 2017 tale of a boy’s journey into the fictional Land of the Dead. It won the Academy Award for Best Animated Feature, and Best Animated Film at the BAFTAs.
Comparison of Depth Map versus Raytraced Shadows in both Maya and Mental Ray Renderers
This series of renders walks through a variety of parameters for casting shadows. It gives example of settings and what they accomplished. Remember that you can load (“Open”) images within the Render View Window and this would allow you to flip back and forth between different tests. This ability makes it much more easier to evaluate setting changes than in this linear catalog of images.
HOW TO CREATE HIGH QUALITY ARCHITECTURAL RENDERS Most of the images you see online look like perfectly styled apartments by interior designers and this is not how most people actually live. I always try to make my images look like someone is living there, but this time I wanted to take it a step further and style an apartment, as I would do it or like someone who doesn’t know a lot about interior design, but who still has some “style”. I aimed for objects that most people could afford and this is where Ikea comes in! The furniture is good looking and most importantly, it is cheap so it fitted perfectly into my project.
 Winning the render wars with Chad Ashley
For this discussion, we’ll be chatting with Greyscalegorilla’s very own render guru and former Digital Kitchen Creative Director, Chad Ashley. We’ll take a look at Arnold, Octane, Redshift, Cycles, Physical Render and break them down in terms of their Speed of convergence(ability to turn around a render), image quality and production features/scalability and also who we think they are best suited for.
Lexicon KeyShot
KeyShot is everything you need to create fast, accurate and amazing visuals. Featuring a real-time workflow to see your renderings and animations take shape instantly, KeyShot reduces the time it takes to create that perfect shot. From scientifically accurate material and environment presets to advanced material editing and animation, creating product visuals or sales and marketing imagery has never been easier.
Dirty Glass: Rendering Contamination on Transparent SurfacesMAXDPETH is the creative blog of Emmy Award winning CG Supervisor and 3D Generalist Timothy Hanson. In addition to having over 12+ years of production experience working for companies like Bad Robot, MPC, The Mill. Mirada, Method Studios, and Google to name a few, he is also a training provider for Chaos Group (creators of Vray), Solid Angle (creators of Arnold), and The Foundry (creators of Mari and Nuke).
 HOW REAL-TIME RENDERING IS CHANGING THE DESIGN LANDSCAPE
Design is evolving, and there’s never been a more exciting time for tapping into the creative possibilities driven by the rapid change of technology. As real-time engines continue paving the way for a new age of experience, designers are gaining greater flexibility and control over their visualizations for architectural, engineering, automotive, and product design. Designing at the speed of thought is no longer a pipedream for today’s digital artists, now that powerful new tools like Unreal Studio are breaking down the barriers keeping data imprisoned in proprietary CAD tools.
V-RAY WINS ACADEMY AWARD
Vector-based or 3D software uses mathematical algorithms and geometric functions and rendering is the process of calculating this information, converting into raster images, to produce a 2D picture. The rendered picture is made up of pixels that create the image or movie file. The lights, shadows, colours, movement, placement of textures and other information in the virtual scene is calculated in the rendering process to produce and display the sequence. In other words rendering is the process of generating pixels from a 3D project.
We view objects based on how light bounces off an object, this light that bounces is know as photons. Photons can bounce of many different things before we see them. We get the perception of colour for the different wavelengths of light created as the photos bounce around. To recreate all of this 3D software uses render engines that use light rays or rays which are emitted from objects in a scene. When the rays from the camera and light bounces off the object we see the object, the area that is lit.
Colour Management allows the switch between sRGB and liner colour space and many other common colour space environments.
Shaders are materials, that are applied to objects in order to give them a specific visual quality such as colour, transparence, reflection or texture. It determines how a surface appears as well as how it reacts to virtual lights.
RENDERERS
BACK BURNER
Autodesk Backburner is a free software application packaged with 3DS Max, Flame, Maya and a range of other Autodesk products. … In setups with multiple networked machines, Backburner lets you render images more quickly and efficiently by breaking the job into smaller parts.
CHAOS GROUP | V-RAY
Chaos develops technology for architecture, engineering, construction, product design, manufacturing, and media and entertainment.
With our research and development, we are revolutionizing the creative process with our integrated end-to-end ecosystem. By streamlining and accelerating workflows, we empower our customers to enhance creativity and drive innovation.
In 2022 Chaos merged with Enscape and acquired Cylindo. In 2023 Chaos acquired AXYZ design. In 2025 Chaos acquired EvolveLAB.
Headquartered in Karlsruhe, Germany, Chaos has offices in 11 cities worldwide.
V-Ray 3.0 for 3ds Max is a comprehensive physically-based lighting, shading, and rendering toolkit, built to meet the creative demands of CG artists and designers.
Subsurface Scattering Shaders and Tools
How to use Gaussian Splats in V-Ray for SketchUp
Beyond polygons: How Gaussian Splatting transforms 3D rendering
Chaos’ New Short Has an Answer for Hollywood VFX Problems
5 Artistic Principles of Photorealistic Rendering
9 tips on how to add realism to any exterior architectural project
10 steps to a hardwood floor that dazzles in V-Ray for 3ds Max
Top 10 tips for creating wow-factor interior design renderings
Top 10 reasons to choose V-Ray for architectural visualization
11 helpful tricks to optimize your workflow in V-Ray 5 for Rhino
How to build your best rendering machine ever
How real-time ray tracing with Chaos Vantage through Unreal can revolutionize virtual production
Chaos Group is evolving. Join CEO Peter Mitev to discover the new technology and services that will help you create your world.
The technology behind photoreal real-time rendering
24 Hours of Chaos — on YouTube
HOW V-RAY FOR 3DS MAX BROUGHT DEADWOOD’S VFX TO LIFE
ANDRE CANTAREL — SENIOR VFX GENERALIST, SCANLINE VFX
ONDŘEJ KARLÍK & JAROSLAV KŘIVÁNEK — CORONA & CAUSTICS
VIDEO TUTORIALS CREATED BY OUR COMMUNITY V-Ray for Sketchup
Professional Rendering for Artists & Designers
VRay Mtl stands for Vray Material – Joel Stutz Visual Center
 CREATING STUNNING ANIMATIONS AND VISUALS WITH GPU RENDERING
V-Ray GPU is developed with NVIDIA CUDA, delivering physically based final frame qualities and highly interactive rendering to support the real-time creative process. It is always scalable to increase speed—within the workstation, across the network, and to GPU clusters or cloud services—so it can go as fast as your project requires
PODCAST
- TOOLS — ART AND TECHNOLOGY PANEL AT THU
- MARTINI GIANT — 2001: A SPACE ODYSSEY & 2010: THE YEAR WE MAKE CONTACT
- KELLY PORT & MATTHEW BUTLER — DIGITAL DOMAIN
- ROBIN COWIE & TONY STANLEY — EA
- LAUREN MAYER-BEUG — CREATIVE DIRECTOR, CHAPEAU STUDIOS
- ALEXANDER SOKLEV — V-RAY GPU TEAM LEAD, CHAOS GROUP
- ANDREW PRICE — FOUNDER, BLENDER GURU/POLIIGON
- V-RAY 5 WITH CHAOS GROUP’S ALEX YOLOV AND PETER MATANOV
- JEFF MOTTLE — CEO AND FOUNDER, CGARCHITECT
- ASUKA TOHDA-KINNEY — CG SUPERVISOR, DIGITAL DOMAIN
- GARY YOST — 3DS MAX DEVELOPMENT TEAM LEADER & WISDOMVR PROJECT FOUNDER
- MIKE CAMPAU — DIGITAL ARTIST
- BILALI MACK — VISUAL EFFECTS SUPERVISOR, ALKEMY X
- KIRSTEN ZIRNGIBL — CONCEPT ARTIST, ILLUSTRATOR & GAME DEVELOPER
- Ari Rubenstein — VFX Supervision & Look Development
- Richard Pay, Uniform & Melissa Knight, Chaos — Rebranding Chaos
- Sophia “PHIA” Bollinger — The Virtual Reality Show
- Chris Harvey — VFX Supervisor
WEBINARS
NVIDIA GPU RENDERING WEBINAR SERIES: DABARTI STUDIO: GPU RENDERING IN PRODUCTION WITH V-RAY
Thinking about switching from CPU to GPU rendering? Hear Tomasz Wyszolmirski explain how Chaos Group’s V-Ray GPU and NVIDIA have transformed his studio’s workflows while lowering costs.
V-RAY DOWN UNDER TOUR 2017 – notes from this presentation, version 3.5.
Chaos Group will present a packed schedule of presentations, covering V-Ray in architecture, design, construction, and media and entertainment. Join us to find out how to create incredible imagery quickly and easily, and to see how professionals use V-Ray.
V-Ray 3.0 for 3ds Max webinar – Australia – Link
A set of video tutorials to get started with V-Ray 3.0 and more information about new features and improvements are available on www.v-ray.com – the new home of the V-Ray community.
DENOISER
Visual noise, noise in shadow, uneven pattern of noise. Linear threshold to noise relationship is better for compositing because you get equal noise in the dark and light. Exposure, noise consistency is better.
Placement of sampling, more evenly and easier for denoising. Denoise at the moment of creation or after processing. Lower the threshold twice get twice the less noise.
Denoiser works first by looking at the world normals. The noise levers are a black and white map and as we render the image V-Ray knows what level of noise has been reached for each pixel and stored in the black and white map which is going to be used later on as a mask. White is a high level, blur more here and black low levers of noise, easy to render, no soft shadows and GI. Sampling control and GI control.
Extract some information for better denoising process and use to denoise more intelligently, works with both samplers, progressive & bucket and CPU & GPU which is hardware accelerated.
Render at lower quality, then recover the information and use denoiser as progressive render works. Increase the quality without rerendering.
DENOISER options, ‘only generate render elements’ option. When rendering a sequence of frames, with stand alone took it denoiser between frames when dealing with animation.
Utilise the GPU to denoise, working much faster. As the rendering goes on, the denoiser will update every now and then. As the progressive render goes on, can see the result in real time.
Hardware Accelerated – on is quicker rendering and will take the resources from the graphic card
Noise Threshold in Render Settings
Colour Threshold – when adjusted the render time is predictable
Frequency 10
Green – less time for denoising
Workflow:
V-Ray continues to render and constantly see the denoise version. Initiate the render and keep an eye on the denoiser result. At the moment you like the denoised version, and there is no detail lost and only recovering the information, stop the render and in the output window look at the max sample level reached or final nose threshold, right before the render was stopped. Take the value, put in V-Ray and rerender using the bucket renderer for the final result. Make sure to get the same result after denoising. Will aid in finding the threshold for the desired quality.
Alternative way to work, start with denoiser preset and high threshold, find something that is in GI, in focus and render with a large threshold. Draw render regions in different areas such as in focus, out of focus, in shadow, bur, reflections and render quick versions and check out the noise and look at the denoiser with different settings with the threshold. Compare the different versions and start to see where the denoiser starts to lose detail then adjust in the presets with adjusting the denoiser lower by two times, each time where there is no noise. This will render the fastest to this chosen quality.
Maya & 3D Max (tools) in different folders. Default will use the graphics card, input = (sequence of frames) and will denoise. Better for denoising animated sequences, when use the one on the interface only have a single frame and V-Ray does not know that there might be a frame before and/or after and use an external tool for that.
Use the stand alone denoiser because there is a sequence of frames, if run from within the frame buffer it does not know there is a frame before and a frame after and will only denoise each frame separately. This can result in some artefacts due to some flickering, consider the frames around the current frame to smooth out all the noise.
Feed it with a sequence of frames and can take frames before and after, depending on what is set to do. Use there frames for analysing the data of the noise, will not simply blur between the frames, even though there is hand held shakiness there is no motion blur from that.
VR MATERIAL SCANNER reduces the gap between photorealistic materials and authored materials. With textures you can get to 80% quickly and then takes a lot of time to fine tune. VR material scanner, take a piece of a physical material and provides a digital replica of the material and will make the look consistent. Adjust the material, adjust the lighting and the material scanner will remove the step giving the real material and how it is in reality and then need to work on lighting and correct exposure. Option to change the paint of the material without affecting the reflections. Reflects the different properties of the materials.
GPU update & CPU, general GPU OPTIMIZATION
Aerial Perspective, Clipper – single plane on the GPU, Shadow Catcher, Directional Light Support,
ON DEMAND MIP MAPPING When have large textures, will optimise them, how much memory are they taking up? 1.2GB down to 10 MB. Creates smaller versions of the textures, done automatically. In the GPU settings have the option for ondemand mip map textures and enable from here.
Rendering with GPU, small amount of memory, to render on the graphic cards need to load all the assets into the memory, optimisation is vital. The out of core optimisation, if the texture is too large the render can start putting textures into the computer memory and it is much slower and the rendering speed slows down.
Knows what is close and further away from the camera, based on distance, creates mip map levels for the maps for the textures for this point of view. Will detect a black and white image, when grey scale not selected will only take one of the RGB channels. Alpha channel, if solid colour will not store alpha for every pixel and will strip away the alpha channel.
ADAPTIVE LIGHTS If you need to render lots of lights, the more lights the better the difference in render time. Global settings > advanced/expert mode > adaptive lights. V-Ray finds out which lights contribute more to the current rendered area and samples only these lights.
Takes into consideration lots of lights and reduces render times about 5 times faster. Understands which 8 lights (can be changed in settings) are most important for this pixel that is being rendered.
GLOSSY FRESNEL
Everything has Fresnel Have to put Fresnel on every reflective surface.
Particular for metals and some kinds of plastics, illumination relies on reflections does not take into consideration the roughness of the surface. Keeps the energy conservation more accurate.
Not only from the viewing direction of the camera, also from the point of view of the light, the angle of the light shines on the object and the angle of the light on the surface for glancing angle. For rough reflections it dulls the surface and on the glazing angles.
Reflections are important and a small amount of light back into the scene. Important when considering energy conservation, when we have some roughness on the surface we are losing some reflection, does not make any difference when the surface is perfectly glossy. When we start taking away some glossiness is does not reflect all the light back in one direction and this setting accounts for this.
The MDL Material library. The VRayMDLMtl material loads NVIDIA Material Definition Language files (.mdl) and renders them directly with V-Ray.
CONNECTION to VR DEVICES and IMPROVEMENTS
RESUMABLE RENDERING progressive and bucket rendering, animation. Tick box under Global Settings. Specify the V-Ray image file format if using progressive rendering and EXR for bucket rendering.
INTERACTIVE RENDER or Production Render
Will the Render be Progressive or Bucket
Render on GPU or CPU
PHOENIX FD – Fluid Dynamics 3.0
https://www.chaosgroup.com/phoenix-fd/maya
Flip solver, quick presets, faster rendering for volumes, improved fire and smoke solver, viewport preview.
Wet and dry map, foam, splashes, removed grid artefacts, better for thin layers of liquids, presets from the tool bar, new forces such as spline attraction, body force can get from one type of emission to another and better preview in the viewport that interacts with scene lighting giving better shading.
Presentation by DMITRIY TEN
https://www.chaosgroup.com/gallery/profile/dmitriy-ten
Workflow:
- Good Reference & Good eye for small detail, is most critical for photorealistic images, is 90% good final result. The interior of a spacecraft.
- On the Maritime Museum project took over 1,000 shots for reference for the modelling and texturing remembering to focus on the imperfections.
- Break down to smaller and smaller pieces until you get simple shapes and some are very repeatable.
- Started modelling, looking at positions and block out, deciding on which shapes and angles look better and what you are going to do. Use simple geometry making sure to replicate the main shapes.
- Use different cameras, settings and lenses. Look at as many renders as possible to see different possibilities, what looks better for that image.
- Consider everyone using the same software.
- Create a library of materials, with everyone using from this library.
- While modelling started combining the parts into one big piece.
- Start lighting, learn about real life, how they work in real life then understand better in 3D. Had the Sun, lights for the Lamps, lights for the Tunnels so light there.
- Always a way to improve render, reflection, specular, lighting passes for compositing.
- Colour grading and using photoshop.
Used V-Ray, did not have another solution for proper translucency, speaking about GPU not using CPU anymore.
Getting high quality and photo real renders. Used VR Scans in GPU mode, attempting to replicate them. Custom shaders, referencing VR Scans with custom built texturing. 16K texture to apply the imperfections.
How do things work in real life? VRscans provide very precise results and different lighting set up in different conditions to get an idea. The biggest problem with photo reference has baked lighting into the pixels and cannot see from different angles, the reflections how they appear from different angles. In production need the flexibility to change things in post, such as reflections, lighting pass and other stuff and is critical to have them for making adjustments in post.
V-Ray 3.6 for SketchUp – Webinar
CORONA
Corona Renderer is a new high-performance (un)biased photorealistic renderer, available for Autodesk 3ds Max and as a standalone CLI application, and in development for Maxon Cinema 4D.
The development of Corona Renderer started back in 2009 as a solo student project of Ondřej Karlík at Czech Technical University in Prague. Corona has since evolved to a full-time commercial project, after Ondřej established a company together with the former CG artist Adam Hotový, and Jaroslav Křivánek, associate professor and researcher at Charles University in Prague.
Despite its young age, Corona Renderer has become a production-ready renderer capable of creating high-quality results. It has been already downloaded over 80 000 times.
Proudly CPU Based
Corona Renderer does not need any special hardware to run. It uses the CPU and you can run it on any processor from Intel or AMD released in the past decade. Why Only CPU? By rendering only on the CPU we avoid all bottlenecks, problems, and limitations of GPU rendering, which include the unsuitability of GPU architectures for full GI, limited memory, limited support for third party plugins and maps, unpredictability, the need for specialist knowledge or hardware to add nodes, high cost, high heat and noise, and limited availability of render farms. Read our in-depth look at the advantages of CPU-based rendering.
DEADLINE
The center of your pipeline AWS Thinkbox Deadline is a hassle-free hybrid administration and compute management toolkit for Windows, Linux, and mac OS based render farms, supporting more than 80 different content creation applications out of the box. Deadline provides flexibility and a wide range of compute management options, giving you the freedom to easily access any combination of on-premises or cloud-based resources for your rendering, render management and processing needs.
DISNEY, WALT
HYPERION
Disney’s Hyperion Renderer. A renderer is the software that takes all of the models, animations, textures as well as lights and other scene objects and produces the final image that make up an animated movie by calculating how the light bounces around a virtual scene and shades the objects. Hyperion is our in-house renderer and is a physically-based path tracer.
ISOTROPIC
Isotropix has released Clarisse 3.6, the latest version of its 2D/3D rendering system, adding support for outline rendering, a shadow catcher for live-action compositing, and a new shading variable system. The update also makes it possible to remove the watermark from the free non-commercial PLE edition. New outline shader for non-photorealistic output, shadow catcher for realistic work.
New Watermark free PLE
NPR Using the Outline Shader
MARMOSET VIEWER
MAXWELL
Maxwell Render is an unbiased 3D render engine, developed by Next Limit Technologies in Madrid, Spain. This stand-alone software is used in the film, animation, and VFX industry, as well as architectural and product design visualisation. It offers various plug-ins for 3D/CAD and post production applications.
MERCENARIES ENGINEERING Guerilla 2.0
Rendered in Guerilla: a still from French animated feature Mune. The new version of the software, Guerilla 2.0, updates the core path tracing engine used in both the renderer and look dev tool Guerilla Station.
Mercenaries Engineering has released Guerilla 2.0: the latest version of its suite of production tools for lighting, look development, scene assembly and rendering. The update overhauls Guerilla’s core path tracing engine, improving performance on complex scenes, and adds support for interactive rendering and light path expressions.
MITSUBA
Mitsuba is a research-oriented rendering system in the style of PBRT, from which it derives much inspiration. It is written in portable C++, implements unbiased as well as biased techniques, and contains heavy optimizations targeted towards current CPU architectures. Mitsuba is extremely modular: it consists of a small set of core libraries and over 100 different plugins that implement functionality ranging from materials and light sources to complete rendering algorithms.
NOTCH
Follow along with Notch product specialist Will Smith as he guides us through setting up a real-time scene in Notch, a rendering engine with a powerful WYSIWYG workflow. This tutorial will guide you through the steps of setting up a real-time scene in Notch, a rendering engine with a powerful WYSIWYG workflow. I’ll be touching on a number of different areas during the tutorial including:
● The asset
● 3D tools and applications
● Mesh optimisation – high and low poly mesh
● Baking high poly details
● Materials
● UVs
● HDRi Images
● Notch user interface
● Lighting parameters
● Importing meshes and materials
NIVIDA
NVIDIA: DISCOVER FASTER, MORE ADVANCED GPU RENDERING
GPUs are transforming rendering—and the entire design process. NVIDIA gives you more ways to enhance your creative workflow with fluid 3D visualizations for better results and immediate decision making. Explore designs with your client in the room. See actors rendered in real time as they portray a character. Even experiment with prototype materials as you accurately simulate real-world lighting conditions.
NVIDIA solutions scale to meet any demand. Instantly accelerate your rendering with NVIDIA® Quadro® GP100 and multi-GPU workstations. Connect a network of local or remote GPU servers with NVIDIA DGX-1™. Or access the cloud for the fastest final frame results possible.
Includes: ELASTIC USES GPU RENDERING WITH OCTANE FOR THE ALIENIST TITLE SEQUENCE, REDSHIFT RENDERING ACCELERATES CREATIVITY AT AIXSPONZA, DABARTI STUDIO: GPU RENDERING IN PRODUCTION WITH V-RAY
NVIDIA ANNOUNCES OMNIVERSE CLOUD TO CONNECT TENS OF MILLIONS OF DESIGNERS AND CREATORS
PHOTOREALISTIC RENDERING in REALTIME
On demand webinar Introducing NVIDIA Quadro RTX REal Time Means Real Change
NVIDIA | WOODS BAGOT TRANSFORMS VISUAL COMMUNICATIONS WITH MOST ADVANCED GPUs
Webinar, Woods Bagot Transforms Visual Communications with Most Advanced GPUs. We hope you found the information that was discussed valuable.
Quake II RTX Releasing for Free with Ray-Tracing Support
NVIDIA has announced that Quake II RTX will be available on GeForce.com as a free download on June 6. Quake II RTX is the world’s first game that is fully path-traced, a ray-tracing technique that unifies all lighting effects such as shadows, reflections, refractions and more into a single ray-tracing algorithm. The result is a stunning new look for id Software’s Quake II, one of the world’s most popular games, originally launched in 1997.
Plugin Products Transition Iray, Cinema 4D and Mental Ray. To bring AI and further GPU acceleration to graphics, NVIDIA continues to significantly focus on developing SDKs and technologies for software development partners who create professional ray tracing products. With this emphasis, NVIDIA has made product development changes around the Iray and Mental Ray plugin products.
NVIDIA IRAY for MAYA
NVIDIA® Iray® for Maya is a plug-in for Autodesk Maya® that DELIVERS EXCEPTIONAL PHYSICALLY BASED IRAY RENDERING. Scene lighting and design are extremely interactive and intuitive throughout the entire look-development process using native Maya controls. This means you can easily create or modify physically based lights and materials with material nodes integrated directly into Maya. All the materials and lights, including the NVIDIA vMaterials Library, are built with the NVIDIA Material Definition Language, so they can be shared with other MDL-compatible tools.
LESTER BANKS GETTING STARTED USING [0X1]’S IRAY FOR MAYA Consultancy posts a look at using their implementation of iRay in Maya, showing off the installation, integration and use of iRay in Maya 2014. Although iRay can Maya can be “ticked” into working together, [0x1]’s iRay is completely integrated into Maya and offers an easy setup and workflow making use of iRay’s embedded features.
NVIDIA – Mental Ray
Nvidia discontinues Mental Ray
Nvidia is stopping development of Mental Ray. As of today, 20 November 2017, it will no longer be possible to buy new subscriptions to the standalone edition of renderer or its 3ds Max and Maya plugins. No new features, but bugfixes to continue throughout 2018.Nvidia announced its intention to discontinue development of new features for Mental Ray in an email to subscribers last week.
mip_fgshooter is a mental ray production shader that allows you to shoot final gather points from multiple cameras instead of just the render camera.
 Flicker – Generally, flicker is a result of changing indirect lighting contribution computations between frames. This indirect contribution computation is based off of the perceived indirect lighting at each of the FG points. Because the location/number of FG points is camera/geometry dependent, and cameras/geometry move between frames in animation, subtle differences in the locations of the FG points causes flicker.
In general, the more stable the final gather points, the more stable the final gather, so it is best to use the stationary cameras in combination with the render camera.
Learning to use and enhance your experience with mental ray
Mental Ray Architectural and Design Visualization Shader Library – link
NVidia Mental Ray Webinar. Exciting new features! 7-Feb-2017
misss_fast_shader2_x shader setup Mental Ray Maya
OTOY – Octane Render
OctaneRender is the world’s first and fastest unbiased, spectrally correct GPU render engine, delivering quality and speed unrivaled by any production renderer on the market. OTOYis proud to advance the state of the art once again with the release of OctaneRender 4™ – available now – with groundbreaking machine learning techniques, out of core geometry support and massive 10-100x speed gains in the scene graph.
Top GPU powered projects created with OctaneRender
OTOY unveils OctaneRender 3: Massive upgrade to the world’s best GPU renderer defines the state of the art for VFX in films, games and beyond
Octane Render is the world’s first GPU based, un-biased, physically based renderer.What does that mean?
It uses the video card in your computer to render photorealistic results fast…really fast.
This allows the user to create stunning works in a fraction of the time of traditional CPU based renderers.
What is OctaneRender? is the world’s first and fastest GPU-accelerated, unbiased, physically correct renderer. What does that mean? It means that Octane uses the graphics card in your computer to render photo-realistic images super fast. With Octane’s parallel compute capabilities, you can create stunning works in a fraction of the time.
NVIDIA GPU RENDERING WEBINAR SERIES: ELASTIC USES GPU RENDERING with OCTANE for the ALIENIST TITLE SEQUENCE
Quick little overview of setting up a diamond material to look accurate in C4D Octane. Hope it helps you out!
C4D Octane Tutorial: Cleaning Up Artifacts with Ray Epsilon
Quickly Set up SSS (Subsurface Scattering) in Octane for Cinema 4D
C4D Tutorial: SSS (Subsurface Scattering) Faked in Cinema 4D
PIXAR | RENDERMAN
REYES
Render Man – free non-commercial
With the new state-of-the-art RIS framework optimized for physically-based rendering, RenderMan can deliver unmatched flexibility for any production pipeline.
Making Art with Soul | The Latest from Pixar’s RenderMan – Foundry
DNEG Spotlight – Building an Animation Pipeline with Katana & RenderMan
RENDERMAN RIS
Unlock the secrets of Pixar’s RenderMan through a series of in-depth tutorials that focus on rendering an animation in Maya with photo-realistic materials and dramatic lighting. For over 30 years, RenderMan has been used in the film industry to render movies featuring groundbreaking visual effects and animation. Now, from Rusty Hazelden, the same dedicated visual effects artist that brought you “The Art of Nurbs“, comes a brand new 5-part YouTube tutorial series: The Art of RenderMan Volume 1, which provides an introduction to Pixar’s RenderMan for Maya.
Pixar Makes Painterly CG: New Research Could Change The Look of Their Films – link
3drender.com – Three D lighting and rendering including challenges
QUBE
At PipelineFX we partner with you to improve your render pipeline. We work hard to understand your rendering workflow and requirements, and offer comprehensive products and services to dramatically improve your rendering performance. We will offer an appropriate amount of installation assistance, targeted end-user and administrative software training and consulting services as needed. Success in digital media today requires maximum efficiency and we will strive to optimize your existing infrastructure as well as planned future expansion.
RADEON PRO
Radeon™ ProRender is a powerful physically-based rendering engine that enables creative professionals to produce stunningly photorealistic images. Built on highly efficient, high-performance Radeon™ Rays technology, Radeon™ ProRender’s complete, scalable ray tracing engine uses open industry standards to harness GPU and CPU performance for swift, impressive results.
RED GIANT
In Depth Look – Red Giant Universe 2.2
“It’s rare we get to introduce technology that is entirely new! Universe is an entirely new foundation for tools. It marries the simplicity of Javascript with the power of the GPU to deliver speedy renders and pixel-perfect results. Users are going to love how quickly we offer new plugins.”
REDSHIFT
Redshift is the world’s first fully GPU-accelerated, biased renderer.
Redshift is a powerful GPU-accelerated renderer, built to meet the specific demands of contemporary high-end production rendering. Tailored to support creative individuals and studios of every size, Redshift offers a suite of powerful features and integrates with industry standard CG applications.
RENDERPAL
RenderPal V2 is a professional Render Farm Manager, dedicated to managing network rendering across small to large render farms. It offers unrivalled functionality and a wide range of features, delivering an enterprise-level solution for distributed rendering. From the artist’s workstation to the various rendering nodes, RenderPal V2 takes care of the entire rendering pipeline.
REBUS FARM
Render your 3D projects at the speed of thought on our render farm, which is a data center consisting of high-performance computers, specialized to render digital images, animations and visual effects.
RebusFarm has been the trusted cloud render farm for 3D artists and studios of all levels for 19 years. Register with us, get your free trial and experience fast, easy and reliable 3D rendering.
SIDE FX
As an independent filmmaker or indie game developer, your goal is to create professional-quality work with a small team and tight budget. Houdini Indie helps you accomplish this by making all the features of Houdini FX affordable for indies.
Mantra
Mantra GPU Rendering option
Mantra is the highly advanced renderer included with Houdini. It is a multi-paradigm renderer, implementing scanline, raytracing, and physically-based rendering. You should use the physically based rendering engine unless you have a good reason to use another engine. Mantra has deep integration with Houdini, such as highly efficient rendering of packed primitives and volumes.
Understanding mantra rendering
The following information about how Mantra works may be useful for understanding the various parameters and how they affect the renderer, performance, and quality. The Mantra render node settings let you choose a rendering engine. You should generally leave it at the default (“Raytracing”), but the following explains the settings. Mantra essentially has two operating modes: physically based raytracing and micropolygon rendering. Micropolygon rendering was a performance compromise that has largely been supplanted by raytracing in modern rendering setups. The micropolygon algorithm was designed for memory efficiency: geometry is diced and shaded once, then discarded when it is no longer needed (though it remains in memory if it is hit by a ray). Now that we have models with very high polygons counts and machines with tons of memory, raytracing/PBR is usually a more efficient method.
SMEDGE
Smedge is an open-ended distributed computing management system with extensive production history at facilities small and large. Create any rendering pipeline imaginable, with local and cloud resources, mixing Windows, Mac and Linux seamlessly.
SOLID ANGLE – Arnold
Render > Render Sequence and you have to render within Maya
What do people at Autodesk / the Arnold team think when having a look back at the “infancy” of the Arnold render?
It is very pleasant to look back and see how versatile Arnold has become after so many years. The first few weeks and months of Arnold renders were all of clay-like stock 3D models with diffuse shading under a flat sky, and maybe a directional light. It’s crazy that even “simple” renders like these were shocking to see in the day, but it was particularly hard to obtain these sorts of images from the mainstream renderers that were available at that time.
Arnold is an advanced Monte Carlo ray tracing renderer built for the demands of feature-length animation and visual effects. Originally co-developed with Sony Pictures Imageworks and now their main renderer, Arnold is used at over 300 studios worldwide including ILM, Framestore, MPC, The Mill and Digic Pictures.
Arnold was the primary renderer on dozens of films from Monster House and Cloudy with a Chance of Meatballs to Pacific Rim and Gravity. It is available as a standalone renderer on Linux, Windows and Mac OS X, with plug-ins for Maya, 3ds Max, Houdini, Cinema 4D, Katana and Softimage.
Arnold is a fast, memory efficient and scalable physically-based raytracer. Its aim is to simplify the pipeline of VFX and animation companies with a reduced set of user interface elements, and by promoting a single pass approach removing all the associated storage and management costs.
ARNOLD ANSWERS COMMUNITY This is the place for Arnold renderer users everywhere to ask and answer rendering questions, and share knowledge about using Arnold, Arnold plugins, workflows and developing tools with Arnold.
Rendering the Future: A Vision for Arnold
French CG news site 3DVF just released a video interview with Solid Angle’s Marcos Fajardo recorded at FMX 2016 in Stuttgart. The interview focuses on the origins of Arnold, its direction and the Autodesk acquisition. The interview is in English, subtitled in French.
Arnold – Solid Angle
ALSHADERS A complete, production-oriented, physically plausible shader library for arnold.
Getting Lighting Render Passes With Arnold Render
HOLLYWOOD-FAVORITE RENDERER ARNOLD NOW AVAILABLE FOR CINEMA 4D
Shading The Car using the Ai Standard Shader
Arnold Rendering a Car in an Exterior, Car Materials
ARNOLD LIGHT BLOCKERS AND MESH LIGHTS
10 Pro Tips For Lighting & Rendering In Maya
How do I make my renders look like photos?
Lee Griggs, Arnold Rendering Tips and Tricks
CGI Tutorial HD: “Arnold Maya Rendering – Basic Interior Sunlight” by – Jon Tojek
Introducing Max to the Power of Arnold
TOOLFARM This major new update includes improved performance and new shaders, bundled with 3ds Max 2018. Arnold is now a standalone renderer as well as a plug-in for Maya, 3ds Max, Cinema4D, and Katana. Fur & Hair, Motion blur, Sub-surface scattering, Volumes, Flexibility and extensibility, Scalability, Instances, Memory efficient, Deferred geometry loading, Subdivision and displacement, Arbitrary Output Variables (AOVs), Standalone command-line renderer.
TOOLFARM Arvid Schneider explains how to set up a lifelike skin shader with the aiStandardSurface shader, and it’s a lot easier than you may think!
AREA Autodesk Newsletter
- Color Correcting Donut Sprinkles By Lee Griggs – Nov 3, 2016: In this tutorial, we will use the versatile Utility shader to generate random colors for the sparkles on a donut. We will then use a variety of MAXtoA shaders to further adjust the colors of the sparkles.
- Flash Photography Effect in MtoA By Lee Griggs – Oct 25, 2016: This short tutorial will show you how to emulate a flash photography effect used to enhance this shocking render of a zombie attack.
MtoA 110 | Detailed Skin Shader | using Arnold with Maya 2017
MtoA 505 | Human Skin with Arnold 5
Tutorial: Creating Realistic Human Skin with Maya and Arnold 5
Rendering with Arnold in Cinema 4D
Arnold for Maya Tutorial – Shaders – HD
Arnold for Maya Tutorial – Lights
Arnold for Maya Tutorial – Image Based Lighting
Arnold for Maya Tutorial – Render Settings – HD
Arnold for Maya Tutorial – AOVs – HD
Maya 2011 Attach Image Sequence Gobo to Spotlight Tutorial by Stuart Christensen .mov
How to Use the AiStandard Shader in Arnold
Maya 2018 – Arnold Workflow Basics
Maya 2018 – Arnold Workflow Part 1
Maya 2018 – Arnold Workflow Part 2
Maya 2018 – Arnold Workflow Part 3
Maya 2018 – Arnold Workflow Part 4
3DELIGHT
The Best of SIGGRAPH 2018 This year at SIGGRAPH we had a few standouts for advances in technology, but also for paradigm shifts in terms of services for at least the media & entertainment realms of computer graphics. I didn’t have much time to attend many panels or talks, but I did get to moderate a panel for Autodesk regarding some changes in how visual effects production is accomplished as more and more people and companies have to contribute to the process.
UNITY
Bringing the 2019 European Games Mascot to Life in Real-Time
With state-of-the art motion capture technology, Asterman was able to meet tight deadlines to deliver a live mascot in two days. Asterman recently delivered a live 3D mascot for the 2019 European Games, which brought together 4,000 athletes from 50 countries. To mark the official presentation of “The Flame of Peace”, participants were joined by the 3D model of a fox cub called Lesik. This digital co-host entertained audiences by moving around, making comments and joking on screen in real-time, powered by Xsens MVN Animate motion capture.
Writing Your First Shader in Unity
In this live training session we will learn the fundamentals of authoring shaders for Unity and you will learn how to write your very first shader. No prior knowledge of authoring shaders is required. In this first step we will introduce our project and goals.
Unity Masterclass: How to set up your project for pixel perfect retro 8-bit games
Retro games with simple mechanics and pixelated graphics can evoke fond memories for veteran gamers, while also being approachable to younger audiences. Nowadays, many games are labeled as “retro”, but it takes effort and planning to create a title that truly has that nostalgic look and feel. That’s why we’ve invited the folks from Mega Cat Studios to help us talk about the topic. In this blog post, we’ll be covering everything you need to create authentic art for NES-style games, including important Unity settings, graphics structures, and color palettes.
UNREAL ENGINE – Epic
Unreal Engine 5.2 electrifies GDC 2023 attendees with photorealistic visuals
AWS Thinkbox Deadline Supports Final-Pixel Renders inside Unreal Engine 5
This tool uses machine learning to animate 3D models on-the-fly, and it’s getting Unreal Engine support soon
Real-time roundup: the growth of interactive 3D and emerging 2021 trends
Behind the scenes at Epic, this story has been reflected in the numbers. By the end of 2020, nearly half of announced next-gen games were being built in Unreal Engine; the number of film, TV, and animation projects that are using or have used Unreal Engine doubled; and innovation in areas like HMI saw real-time workflows fuel cutting-edge new experiences, such as the digital cockpit in General Motors’ recently announced GMC HUMMER EV and Cadillac LYRIQ.
50 Mind Blowing Unreal Engine projects you need to see
Unreal Engine is arguably the world’s most open and advanced real-time 3D creation platform. It continuously evolves to serve not only its original purpose as a state-of-the-art games engine. The platform extensively by aspiring artists at The Rookies as it gives them freedom and control to deliver cutting-edge content, interactive experiences, and immersive virtual worlds. Here are some of the best content we’ve seen already this year.
Creating a Stylised Environment in Unreal Engine
Alejandro Díaz Magán is a 3D Artist from Málaga, Spain. After finishing his studies in the Master’s Degree in 3D Character Modelling at Animum Creativity Advanced School, he is currently looking for a job in the Games Industry and working on personal projects as a self-taught artist.
REWIND Delivers an Explosive VR Experience for INFINITI
Manufacturers from private jets to the latest sneakers constantly seek innovative ways of communicating brand values to their target customers base – which has led many to incorporate VR into their experience design process. Common sense dictates that the more engaging an experience is, the more likely someone will be affected by it. VR, or full immersion, is one of the most powerful tools for engagement available, especially when wielded by an expert.
“Unreal Engine allowed us to take that huge CAD model, get it into engine and make it run in real-time,” says Solomon. “The challenge for the INFINITI project was that not only could you see the outside of the car, but you could see every nut and bolt it was made from, so we had to find a way of getting the exact model including nuts, bolts, and screws into the game engine and running in real-time with it.”
HOW REAL-TIME RENDERING IS CHANGING THE DESIGN LANDSCAPE
Design is evolving, and there’s never been a more exciting time for tapping into the creative possibilities driven by the rapid change of technology. As real-time engines continue paving the way for a new age of experience, designers are gaining greater flexibility and control over their visualizations for architectural, engineering, automotive, and product design. Designing at the speed of thought is no longer a pipedream for today’s digital artists, now that powerful new tools like Unreal Studio are breaking down the barriers keeping data imprisoned in proprietary CAD tools.
misss_fast_shader2_x shader setup Mental Ray Maya
WETA DIGITAL
Manuka: Weta Digital’s new renderer
After many years as one of the world’s largest and most accomplished visual effects studios, Weta Digital began a research project that has evolved into their own full blown physically-based production renderer: Manuka. In fact, the project encompasses not just the final renderer but as part of work in the lead-up to the new Avatar films, they have also developed a pre-lighting tool called Gazebo, which is hardware based, very fast and also physically based, allowing imagery to move consistently from one renderer to another while remaining consistent and predictable to the artists at Weta.
CLOUD and RENDERING SERVICES
SEE ALSO CLOUD – www.therese3d.com under TUTORIALS, MAGAZINES, LINKS & RESOURCES under C
WHAT NOW and WHAT’S AHEAD FOR CLOUD RENDERING
Method Studios Takes AWS Cloud Rendering to the Next Level
Visual effects company Method Studios works on content for all screen types – feature films for cinemas, television content and commercials for home or mobile screens, title designs and others. At its locations around the world – Los Angeles, Melbourne, Montreal, New York, and Vancouver – each team customises its own production workflow based on project requirements, and meanwhile the company uses a common suite of tools to collaborate between facilities.
RENDER FARMS – WHERE TO BEGIN
So, you already know a render farm harnesses greater processing capacity to enable your artists to create multiple creative iterations, get jobs out faster and achieve photo-realistic output where desired.
You get it and have already tried…
So why doesn’t mine work, how do I make it better?
Many applications such as SketchUp are primarily linear applications for modelling and utilise single-threaded processing for majority of tasks. Most applications, at least on the workstations, rely heavily on OpenGL, which provides robust 3D APIs and raster pipelines, but were designed decades ago without multi-core considerations. You may have invested in multiple (12-24+) core processors when you could have invested in lower core count with higher speed like 3.5Ghz+ for the artists and investing in a 3rd party.
Q&A with Arvind Sond and David Sanchez: the studio founders going cloud native. Cloud technology will revolutionize visual effects (VFX) in the coming years. Studios will be able to harness the power of huge render farms without needing the space to house them, or pull in the best talent around without uprooting their families.
DLF has a series of conversations listing Renderers
Appleseed – http://appleseedhq.net/
Arion (was Fryrender) – http://www.randomcontrol.com/arion –
Arnold
Blender cycles
Corona
Clarisse http://www.isotropix.com/
Guerrilla
Indigo
LuxRender
http://www.luxrender.net/forum/gallery2.php
http://www.luxrender.net/en_GB/download
Mental Ray
– has won an Academy award
Mitsuba
http://www.mitsuba-renderer.org/download.html
Modo
Mantra (with Deep) and Houdini
Maxwell
Octane
http://render.otoy.com/gallery2.php
http://render.otoy.com/downloads.php
Povray
http://www.povray.org/download/
Redshift
Render Man
3delight
Thea Render
Turtle
Vray
http://vray.cgdo.ru/gallery.html
http://vray.cgdo.ru/download.html
Vray release a new renderer UVRAY
http://www.fxguide.com/fxpodcasts/fxpodcast-292-v-rays-new-renderer/
http://www.chaosgroup.com/en/2/vray_maya_licensing.html#tab2
Yafaray
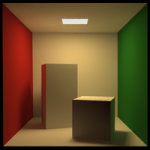
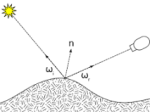
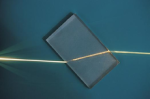
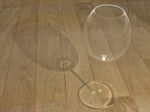
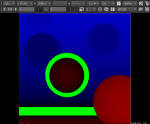
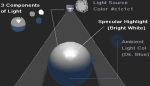
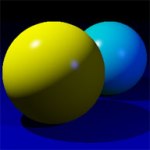
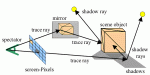
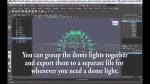


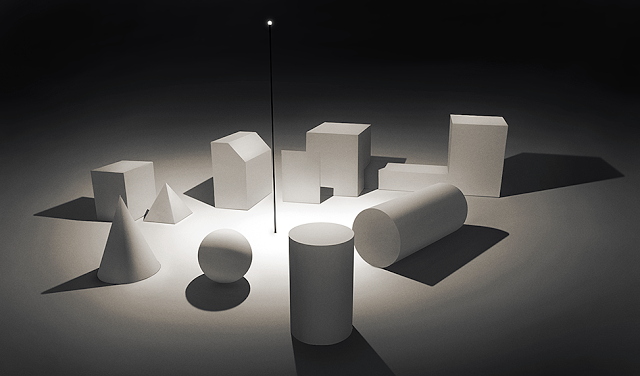


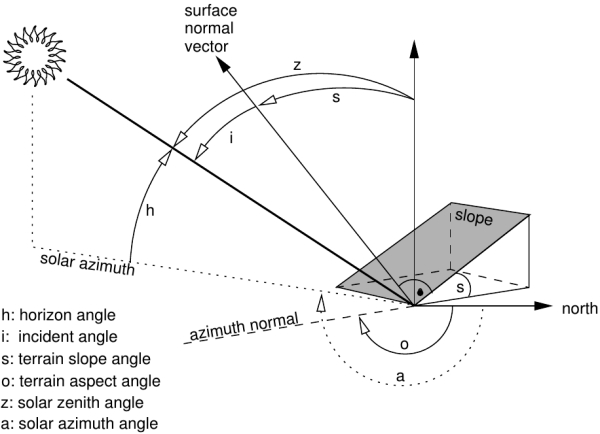


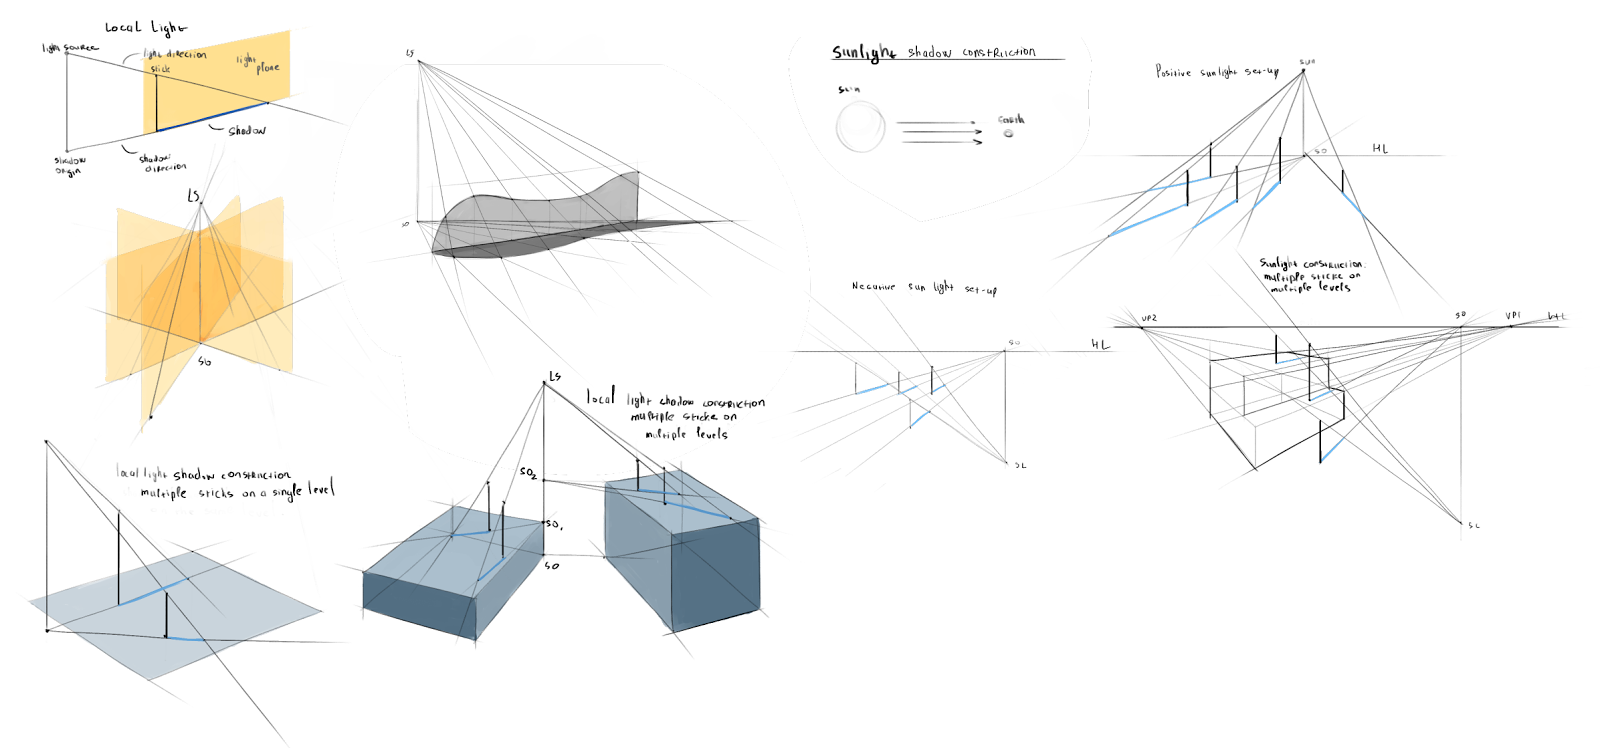


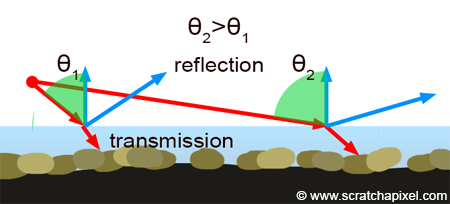

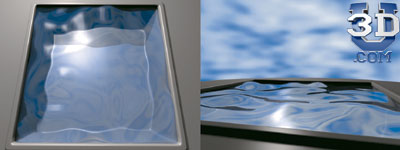
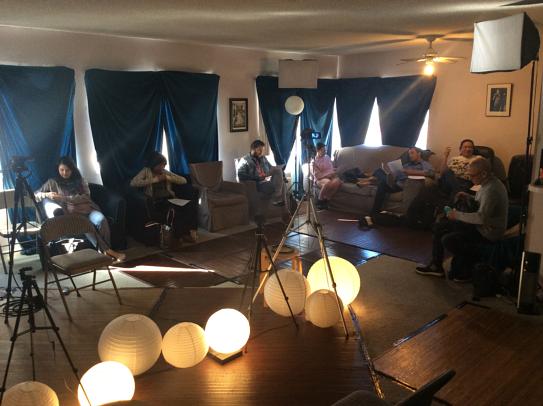

That’s interesting that if you render in real time that it can make you change the way you see the project. I would think it would be interesting to try and do a project both ways so that you can see what the best way to do it would be. I feel like there would be benefits of rendering graphics both ways so It might be interesting to do both.