This post is made up of information that I have collected and continually adding to along my journey about lighting, shaders, rendering.
Top 10 reasons to take part in student rendering challenges
What judges look for in winning student rendering challenge entries
3drender.com – Three D lighting and rendering including challenges
The Science of Rendering Photorealistic CGI
Disney’s Practical Guide to Path Tracing
CG Channel.com
MAXDEPTH Resolution Revolution Redux: Setting up multi-tile uv shader networks in Arnold for Maya
LIGHTING
Lighting creates a visual mood, atmosphere, perception of colour, to distinguish shapes and form, a sense of meaning and depth for the audience, letting the audience know where to look, showing us what we see. Objects and characters look like they fit and live in their surroundings. Learning to see light and the amazing effects it creates influences us in how we light our scenes, how we notice the bumps and curves, the light and dark, the brightness of highlights, rich blacks and bright whites, shadows and diffused light. Why do things look the way they do? Where is the light coming from. What is the range of qualities from soft and diffuse to harsh and intense? Looking at sharp and soft edged light, different angles, intensities and shadows. Consider lighter and darker areas while guiding the eye towards certain objects and actions.
For subtlety, for authenticity, add little movements to the lights, even subtle changes in colour, or even obstructions out of view of the camera, which move around randomly, to cause differences in your indirect lighting. Consider choosing to have your frame render steps happening at twice as often as your main character animation steps, but still have the lighting effects happen in the extra steps. Think about a 1 hour shot taking one frame every minute then the same animation scaled to 60 frames long if you turn off motion blur.
When a character is moving towards or away from a light source, the intensity of the light cast onto the character needs to simulate what it would be in real life to be believable.
A Surface Normal is an imaginary perpendicular tangent line that emanates fro all surfaces to give the surface a direction. All objects have the ability to cast and receive shadows.
Attributes of lights can be animated such as intensity, penumbra angle, colour, translated, scaled and rotated for lights turning on and off, candles, campfires, emergency lights, decorative lights, flickering, Christmas lights etc.
SHADOWS
Shadows are an important part of creating mood and atmosphere in a scene.
Our world is made up of direct lighting, cast shadows, indirect lighting and ambient occlusion working together. In reality, shadows become gradually softer as the distance increases between the cast shadow and the shadow-casting object. A balance of light and dark is important. High-Dynamic range images (HDRI) are often used to create more realistic lighting. To add to the realism and depth of a shot or scene consider if the shadows soften or diffuse as they shadow falls from its casting object, softening more towards the edge of the shadow.
The effects of shadows are part of creating atmosphere and mood helping to define the look and feel of the scene. Consider the type of shadow, the elevation and direction of a light are important influences on the amount and shape of the shadow areas. Generally the shadows become more dominant as the angle of light incidence increases and as the lighting moves from front to back. A dark, gloomy scene may require the lights behind the objects so the shadows are being cast into the frame. Cross lighting to maximise textures creating long shadows and to minimise textures use frontal light giving a flat look.
SHADOW ATTRIBUTES Maya calculates the distance from the light to the nearest shadow casting surface and the distance from the light to the next nearest shadow casting surface and averages them. If the distance from the light to another shadow casting surface is greater than the depth map distance, that surface is in shadow.
DEPTH MAP SHADOWS renders from the point of view of the light source. Records distances between the lights and objects in the scene. The bias is a value by which the camera ray’s intersection point is moved closer to the light source to avoid incorrect self-shadowing.
RAYTRACE SHADOWS can be used to render transparency mapped shadows to see details in the shadow, coloured transparent shadows when there is colour on the transparency channel, shadow dissipates as it gets further away from the shadow casting object or attenuation, render motion blurred shadows.
DIRECT ILLUMINATION, light source directly illuminates an object.
INDIRECT ILLUMINATION, light illuminates objects by reflection or transmission by other objects.
GLOBAL ILLUMINATION, describes indirect illumination which includes Caustics, Final Gather and effects such as Caustics.

Imagine a shaft of yellow sunlight beaming through a window. According to quantum physics that beam is made of zillions of tiny packets of light, called photons, streaming through the air. But what exactly is a photon? A photon is the smallest discrete amount or quantum of electromagnetic radiation. It is the basic unit of all light.
Light is emitted from the source in the form of energy, called photons which are followed as they bounce around a scene until they are either absorbed or escape to infinity. The absorbed photons are stored in a Photon Map and used at render time to calculate illumination in a scene.
STARTING OUT LIGHTING 3D
Lighting is important for highlights, diffused light, shadows, light and dark to create an interesting image and scene, create a sense of detail from blacks to whites. It is shot specific. The nodes have attributes the govern how they function.
Three point lighting is the traditional approach
- primary or key light: is the principal light giving primary shadows, placed to the front and off centre and an important sense of lighting direction
- fill light: softer light to fill the scene, is diffused light that softens shadows and illuminates the dark areas, placed in the front and opposite side to key light to target the dark side and could be a different tint
- back light or rim light: to give depth, bring the subject out from the background it can highlight the edges and is not a background light, placed behind the subject and could create a bit of a halo giving the subject more of a presence against the background. This is not the same as the background light which lights the environment
Other lighting could include
- practical: not to interfere with the main lighting unless the the main light is coming from this source such as a candle
- background light: consider matching the direction of the key light
Lights
- directional: evenly across the scene, sunlight or general indoor, gives an accurate sense of direction without emanating from a specific source, no scattering of light or scale, parallel rays even over distance, no decay rate. The shadows are parallel, parallel rays, illuminating objects from the same angle, a harsher light with harder edges. Do not factor in their position in the scene when calculating shadows, only the orientation. Are not the best lights for detailed shadow-map shadows, have good raytraced shadows.
- spot: cone of influence in a specific direction, can be used for keys, fills rims and cast light in specific areas, emit from a specific point and radiate out of a cone shape, spread rays, can create a circular focus of light such as flashlight, directionals spread the light evenly. Consider decay rate, cone angle, penumbra angle, negative – softens the light into the width of the cone, decreasing the size of the focus, positive – softens away from the cone, drop off softens from the centre, link a target to the light, shadows diverge at different angles. The size of the viewable area, from the light’s point of view is restricted by the cone angle and the distance between the light and the subject. Create shadow maps with greater accuracy at lower depth-map resolution.
- point: casts light from a specific point, spread evenly in all directions, omni directional, decay rate adjusts intensity over distance, candlelight, light bulb, setting a mood, shadows radiate out in all directions, a more subtle light with richer shading on the surfaces.
- area: computation reflects the size and orientation, a larger light emits more light, the further away from the object the less light is cast onto the object, array, collection of spot lights from a rectangular shape, criss-crossing rays, most realistic, scaleable and affects intensity, default decay rate, creates shadows, larger the light the brighter eg through a window, specific area of an object, sliver of light or large diffused lighting in an environment, if you close the window shade the amount of light is reduced. It is difficult to create straight, long, specular highlights such as neons, soft lighting distribution and realistic shadows that vary from hard to soft.
- ambient: usually used as a non-directional light to simulate the diffused scattered or reflected light, even light across entire scene can be flat, no decay, no specular highlights, does not show bump maps, adjust ambient shader slider. The Ambient Shade attribute if set to 0, 0 acts like an RGB multiplier affecting the contrast levels, 1 is fully directional.
- volume: illuminates within a given volume, can blend colours, control the direction
- IBL: image based lighting, environment sphere with an image assigned that uses the brightness to cast light
- HDRI: several photos at varying exposures from very dark (low exposure) to highlight the brightest parts to very bright (overexposed) to capture the darkest parts giving a range of bright to dark, rotation. It involves taking several shots of the same subject matter with bracketed f stops and assembling the images into a floating pint tiff HDRI. An HDRI has an extra floating point value that is used to describe the exponent or persistence of light at any given point. Pixels that have a high floating point value (exponential value), are not affected very much by a darkening of the overall image. Pixels that have a lower persistence of light would be affected more by this same darkening operations. Contributes to crating photorealistic images.
When using Global Illumination and Final Gather use quadratic decay rate, ensuring the light levels decrease in intensity based on the inverse square law.
Attributes
- colour: the darker the colour the dimmer the light, controlling the colour cast and can affect brightness
- intensity: how much light is cast, higher intensity gives brighter illumination, brightness of the light. Negative values will subtract light eg produce dark spots instead of hot spots on specular shading.
- cone angle: width of the cone
- penumbra angle: intensity at the edges of the cone, negative value softens into the width, positive softens away from the cone. An area of diminishing intensity rimming the edge of the cone of light. The intensity of the light falls off linearly between the cone angle and cone angle + penumbra angle. Negative numbers will create a softening effect inwards from the edge of the cone of influence.
- drop off: is how much light is delayed along the distance of the cone, similar to decay except that its function is to cause the light to diminish in intensity perpendicular to the light axis instead of along the light axis. Cosine raised to the power of dropoff (where Cos is the dot product of the light axis and the lighting direction vector).
- illuminates: by default is related to light linking of specific objects, usually keep checked
- emit diffuse and emit specular: not for ambient light, ability to cast diffuse lighting or specular highlights on an object which can create special effects such as turning off to reduce shininess and reduce glare
- illuminates by default: the light will not illuminate all objects, look at light linking to illuminate specific objects
- decay rate: how light diminishes with distance, adjust intensity level exponentially, the rate at which the intensity falls off with distance. Linear intensity decreases in direction proportion to distance (l = 1/d). Quadratic is how light decays in real lift (l = 1/d*d). Cubic decays faster than real life (l = 1/d*d).
- decay regions: allows regions to be lit or non-lit within the same cone of light
- intensity curve: controls the exact intensity of a light at a given distance from the light source, in the graph editor vertical and horizontal axes represent intensity and distance
- colour curve: control the red, green and blue values of the light over distance, to take out any colour component set the intensity value to 0.0
LIGHT LINKING a new light source illuminates all surfaces in the scene by default, linked lights light (or group of lights) to illuminates a specific surface (or group of surfaces) or object (or group of objects).
INTENSITY CURVE of the Spot Light. An intensity curve or an expression can be used to control decay. You can also create a custom brightness decay rate using an intensity curve. You can edit curves in the Expression or Graph editors.
9 steps to achieving stunning interior lighting in V-Ray for 3ds Max
FOUNDRY
- Foundry Live: Look Development and Lighting Meet-Up
- Katana Lighting and Rendering Masterclass
- Taking on sequence lighting and B*Bots with Foundry’s Katana
JEREMY BIRN Dec 17, 2013 Top Ten Tips for More Convincing Lighting and Rendering
The Making of ‘Studio Lighting’ by Amir Nabavi
10 key tips for lighting and look development
Foundry’s Look Dev and Lighting Update Oct 2022
 Lighting the way: these top artists share their approach to illumination
Lighting designers share their perspectives on their craft. Great lighting design has the power to grab the eye, weave emotion throughout a scene and build atmospheric tension that sparks viewers’ imaginations. Using proper lighting design to tell a story with your work is essential in VFX, animation and design. For many projects, lighting is everything, which is why it’s worth seeking out great examples of how top artists are putting it to best use.
Hunting for inspiration for your next project? Here’s a look at the unique visual treatments of three artists from our community and how they approach lighting in their work.
Learn How to Light and Render Like a Pixar Artist
The whole process was very tough and full of learning in many aspects. The breakdown is going to walk you through the entire process, including both the aesthetic and technical choices that were made.
Valuable lessons to learn about 3D Composition and Lighting
A fantastic article written by Balazs Domjan that goes into detail about all the mistakes he made while creating his award winning game scene. From basic composition concepts through to lighting principles.
CommonPoint – Lesson 12 – Overcast I Relighting, HDRI
Mastering artistic lighting by 3dtotal staff
Video lighting tips and tricks for your next at-home shoot
Lighting Tutorials and the Book by Gleb Alexandrov
5 lighting tips for photorealistic renders
SHINING A LIGHT ON ‘WHAT WE DO IN THE SHADOWS’
How to optimize your home lighting design based on color temperature
ARNOLD GALLARDO: 3D Lighting, Concepts and Techniques
Gallardo, A., 2000. 3D lighting: history, concepts and techniques. Charles River Media, Rockland, Mass.
LIGHT AND RENDER DAY AND NIGHT SCENES IN V-RAY FOR CINEMA 4D
With the array of tools in V-Ray for Cinema 4D, it’s easy to create stunning exterior renders depicted at any time of day. With full creative control, you can choose to give your projects a bright and playful feel or use low light and subtle illumination to create atmospheric, cozy scenes.
In these two tutorials in our quickstart video guides for V-Ray for Cinema 4D, Fabio Palvelli explains how to create impressive, realistic exteriors in just a few simple steps. You’ll discover how to use image-based lighting to illuminate exterior arch-viz environments, as well as learn Fabio’s essential tips and tricks to create eye-catching, photorealistic imagery.
HOW TO LIGHT AND RENDER INTERIORS WITH V-RAY FOR CINEMA 4D
In these first two tutorials of our new quick-start video guide for V-Ray for Cinema 4D, Fabio Palvelli walks you through how to light interiors using V-Ray 3.7 for Cinema 4D. The video tutorials featured below cover both daytime and nighttime lighting techniques and they will arm you with the skills you need to put V-Ray to the test for your best renders yet. You’ll learn how to work with some of the basic functions of V-Ray for Cinema 4D and how to adjust the lights and colors to achieve maximum realism in your work.
Gleb Alexandrov
Lighting enthusiast and founder of Creative Shrimp, shares his immersive images and advice for artists stepping out into the online world.
THE SHAPE OF LIGHT
6 Portrait Lighting Patterns Every Photographer Should Know
In classical portraiture there are several things you need to control and think about to make a flattering portrait of your subjects, including: lighting ratio, lighting pattern, facial view, and angle of view. I suggest you get to know these basics inside out, and as with most things, then you can break the rules. But if you can nail this one thing you’ll be well on your way to great people photos. In this article we’re going to look at lighting pattern: what is it, why it’s important, and how to use it. Perhaps in another future article, if you enjoy this one, I’ll talk about the other aspects of good portraiture.
COLOUR MANAGEMENT
COLOUR SPACE notes from Lanier, L., 2011. Maya studio projects. Texturing and lighting. Sybex, Indianapolis, Ind. pp 112 – 115.
Gamut: all the colours a device can produce
Colour Space: gamut that utilises a particular model
Colour Model: establishes primary colours, cominationsof which form all other visible colours e.g. RYB, RGB.
Monitor: brightness, contrast, gamma correction, colour temperature
Gamma Correction: applies a specific curve to neutralise a monitor’s non linear voltage-to-brightness relationship. If gamma correction is not applied, displayed images receive additional contrast through their mid tomes, lose details in shadows and dark areas. The result is inaccurate and usually unaesthetic.
Colour Temperature: colour of light measured in Kelvin, determines the white point of the hardware
White Point: is a coordinate in colour space that defines what is ‘white’
LUT: is an array used to remap a range of input values, the systems graphic cars is able to extract gamma correction curves from LUTs
Chip Chart: is either a grey scale rectangles lined up in a row or a continuous grey scale gradient.
The Image displayed is loaded into a frame buffer (portion of RAM storage), each pixel is remapped through the LUTs before its value is sent to the monitor. The original pixel values are temporarily changed and the original file remains unchanged.
The colour space of various output devices are different.
[DLF] Maya 2017:
Maya’s color management isn’t new. Same as 2016 yeah?
Maya exports linear by default. exr, if not set it to exr, 16 bit (half) is usually fine. Nuke AE will auto srgb them. In AE you have just to manually match bit depth. It displays all images and the viewport to srgb automatically. Does the conversion for you for the display.
Recreating real-world color: the promise of Hybrid Log Gamma. There’s lots of excitement around the potential of immersive volumetric content to transform viewing experiences. In the past, we’ve pointed to the enterprise applications of VR, as well as some of the amazing progress being made in the development of AR and MR devices. But, despite this progress, immersive content has yet to fully enter people’s homes and become a staple of mainstream consumption. To reach that stage, immersive content will have to be – at a minimum – as good as what’s already captured by traditional devices. Advancements in both capture and display tech are needed, because the central conceit of immersive content is how closely it mimics our real-life perceptions.
RENDERING
The surface properties, lighting, shadows, movement and shape of objects are calculated by the computer and saved as a sequence of images. Plug-in Manager under Settings/Preferences Window.
- Maya Software: raytracing, reflections, refractions, shadows, motion blur, transparency, batch render
- Maya Hardware or Hardware 2.0: faster render times, lacking some of the features, shadows, specular highlights, bump maps, reflections, motion blur, particles
- Mental Ray: raytracing, reflections, refractions, physical sun and sky, photon maps, caustics, global illumination, final gather, batch render
- Maya Vector: has an illustrated or cartoon look with black outlines over flat-colour passes, outputs as Adobe Illustrator files
- Arnold
- V-Ray
- Vector Render: cartoon style images and animation, vector content for a web site
- Maxwell
- Renderman
BITMAP IMAGES
File Size of an Image, can carry the necessary information to display photorealistic content being largely used to display photographs, textures or computer generated images. Scaling has an impact on the image quality with large quality bitmaps requiring a lot of memory:
- Resolution, the number of pixels in the X and Y directions
- Bits per pixel defines how much information can be stored per pixel
32 bit with 24 bits for the colour information (red, green, blue) and 8 bits for the alpha channel. 24 bits of colour information per pixel = 2 to the exponent 24 = 16,777,216 colours. The alpha channel contains an additional 8 bits used for compositing.
VECTOR IMAGES
Described by two colour properties with a mathematical description for the shape and colour making the quality independent of the resolution. Generally used for print publishing, web formats, small file size and scalable, handles curves and closed shapes that can be filled with solid colours and colour ramps:
- Outline
- Fill
Some vector formats:
- Macromedia Flash .swf
- Swift 3D Importer .swift
- encapsulated postscript .eps
- Adobe Illustrator .ai
- SVG scalable vector graphics .svg
RENDER SETTINGS
- File Name – file name, frame number, extension
- Image Format (TIFF, Targa, IFF, OpenEXR)
- Frame Padding – inserting leading zeros in the frame number for numerical order
- Frame Range
- Renderable Camera
- Alpha Channel (Mask), White is opaque
- Depth Channel, distance of an object from the camera, Z Depth
- Image Size
- Resolution, width and height set the pixel size
- Quality Settings
- Raytracing Settings
- Sampling Mode is the number of times the renderer reads and compares the colour values of adjacent pixels in order to smooth the resulting render to avoid jagged lines
- Min and Max Sample Levels sets the number of times the renderer samples a pixel to determine how best to anti-alias the result, is dependent on the Colour and Alpha Contrast Thresholds.
- Anti-alias is the effect produced when pixels appear to blur together to soften a jagged edge on an angled line, a visual stair-stepping of edges that occurs in an image when the resolution is too low. Anti-aliasing is the smoothing of jagged edges in digital images by averaging the colors of the pixels at a boundary.
- Anti-aliasing Contrast values determine when the renderer turns up the number of samples in a particular region of the frame, between neighbouring pixels when below the threshold value the sample rate is higher. Lower thresholds force the renderer to sample difficult areas closer to or at the max value.
- Multi-Pixel Filtering Handle when the Max Sample Level attribute is set to a value higher than 9 filtering is done on the results of the sampling of pixels to blend the pixels of a region together to form a coherent image, Box, Gauss, Mitchell, Triangle, Lanczos
- Sample Options Heading turning on the Sample Lock and Jitter attributes reduces noise and artefacts in rendered sequences with lots of movement.
- Motion Blur
- Passes, separating different elements of a scene into separate renders
- Ambient Occlusion, adds depth and reality reducing the amount of light when two objects or surfaces are close to each other improving contact shadows and improving definition in surface creases and corners
- Lighting Settings and Options
- Features
SOFTWARE RENDER
3D Motion Blur, Reflections, Refractions, Shadows.
HARDWARE RENDER
Limitations including shadows, reflections and glow. Particles can be rendered for their position, matte and alpha information with colour, shadows, reflections , environment lighting being added at the compositing stage.
MENTAL RAY
- Caustics is the scattering of light reflections off and through semitransparent objects simulating the way light reflects and refracts through objects and surfaces, concentrating onto a small area. Surface caustics only show up on objects surfaces, while volume caustics are visible as they pass through 3D space.
- Global Illumination is the effect of light reflected from one object to another simulating real world lighting by reflecting light off surfaces to illuminate other surfaces. Photon Mapping where photons bounce around many times.
- Final Gather relies on direct and indirect light, diffuse reflections of light, tracing light as it reflects off surfaces to illuminate the scene taking into account colour bleed of light from one surface to another. Illuminating the scene from lights as well as objects taking including the brightness of objects. Every object in a scene is, in effect, a light source. A ray contacts a surface to determine if there is a diffuse light contribution to the emitting surface points colour value calculating from the first surface. Helpful in rendering very diffuse scenes where indirect illumination changes slowly, elimination of low frequency noise, for finer detailed resolutions, combined with GI more physically accurate is possible, convincing soft shadows, helps to eliminate dark corners. Contributes to creating photorealistic images.
- Depth Map Shadows represents the distance from a specific light to the surfaces the light illuminates
- Ray Trace Shadows tracing paths of light from the camera and simulating the effects, reflections, refractions and shadows. The lower of the limits will determine the limit for each surface. Recursion Depth, Subdivision Power
- Image-Based lighting uses an image to illuminate a scene, typically a High Dynamic Range Image HDRI
- Physical Sun and Sky simulates open-air sunlight, adjust Reflectivity, Multiplier, Direction (rotation affecting the time of day) and the default turns on Final Gather
- Light Fog light fog attribute on the light attribute, Depth Map Shadows
- Lens Flare and Lens Glow lens flare and light glow attribute, consider putting the glow on the shader
- Optical FX Attributes
DIFFERENCE BETWEEN SCANLINE and RAYTRACING RENDERING
A scanline renderer calculates shadow information using pre-computed depth maps. These shadow depth maps describe whether a given point is in shadow.
The raytracing algorithm sends rays into the scene from the position of the render camera. The rays with either hit an object or go through an empty space. If a ray hits an object, the corresponding material shader is referenced or called. If the material shader is reflective or refractive, secondary rays will subsequently be sent into the scene. These secondary rays are used to calculate reflections and refractions.
REFLECTIVITY, TOTAL INTERNAL REFLECTIONS, REFLECTION SPECULARITY
Depends on the angle the object is viewed with reflections more pronounced from an angle.
REFRACTIONS
Refraction Index is the ratio of teh speed at which light is travelling in the object versus in a vacuum. When it is 1.0 there is no distortion or bending.
LIGHT ABSORBANCE
Transparent materials usually absorb an amount of light that passes through them, the thicker the material the less light gets through.
IRRADIANCE
The total incoming illumination, the amount of light that is incident upon a surface.
INCANDESCENCE
Is the emission of electromagnetic radiation (including visible light) from a hot body as a result of its high temperature.
SURFACE THICKNESS
Consider when the surfaces are not visible.
SHADERS
A computer program that calculates the appropriate levels of light, darkness, and colour during the rendering of a 3D scene allowing for various kinds of rendering effect to rendering output. Shaders apply a renderable colour, surface bump, transparency, reflection, shine or similar attribute to an object.
MENTAL RAY BASE SHADER LIBRARY
CONTOUR SHADERS
PHENOMENON
CAMERA
Cinematography describes the process of making decisions about factors that communicate a meaning in your 3d animation/ film. The camera angle, action and direction, lens type, camera motion, and lighting all affect the meaning of your work.
Focal Length of 24 places a 24mm lens on the camera
Depth of Field adds blur to the render for the areas of the image that may be out of the lens’s focal depth. The F Stop setting sets how much is in focus around the focal distance, higher value the focus runs deeper than a low F Stop value.
Render Time Calculator – Simon Reeves
Render Calculator – JokerMartini
What Is PBR (Physically-Based Rendering)? A complete guide
Nuno Silva – Realistic Car Animation That Works With Every Renderer
Learn Corona Renderer – Corona Tile Map
RenderRam – Brain hacks for viewing images differently
MEL COMMANDS FOR SETTING RENDER GLOBAL VALUES?
Writing OSL Shaders 2: Data Types and Globals
SHPERE VFX
RefractiveIndex.INFO – Refractive index database
Renderman vs. Vray vs. Arnold
Octane vs Arnold vs Physical – What Renderer is Right for You?
Rendering with Pablo
UV LAYOUT
3delight
AUTOMATE MULTIPLE CAMERA RENDERING?
How to build your best rendering machine ever
INNOBRIGHTTechnologies has released Altus 1.5, the latest update to its standalone tool for denoising images generated in a range of common renderers, including Arnold, Redshift and Maxwell Render.
GTA V: Graphics Study Nov 2 2015 – Adrian Courrèges
LEE GRIGGS
Luxpop 3D Print Files for lab and workshop. Index of Refraction, Thin film, Optomechanics for all.
Rooster Teeth Tutorial #7: Environment Lighting
CYLINDRICAL IMAGES
In order to render three-dimensional virtual scenes more realistically, One often needs to draw images of objects which are reflected by the cylindrical surface mirror. Doing so, we first define the cylindrical image model as the set of image points, in which each element is the image of vertex in original model, reflected by the cylindrical surface mirror, also with the same connectivity as the original model. We determine the reflective point for corresponding vertex by the ray tracing method, which is the key step for generating the image model. In order to accelerate the generation and rendering processes, we conduct visibility test, computing only the part of image model visible for current viewpoint. We also provide the experimental results that validate the algorithm and show timing statistics of the algorthm.
RENDERING A 3-MINUTE ANIMATED MUSIC VIDEO FOR RON ARTIS II In My Heart
How Pedro Conti and Fernando Peque rendered a 3D short for Ron Artis II using V-Ray. Go behind the scenes and learn about their first experience with Phoenix FD.
Star Citizen Gas Station made with Unreal Engine
We asked Julian Rabe, a 22 year old from Germany, to share with us how he created an environment for games, in Unreal Engine. With a passion for drawing and playing video games, Julian got into the world of 3D by way of a Maya modeling class at university at the end of 2017. He then started learning more and more about 3D modeling on his own, but his training was lacking in structure. After searching for a course in 3D Computer Graphics, Julian found himself at Think Tank, graduating in 2019. This is a breakdown of his project he created during the Mentorship Term.
Instant Meshes algorithm – an interview with Dr. Wenzel Jakob
Foundry Trends recently caught up with Wenzel Jakob, creator of the Mitsuba renderer, for a deep dive into the powerful auto-retopology Instant Meshes algorithm he co-developed. An assistant professor leading the Realistic Graphics Lab at EPFL in Lausanne, Switzerland, Wenzel’s research revolves around rendering, appearance modeling, and geometry processing. Here’s what he had to say.
Path Tracing 3D Fractals
In some ways path tracing is one of the simplest and most intuitive ways to do ray tracing. Imagine you want to simulate how the photons from one or more light sources bounce around a scene before reaching a camera. Each time a photon hits a surface, we choose a new randomly reflected direction and continue, adjusting the intensity according to how likely the chosen reflection is. Though this approach works, only a very tiny fraction of paths would terminate at the camera.
REAL TIME GRAPHICS
Could you introduce yourself? I’m Matt Swoboda, the founder and director of Notch, a visual creation tool that works entirely in real-time. Notch technology powers visuals for acts from U2 to Beyoncé and Ed Sheeran, Eurovision, The Brits and numerous music festivals worldwide. Notch is a solution for artists and producers working in live events, interactive installations, mixed reality production, virtual reality, and motion graphics. Real-time isn’t just about pumping out frames faster, it changes the creative process completely. If a creative can see the full and final result of a render in real-time it changes the way they think when creating content. The iteration cycle moves to zero.
What is 3D rendering — a guide to 3D visualization
3D imagery has the power to bring cinematic visions to life and help accurately plan tomorrow’s cityscapes. Here, 3D expert Ricardo Ortiz explains how it works.
Since its breakthrough work on Toy Story more than 22 years ago, Disney’s Pixar has been a mainstay and leading light in the world of CGI. Producing blockbuster after blockbuster, the California-based studio has consistently redefined and pushed the boundaries of computer animation.
One such success was Coco, Pixar’s 2017 tale of a boy’s journey into the fictional Land of the Dead. It won the Academy Award for Best Animated Feature, and Best Animated Film at the BAFTAs.
Comparison of Depth Map versus Raytraced Shadows in both Maya and Mental Ray Renderers
This series of renders walks through a variety of parameters for casting shadows. It gives example of settings and what they accomplished. Remember that you can load (“Open”) images within the Render View Window and this would allow you to flip back and forth between different tests. This ability makes it much more easier to evaluate setting changes than in this linear catalog of images.
HOW TO CREATE HIGH QUALITY ARCHITECTURAL RENDERS Most of the images you see online look like perfectly styled apartments by interior designers and this is not how most people actually live. I always try to make my images look like someone is living there, but this time I wanted to take it a step further and style an apartment, as I would do it or like someone who doesn’t know a lot about interior design, but who still has some “style”. I aimed for objects that most people could afford and this is where Ikea comes in! The furniture is good looking and most importantly, it is cheap so it fitted perfectly into my project.
 Winning the render wars with Chad Ashley
For this discussion, we’ll be chatting with Greyscalegorilla’s very own render guru and former Digital Kitchen Creative Director, Chad Ashley. We’ll take a look at Arnold, Octane, Redshift, Cycles, Physical Render and break them down in terms of their Speed of convergence(ability to turn around a render), image quality and production features/scalability and also who we think they are best suited for.
Lexicon KeyShot
KeyShot is everything you need to create fast, accurate and amazing visuals. Featuring a real-time workflow to see your renderings and animations take shape instantly, KeyShot reduces the time it takes to create that perfect shot. From scientifically accurate material and environment presets to advanced material editing and animation, creating product visuals or sales and marketing imagery has never been easier.
Dirty Glass: Rendering Contamination on Transparent SurfacesMAXDPETH is the creative blog of Emmy Award winning CG Supervisor and 3D Generalist Timothy Hanson. In addition to having over 12+ years of production experience working for companies like Bad Robot, MPC, The Mill. Mirada, Method Studios, and Google to name a few, he is also a training provider for Chaos Group (creators of Vray), Solid Angle (creators of Arnold), and The Foundry (creators of Mari and Nuke).
 HOW REAL-TIME RENDERING IS CHANGING THE DESIGN LANDSCAPE
Design is evolving, and there’s never been a more exciting time for tapping into the creative possibilities driven by the rapid change of technology. As real-time engines continue paving the way for a new age of experience, designers are gaining greater flexibility and control over their visualizations for architectural, engineering, automotive, and product design. Designing at the speed of thought is no longer a pipedream for today’s digital artists, now that powerful new tools like Unreal Studio are breaking down the barriers keeping data imprisoned in proprietary CAD tools.
V-RAY WINS ACADEMY AWARD
Vector-based or 3D software uses mathematical algorithms and geometric functions and rendering is the process of calculating this information, converting into raster images, to produce a 2D picture. The rendered picture is made up of pixels that create the image or movie file. The lights, shadows, colours, movement, placement of textures and other information in the virtual scene is calculated in the rendering process to produce and display the sequence. In other words rendering is the process of generating pixels from a 3D project.
We view objects based on how light bounces off an object, this light that bounces is know as photons. Photons can bounce of many different things before we see them. We get the perception of colour for the different wavelengths of light created as the photos bounce around. To recreate all of this 3D software uses render engines that use light rays or rays which are emitted from objects in a scene. When the rays from the camera and light bounces off the object we see the object, the area that is lit.
Colour Management allows the switch between sRGB and liner colour space and many other common colour space environments.
Shaders are materials, that are applied to objects in order to give them a specific visual quality such as colour, transparence, reflection or texture. It determines how a surface appears as well as how it reacts to virtual lights.
RENDERERS
What is the Best External Render Engine of 2024: A Comprehensive Overview
BACK BURNER
Autodesk Backburner is a free software application packaged with 3DS Max, Flame, Maya and a range of other Autodesk products. … In setups with multiple networked machines, Backburner lets you render images more quickly and efficiently by breaking the job into smaller parts.
CHAOS GROUP | V-RAY
V-Ray 3.0 for 3ds Max is a comprehensive physically-based lighting, shading, and rendering toolkit, built to meet the creative demands of CG artists and designers.
An introduction to V-Ray Profiler: Examine render times and optimize performance
5 Artistic Principles of Photorealistic Rendering
9 tips on how to add realism to any exterior architectural project
10 steps to a hardwood floor that dazzles in V-Ray for 3ds Max
Top 10 tips for creating wow-factor interior design renderings
Top 10 reasons to choose V-Ray for architectural visualization
11 helpful tricks to optimize your workflow in V-Ray 5 for Rhino
ChaosTV – Creating realistic snow with V-Ray for 3ds Max
Pursuing realism: achieving incredible archviz with V-Ray and Vantage
The Qt-fication of V-Ray
Tools & Techniques to Visualize an Eco-friendly Home
The light touch: Your complete guide to V-Ray lens effects
How to build your best rendering machine ever
Breaking the mold: Creating immersive renders with V-Ray for 3ds Max
Talking garbage with 3D artist Oliver Kentner
Creating photoreal interiors with V-Ray for Cinema 4D
3D furniture rendering: everything you need to know
V-Ray 6 for Houdini Advances with Solaris, Volumetrics and Lighting Developments
Rendering as a productivity enhancer at every stage of a project
Best of the Chaos blog: Top 12 stories of 2022
The complete guide to Chaos Phoenix, Part 1 — Getting to know dynamics simulation
Exploring lighting and human emotions (Chaos Campus Live Show Episode 4 Recap)
DesignMorphine thesis projects rendered in V-Ray: Part 1
Architectural rendering basics: Exteriors
Architectural rendering basics: Interiors
Painting with pixels: Archviz studio Rembrandt is Dead on its workflow
Use these 5 Chaos Phoenix expert tips to make your archviz scenes amazing
Behind the scenes of the V-Ray 6 release videos with the Chaos 3D team
V-Ray wins Engineering Emmy® Award
V-Ray for Cinema 4D – Beginner’s guide to interior design rendering
How V-Ray makes it easy for anyone to render
How real-time ray tracing with Chaos Vantage through Unreal can revolutionize virtual production
How Embraer relies on the Chaos ecosystem to render their business jets
Embraer uses Chaos Scans along with V-Ray Collection to create impressive renders of business jets in 3ds Max
More options for your simulations with Chaos Phoenix
How Chaos Vantage Improved Silkroad Digital Vision’s Workflow
How Chaos Vantage speeds up CMGR’s pipeline and boosts creativity
How we perfected white and light hair colors in V-Ray
Scanline VFX Supervisor Bryan Grill tells us how rendering with V-Ray for 3ds Max helped control the action
How V-Ray fuels creativity in Think Tank students
How V-Ray powered up Free Guy’s visual effects
How to optimize your scene for rendering in V-Ray
How V-Ray App SDK powers Maticad’s DomuS3D software
How to train your seahorse with V-Ray for Maya
How V-Ray for Maya helped create this astonishing sci-fi scene
Read an exclusive excerpt from Ian Spriggs’ book
Rookies finalist Luis de la Rosa has his say on V-Ray 6 for 3ds Max
Stress-free archviz workflows with V-Ray
Going microscopic with V-Ray for Rhino and Chaos Cloud Rendering
Chaos Group is evolving. Join CEO Peter Mitev to discover the new technology and services that will help you create your world.
Learn how V-Ray 5 for 3ds Max’s materials helped create this crashed car renderingCorona Renderer 7 Webinar
The key to creating captivating animation: V-Ray Collection
Elevate your archviz with tile patterns in V-Ray for 3ds Max
Creating a welcoming living room in V-Ray for SketchUp
Chaos Unboxed Live: the recap
Fashion forward: The role of 3D rendering in the industry
What is archviz? Everything you should know
Layers
The Layers panel in New V-Ray Frame Buffer provides a new powerful workflow for making adjustments to your rendered image. You can bring out render elements and compose them together with individual color corrections in the panel’s Composite mode, or deconstruct light contribution in the scene and fine-tune each light individually in the completed render using the VRayLightMix mode. You can also color correct the final render just like you were able to do in the previous version of VFB.
The technology behind photoreal real-time rendering
Architects, designers, and 3D artists have dreamed of real-time ray-traced graphics for many years. Being able to explore, interact with and change a scene in real-time can shorten workflows, accelerate the time to finished shot, and make it easier for clients to understand and manipulate even your most complex designs.
This article will explore the incredible technological developments that have made real-time rendering a possibility today, as well as the challenges developers have faced to create these unique experiences.
How Uniform Group created Chaos’ wonderful worlds with Chaos Cloud
Chaos’ new tagline, Create Your World, extends far beyond our software. Working together with Uniform Group, a modern family of creative businesses, we’ve sown it into our DNA with visuals that reflect our world-building theme. Along with the icons, fonts and phrases, we turned to Uniform Group to create globes that encapsulate the potential of Chaos products. It was an incredible opportunity for Uniform Group’s V-Ray for 3ds Max-lovin’ 3D team.
Foilco materials added to Chaos Scans
Chaos Scans users can now add a touch of class to their projects with over 270 ultra-realistic, luxurious new materials from world-renowned foil specialist, Foilco. Thanks to the accuracy of the Chaos Scans process, these virtual foils look and respond exactly like the real thing—and even include complex holographic materials.
How V-Ray for Rhino powers ANTIREALITY’s fantastic architecture
A frequent topic of conversation in the CG Garage podcast is virtual architecture. Thanks to modeling, design, and rendering software, architects can be freed from the earthly constraints of gravity and materials and create abstract forms that challenge our relationship with the built environment. Architects and arch-viz artists are only beginning to explore this limitless real estate—but ANTIREALITY has already staked a claim.
What is 3D rendering — a guide to 3D visualization
3D imagery has the power to bring cinematic visions to life and help accurately plan tomorrow’s cityscapes. Here, 3D expert Ricardo Ortiz explains how it works. 3D rendering is all around us. From huge action movies to car commercials to previews of upcoming buildings or product designs, 3D visualization has become so widespread and realistic that you probably don’t even know it’s there.
See what’s new in Phoenix 4, update 4.
Phoenix 4, update 4 introduces features and improvements including collision between Active Bodies, Color Absorption and Massive Wave Force, to let artists achieve production-quality simulations in less time.
This update is also Autodesk 3ds Max 2022 and Maya 2022 compatible.
CHAOS LAUNCHES NEW FREE 3D CONTENT COLLECTION FOR ARCHITECTS AND DESIGNERS
LOS ANGELES, Calif. – February 23, 2021 – Today, Chaos (formerly Chaos Group) launches Chaos Cosmos, a new 3D content system that reduces the process of staging interiors and environments to a few clicks. Highly curated, the library launches with over 650 free models and HDRIs that will address the most common use cases found in architecture and design, including furniture, trees, cars and people. Architects and designers can now test ideas more freely as they cycle between real-time visualization and photorealistic rendering.
ELS Architecture and Urban Design’s favorite V-Ray 5 for Revit features.
ELS Architecture and Urban Design needs software it can rely on. Its 50-strong workforce covers everything from initial concepts to the construction documents. Smooth workflows are a priority, and after trying many different pieces of software, the company has found Revit and V-Ray for Revit to be a solid solution for its needs.
The secrets of the Wooden Metropolis.
Every day, an area of woodland bigger than New York City is deforested. This unsettling fact is vividly brought to life German conservation NGO Robin Wood’s advert, which turns a splintered tree stump into a high-rise metropolis.
24 Hours of Chaos — on YouTube
Our globe-trotting series of livestreamed presentations is now online. Check out insights, tips and hilarity from the international CG community.
Under the hood of Ash Thorp’s stunning “Evinetta”
Cloud rendering “Ascendant’s” effects
Sci-fi thriller “Ascendant” features the elevator journey from hell. VFX Supervisor Christian Debney tells us how Chaos Cloud took its effects to another level.
Say hi to I.D.A., Nu Boyana FX’s digital human
What started as an R&D project evolved into a thought-provoking short film. Here’s how Nu Boyana FX used V-Ray for Maya to create a photorealistic digital human.
RENDERING 1,000+ IMAGES WITH CHAOS CLOUD AND V-RAY 5 FOR 3DS MAX
CGI production studio Mintviz on how V-Ray 5 for 3ds Max and Chaos Cloud’s features helped them create hundreds of images for Bush Furniture in very little time. Chaos Cloud and V-Ray 5 go hand-in-hand. With Chaos Cloud’s rendering, users can access the unlimited power of virtual machines as if they were their own local render farms, while V-Ray 5’s post-production features allow them to make changes after they’ve rendered.
EPIC ADVERTISING WITH V-RAY 5 FOR 3DS MAX
Mondlicht Studios’ work belies the seven-strong size of its team. It’s created epic advertising campaigns for Netflix and Amazon Prime Video series, energy drinks, gaming chairs and futuristic car concepts. It also indulges its creative side with imaginative passion projects that bring out the details in classic and modern cars, place Nike sneakers into sci-fi environments and create drool-worthy foodstuffs.
MAKING KATY PERRY “SMILE” WITH V-RAY FOR 3DS MAX
The music video for Katy Perry’s “Smile” had to be bright and colorful to match the song’s catchy, upbeat nature — and that’s exactly what it achieves. The promo — which transports the musical megastar into a bittersweet video game world — gels so perfectly with the song that it’s hard to separate the two.
HOW TO RENDER AN ARCHITECTURAL SCALE MODEL IN V-RAY FOR SKETCHUP
In this tutorial, I will show you how to use photo compositing in V-Ray for SketchUp to seamlessly integrate your SketchUp model with a photo of a real-life site study model. The resulting image looks just as good as the real thing, with the advantage that you can quickly tweak and re-render the shot if you need to make changes.
You can also use these techniques elsewhere: For instance, to add a full-scale architectural model to an on-site photograph or to integrate an object with a real-world setting.
CREATING A SPECTACULAR ANIME HOMAGE WITH V-RAY
In just 90 seconds, “Showtime” establishes a world that feels like it could fit right in with the cyberpunk dystopias of Akira and Ghost in the Shell, while setting up an intense combat sequence between a cybernetically enhanced heroine and Jason Voorhees-esque mooks.
Behind this anime short is Maciej Kuciara. Originally from Poland, Maciej joined game developers People Can Fly and Crytek before crossing the Atlantic to work for Naughty Dog, the company behind The Last of Us. Then, he jumped to the big screen for an impressive array of movies, including Avengers: Endgame, Wonder Woman 1984 and, of course, the 2017 Ghost in the Shell remake.
We talk to Maciej about how he’s developed “Showtime” — and how his custom V-Ray for 3ds Max shader helped him nail that distinctive manga look.
5 ESSENTIAL V-RAY 5 FEATURES FOR VFX ARTISTS
V-Ray 5 empowers you to create your best work even faster. The first thing you’ll notice about V-Ray 5 for 3ds Max and V-Ray 5 for Maya is that we aren’t measuring a rendering speed increase over V-Ray Next. We’ve been listening to users and we found that convenient workflows are more valuable. V-Ray Next dramatically improved speeds and introduced many default settings that simply work. Now, we’ve taken V-Ray 5 one step beyond . . . The new V-Ray 5 is focused on faster, simplified and more efficient workflows. From its new and uncomplicated user interface to the redesigned V-Ray Frame Buffer, the improvements and new features in V-Ray 5 will significantly boost workflows for users in every industry — from architecture to visual effects.
WORKING FROM HOME: CHAOS CLOUD DELIVERS VIVARIUM VFX
WORKING FROM HOME: CHAOS CLOUD DELIVERS VIVARIUM VFX
Jonas Ussing contributed great shots to sci-fi movie “Vivarium.” He tells us how Chaos Cloud and V-Ray for 3ds Max rendering software help him create VFX at home. Will smaller studios take over the VFX industry? Thanks to the power of cloud computing, it’s possible to render visual effects from bedrooms. And, the restrictions of COVID-related lockdowns have thrust these workflows into practice in the real world.
HOW V-RAY CAN TRANSFORM A SUNNY 3D ENVIRONMENT TO STORMY
Artist Jiří Matys used V-Ray for 3ds Max to transform a day scene into a dramatic rainy night. He reveals his secrets for creating glass, grass and greenhouses. Multi-talented freelance artist Jiří Matys has tackled everything from dinosaur skulls to cartoon snowmen to interior and exterior renders. For a recent commercial project, he was tasked with creating renders of an innovative modular greenhouse system — but it grew into an interesting personal experiment in turning day to night and sun to storm.
5 ESSENTIAL V-RAY 5 FEATURES FOR VFX ARTISTS
V-Ray 5 is a major update to our rendering software. Find out how its new features and improved workflow can give you more creative flexibility than ever before. V-Ray 5 empowers you to create your best work even faster. The first thing you’ll notice about V-Ray 5 for 3ds Max and V-Ray 5 for Maya is that we aren’t measuring a rendering speed increase over V-Ray Next. We’ve been listening to users and we found that convenient workflows are more valuable. V-Ray Next dramatically improved speeds and introduced many default settings that simply work. Now, we’ve taken V-Ray 5 one step beyond . . .
Chaos Group Releases Personal Learning Edition of V-Ray for Maya
LOS ANGELES, Calif. – April 16, 2020 – V-Ray PLE helps new and self-taught CG artists explore the benefits of photorealistic rendering at their own pace, using a free non-commercial license that can be renewed every 90 days. With access to nearly every V-Ray feature, artists can build new skills as they try out some of the same tools used to bring Game of Thrones and Avengers: Infinity War to life.
WHY IAN SPRIGGS USES V-RAY GPU RENDERING FOR 3D PORTRAITS
We caught up with Ian to talk about how he’s experimenting with self-portraiture, switching to V-Ray GPU rendering and taking his in-depth knowledge of the past into the future.
RENDERING TOYOTA’S GR YARIS CONCEPT IN V-RAY FOR CINEMA 4D
CGI Artist & Retoucher Tim Taylor reveals how The&Partnership London created striking car renders for Toyota Europe’s GR Yaris Concept using V-Ray for Cinema 4D.
7 PRO TIPS FOR YOUR V-RAY GPU RENDERS
Rusty Hazelden Launches The Art of V-Ray Vol. 1
VFX artist Rusty Hazelden has released an in-depth 4-part V-Ray tutorial series on YouTube—The Art of V-Ray, Volume 1—which is a practical guide to mastering the V-Ray renderer in Autodesk Maya. Discover how to harness the power of V-Ray through a series of in-depth Maya tutorials from Rusty Hazelden that focus on rendering an exciting television commercial featuring colorful splashes of paint. Check out the first chapter here, then click over to Rusty’s YouTube channel for more:
STUDENT RENDERING CHALLENGE | Oct 8 – Nov 23, 2018 See the winners.
HOW V-RAY NEXT SPED UP TILTPIXEL’S 3DS MAX RENDERINGS BY 25%
TILTPIXEL reveals how it visualized the modernization of a decades-old architectural structure to meet the demands of modern tenants, with V-Ray and Phoenix FD.
WHAT IS V-RAY FOR GRASSHOPPER? KPF REVEALS THE MAGIC
Kohn Pedersen Fox Associates (KPF) is pioneering data-driven design. The international architecture firm has designed five of the world’s 10 tallest buildings and it prides itself on creating sustainable structures which subtly stand out without disrupting the built environment — a process that requires teams of experts running specialist software.
THRIVING ON CHAOS: V-RAY, CORONA AND LAVINA AT SIGGRAPH 2019
Everyone’s talking about real-time ray tracing. An early glimpse of Project Lavina, Chaos’ groundbreaking application for 100% ray tracing in real-time, was revealed last year at SIGGRAPH. And this year, for the first time, SIGGRAPH attendees were able to get hands-on experience with Lavina on both the exhibition floor and during the annual NVIDIA Limelight event in Los Angeles.
HOW TO MAKE THE MOST OF V-RAY FOR SKETCHUP IN ARCH-VIZ
Through “Visualizing Architecture,” Alex Hogrefe has made a name for himself as an arch-viz expert. His blog includes his musings on the world of arch-viz, accessible tutorials and his own playful and experimental renders. Since 2010, Alex has also published a series of books entitled “VA Portfolio,” which catalog the work displayed on his blog — and more — while demonstrating his skills as a designer and editor.
MASTER V-RAY NEXT FOR MAYA WITH THIS 4-PART PRACTICAL GUIDE
In The Art of V-Ray Vol. 1 training by VFX artist Rusty Hazelden, you’ll discover an in-depth series of free video tutorials on just about every aspect of V-Ray Next for Maya. In the first, Rusty guides viewers through V-Ray’s frame buffer, real-time light and material adjustment via V-Ray IPR, and a comparison of progressive and bucket rendering modes. Rusty uses a paint commercial as the basis for the project, with animated colorful splashes created using Phoenix FD for Maya, Chaos Group’s fluid dynamics simulator. Check out the first tutorial in this four-part practical guide and unlock the powerful features available in V-Ray Next for Maya. Plus, read more below about Rusty and the making of these essential guides.
HOW THEY MADE A BETTER CGI THANOS FOR AVENGERS: ENDGAME
An epic VES win for “Outstanding Animated Character in a Photoreal Feature” on Infinity War was a perfect boost for Digital Domain to evolve Thanos into his most ultimate version for Avengers: Endgame. “It’s a huge win and I don’t think anyone took it for granted,” Séraphin Guery, Lead Look Development Artist at Digital Domain told us. “The goal was to take Thanos to another level [for Endgame] while maintaining the already incredible result from the previous movie.”
HOW V-RAY FOR 3DS MAX BROUGHT DEADWOOD’S VFX TO LIFE
Since series one, FuseFX has played a big part in adding visual effects to Deadwood’s gritty, violent Western world. Now, the company is back on familiar territory — albeit with the added firepower of V-Ray for 3ds Max – for Deadwood: The Movie. This eagerly awaited feature-length episode ties up loose ends and draws this revisionist Western adventure to a close. We spoke with Visual Effects Supervisor Eric Hayden about his background in effects, how FuseFX contributed to the show and some of the surprising ways V-Ray for 3ds Max was used.
ANDRE CANTAREL — SENIOR VFX GENERALIST, SCANLINE VFX
Last month, Andre Cantarel’s CG model of the White House caught the attention of the CG industry thanks to its meticulous attention to detail. In this podcast, Andre tells Chris how this passion project came to fruition, the secrets he discovered in researching the building and what he plans to do with the construction. Creating presidential palaces isn’t all Andre does. His career in VFX has taken him from flipbook animations to working as a senior generalist for companies such as Uncharted Territory and Scanline on movies including Independence Day: Resurgence, Justice League and Tomb Raider. Andre reflects on how hardware, software and the industry have developed and looks to his upcoming project: a model of Russia’s formidable Mi-24 helicopter gunship.
ONDŘEJ KARLÍK & JAROSLAV KŘIVÁNEK — CORONA & CAUSTICS
Caustics are everywhere. Defined as concentrations of light refracted or reflected off a specular surface, common examples include the patterns you see on the bottom of a pool and the bright curves of light in a wine glass’s shadow. But they also affect the way you see through windows and the reflections cast by any shiny surface. Turning on caustics in ray traced renders can add subtle levels of realism, but their high computational expense means they are usually omitted.
Check out highlights from the biggest and best Total Chaos conference to date
In May 2019, over 1,000 CG fans from around the world descended on Sofia, Bulgaria, for three days dedicated to all things 3D. We’ve rounded up the best of the best so you can relive the event or see what you missed.
There have always been blips of mature content on the animation spectrum, but never anything like Love, Death & Robots. Released in March, the anthology kicked open the doors for adult-oriented content in the medium, giving a generation of fans raised on Liquid Television a way to explore the many sides of human nature in the most visceral way possible. The brainchild of Tim Miller and David Fincher, Love, Death & Robots weaves the provocative world of ‘70s comic books into 18 short stories that run the gamut from sci-fi to horror. In this world, viewers go from “sentient dairy products” to “werewolf soldiers” pretty quick, which inspired Miller’s Blur Studio to call on friends and rivals to bring in a little stylistic diversity.
“There’s nothing more powerful in the world than a good story.” (Daenerys, Game of Thrones Season 8.) And, as any Games of Thrones fan knows: You don’t (can’t, won’t!) skip the credits. Each intro sequence is an essential clue into where the story is going. For production studio Elastic, season 8 of Game of Thrones was the last leg of a 10-year journey creating the opening credits for the world’s favorite medieval fantasy epic. After seven seasons, the story centered in on Westeros and created a new challenge for Elastic’s artists — who were previously used to making sense of the larger sprawl.
MIKE HILL — DESIGNER, CONCEPT ARTIST AND FILM ANALYST
Mike Hill’s enviable career has seen him wear many hats on big projects in film, TV and games. He designed the formidable Retribution spaceship for Call of Duty: Infinite Warfare, helped conceptualize some of Game of Thrones’ most iconic sets and scenes, created the intricate Memory Orb device for Blade Runner 2049, and worked out how to unite 18 disparate episodes of Netflix series Love, Death & Robots.
JOSE PAREJA GOMEZ AND MARKO MARGETA — ZAHA HADID ARCHITECTS
Zaha Hadid Architects has always embraced technology to stay ahead of the game — even the late Zaha Hadid was herself using computers to design buildings back in the 90s. Today, the company makes use of software including Revit, Maya, V-Ray, Rhino and Grasshopper to create its iconic parametric designs, as well as lots of bespoke tools to create VR experiences and model human interactions.
Ian Spriggs exclusively unveils his latest portrait, Vlado on new V-Ray Next for 3ds Max features, women in tech panel plus more from Chaos Group’s conference.
On May 17, 2019 we unleashed Total Chaos. The day started with an incredible keynote from the most important people behind V-Ray and Corona. Then, the 1,000-strong crowd dispersed to check out a diverse array of presentations from professionals in the CG industry.
Total Chaos’s last day was a cornucopia of cool CG content covering everything from the world’s biggest buildings to the universe’s biggest bad guys.
Total Chaos’s second and final day was every bit as good as the first. The line-up of 34 presentations and discussions across four stages demonstrated the incredible diversity of the CG industry. The crowds were astonished by AI-powered world builder Promethean AI, inspired to create a mobile game with Gameloft Sofia, learning how Blur Studio coordinates artists around the world or discovering the inner workings of Chaos Cloud.
Architecture is adapting to new technology more quickly than any other field. VR and 360-degree renders are giving architects and their clients a sense of scale like never before, while advanced computer modeling and 3D printing are making it possible to experiment with new materials and forms. And on the site: AR is making it easy for construction managers to put all the pieces into the right places.
SPAGHETTI AND MEATBALLS — WITH A SIDE OF V-RAY FOR HOUDINI
The Total Chaos 2019 keynote was a treasure trove of delights for CG fans. Among the surprise announcements and groundbreaking product demonstrations, one moment was a complete hit with the audience: Vlado’s unveiling of Peter Sanitra’s spaghetti with meatballs video. Created with V-Ray for Houdini, the sim depicts succulent meatballs tumbling down a slope covered in moist spaghetti, tender basil, crumbly parmesan and rich tomato sauce. It’s strangely hypnotic, beautifully realistic — and it will cause tummy rumbles if you’re even slightly hungry. We join Peter in his V-Ray-powered kitchen to talk about how he cooked up this tasty concoction.
KIRK SHINTANI — ELASTIC: GAME OF THRONES OPENING CREDITS
Game of Thrones’ opening credits sequence has become one of the most iconic in the history of TV. Every week, millions of people around the world have their appetites whetted and spines tingled by the famous theme music and an exploration of an animated 3D map of Westeros, complete with the themes and locations of the forthcoming episode.
DARIN GRANT — CTO, ANIMAL LOGIC
A lot has changed since Darin Grant last appeared on the CG Garage podcast back in September 2016. The VFX industry has overcome its cloud-computing fears and embraced it wholesale, making it faster and cheaper to create imagery for Hollywood movies. Darin, meanwhile, left Solid Angle to consult for various companies and is now CTO for creative digital studio Animal Logic, the company behind The Lego Movie 2, The Matrix and Happy Feet.
2 IMPORTANT THINGS V-RAY FOR UNREAL SOLVES FOR ARTISTS & DESIGNERS
There are so many great things you can do inside a real-time engine. Which is why so many artists and designers have added Unreal to their creative workflows. To help V-Ray users get the most from real-time, we felt there were two important problems to solve:
- Make it easy for designers to get their work into real-time.
- Once in real-time, make sure V-Ray is always there for you.
“Love, Death + Robots” with Blur Studio – Behind the Scenes
Production Studio Explores Different Animation Styles with Help of V-Ray Renderer; New Anthology Now on Netflix LOS ANGELES, Calif. – March 18, 2019 – There have always been blips of mature content on the animation spectrum, but never anything likeLove, Death & Robots. Released last weekend, this new anthology kicks open the doors for adult-oriented content in the medium, giving a generation of fans raised on Liquid Television a way to explore the many sides of human nature in the most visceral way possible.
Learn how V-Ray helped Digital Domain maximize the level of detail on Thanos in Avengers: Infinity War and render some of the film’s most challenging moments.
Earth’s mightiest heroes could just be the VFX artists that brought Marvel’s evilest villain to life in Avengers: Infinity War. To most, Thanos is the brute that came from space to steal a necklace from a wizard, but to the talents at Digital Domain, he represented an incredible opportunity to raise the bar even higher for the CG characters in Marvel’s Cinematic Universe.
Ingenuity Studios was founded in 2004 as a one-man shop crafting music videos. From there, the studio has grown and expanded into CG and VFX work for commercials, film and television. Today, Ingenuity Studios houses 100 people across offices in New York and Los Angeles and tackles an unusually wide variety of work — everything from Pixar-style animation and graphics-heavy music videos to photorealistic digital doubles and blockbuster FX work. And the client list is seriously impressive, too: Netflix, Marvel, Fox, ABC, NBC, New Line and Blumhouse, to name a few.
Chaos Group Acquires Render Legion and Corona Renderer. Chaos Group has acquired Render Legion, based in Prague, creator and developer of the Corona renderer. Recognised for ease of use, Corona has gained popularity among artists working in architectural visualisation. The Render Legion team, including its founders and developers, will join Chaos Group as they continue to develop Corona using support and resources available to them through this deal. V-Ray will continue to be a core component of Chaos Group’s portfolio. Both Corona and V-Ray will continue to be developed independently by their original teams, following their own paths, with the same type of innovation that users are accustomed to – except that they will be sharing ideas, research and developments. An example is V-Ray’s DMC sampler [diffusion Monte Carlo], planned to appear in Corona v1.7, and the Render Legion team is helping Chaos to optimise V-Ray’s dome light.
The importance of metalness and why we’ve added the Metalness parameter to the V-Ray standard material to better support a PBR workflow in V-Ray Next.
The term “Physically Based Rendering” — or PBR — does, in itself, imply that the material definition used in PBR is based on real physics. Some have also interpreted this as meaning that other shading models are not based on real physics; which is wrong. While real-time rendering shading models were not necessarily based on real physics, other ray tracers, such as V-Ray, have always been physically based. As such, PBR shading models became very popular for real-time rendering for two basic reasons:
Introducing the next generation of rendering.
With powerful V-Ray Scene Intelligence, fully redesigned IPR, and 2X faster GPU production rendering, V-Ray Next is smarter, faster, and more powerful than ever.
See the visionary keynote, plus more presentations and interviews from Total Chaos
Total Chaos 2018 was a blast! Over 900 visitors enjoyed two days of world-class presentations and hands-on workshops. Absolutely everything was awesome, but we’re proud to bring you some of the very best content, below.
YOU WON’T SEE ANOTHER ARCH VIZ MOVIE LIKE LANDMARK ANYTIME SOON
Architectural communication studio Beauty and The Bit unleashed its inner Kubrick for this atmospheric short film. Watch it here, and find out how director Victor Bonafonte took advantage of V-Ray Cloud.
Welcome to the V-Ray for Rhino official Courseware site. The goal of this courseware is to improve the level of knowledge of V-Ray among its users.
BLOATED MOTORS: INK GIVES THE 70S’ UNLOVED AUTOS A HELIUM INJECTION
What began as an in-house experiment has ballooned into a viral phenomenon. We talk to the minds behind this playful reimagining of the cars that style forgot.
VIDEO TUTORIALS CREATED BY OUR COMMUNITY V-Ray for Sketchup
Professional Rendering for Artists & Designers
VRay Mtl stands for Vray Material – Joel Stutz Visual Center
If you ever spoke with an architect who does 3d environments, you might have heard a lot about Vray and Unreal Engine 4. A couple of years ago, there were a lot of guys moving from traditional renders to real-time. There were a lot of new limitations, connected with game-specific requirements to 3d. There was a lot of nagging about workflow, and ultimately there was talk about UE4 renders not getting just the right kind of a photo feel, clients expect from archviz. It’s all debatable, but we were witnesses of these talks and arguments. But now it seems, we might have a Vray integration in Unreal Engine
V-Ray | NUKE unifies the pipeline between NUKE artists and 3D artists for unprecedented workflow improvements at all stages of production, while providing access to V-Ray’s advanced ray tracing capabilities.
 CREATING STUNNING ANIMATIONS AND VISUALS WITH GPU RENDERING
V-Ray GPU is developed with NVIDIA CUDA, delivering physically based final frame qualities and highly interactive rendering to support the real-time creative process. It is always scalable to increase speed—within the workstation, across the network, and to GPU clusters or cloud services—so it can go as fast as your project requires
PODCAST
- TOOLS — ART AND TECHNOLOGY PANEL AT THU
- MARTINI GIANT — 2001: A SPACE ODYSSEY & 2010: THE YEAR WE MAKE CONTACT
- KELLY PORT & MATTHEW BUTLER — DIGITAL DOMAIN
- ROBIN COWIE & TONY STANLEY — EA
- LAUREN MAYER-BEUG — CREATIVE DIRECTOR, CHAPEAU STUDIOS
- ALEXANDER SOKLEV — V-RAY GPU TEAM LEAD, CHAOS GROUP
- ANDREW PRICE — FOUNDER, BLENDER GURU/POLIIGON
- V-RAY 5 WITH CHAOS GROUP’S ALEX YOLOV AND PETER MATANOV
- JEFF MOTTLE — CEO AND FOUNDER, CGARCHITECT
- ASUKA TOHDA-KINNEY — CG SUPERVISOR, DIGITAL DOMAIN
- GARY YOST — 3DS MAX DEVELOPMENT TEAM LEADER & WISDOMVR PROJECT FOUNDER
- MIKE CAMPAU — DIGITAL ARTIST
- BILALI MACK — VISUAL EFFECTS SUPERVISOR, ALKEMY X
- KIRSTEN ZIRNGIBL — CONCEPT ARTIST, ILLUSTRATOR & GAME DEVELOPER
- Ari Rubenstein — VFX Supervision & Look Development
- Richard Pay, Uniform & Melissa Knight, Chaos — Rebranding Chaos
- Sophia “PHIA” Bollinger — The Virtual Reality Show
- Chris Harvey — VFX Supervisor
WEBINARS
NVIDIA GPU RENDERING WEBINAR SERIES: DABARTI STUDIO: GPU RENDERING IN PRODUCTION WITH V-RAY
Thinking about switching from CPU to GPU rendering? Hear Tomasz Wyszolmirski explain how Chaos Group’s V-Ray GPU and NVIDIA have transformed his studio’s workflows while lowering costs.
V-RAY DOWN UNDER TOUR 2017 – notes from this presentation, version 3.5.
Chaos Group will present a packed schedule of presentations, covering V-Ray in architecture, design, construction, and media and entertainment. Join us to find out how to create incredible imagery quickly and easily, and to see how professionals use V-Ray.
V-Ray 3.0 for 3ds Max webinar – Australia – Link
A set of video tutorials to get started with V-Ray 3.0 and more information about new features and improvements are available on www.v-ray.com – the new home of the V-Ray community.
Watch the reocrding | find out how to transfer V-Ray for 3ds Max projects into Unreal Engine.
In this webinar, host Simeon Balabanov will cover everything from installing the plugin to setting up your project and moving your V-Ray data into Unreal. You’ll also find out the simple techniques which ensure your projects look as good as possible in Unreal.
V-Ray Next for Revit is here – next generation rendering
DENOISER
Visual noise, noise in shadow, uneven pattern of noise. Linear threshold to noise relationship is better for compositing because you get equal noise in the dark and light. Exposure, noise consistency is better.
Placement of sampling, more evenly and easier for denoising. Denoise at the moment of creation or after processing. Lower the threshold twice get twice the less noise.
Denoiser works first by looking at the world normals. The noise levers are a black and white map and as we render the image V-Ray knows what level of noise has been reached for each pixel and stored in the black and white map which is going to be used later on as a mask. White is a high level, blur more here and black low levers of noise, easy to render, no soft shadows and GI. Sampling control and GI control.
Extract some information for better denoising process and use to denoise more intelligently, works with both samplers, progressive & bucket and CPU & GPU which is hardware accelerated.
Render at lower quality, then recover the information and use denoiser as progressive render works. Increase the quality without rerendering.
DENOISER options, ‘only generate render elements’ option. When rendering a sequence of frames, with stand alone took it denoiser between frames when dealing with animation.
Utilise the GPU to denoise, working much faster. As the rendering goes on, the denoiser will update every now and then. As the progressive render goes on, can see the result in real time.
Hardware Accelerated – on is quicker rendering and will take the resources from the graphic card
Noise Threshold in Render Settings
Colour Threshold – when adjusted the render time is predictable
Frequency 10
Green – less time for denoising
Workflow:
V-Ray continues to render and constantly see the denoise version. Initiate the render and keep an eye on the denoiser result. At the moment you like the denoised version, and there is no detail lost and only recovering the information, stop the render and in the output window look at the max sample level reached or final nose threshold, right before the render was stopped. Take the value, put in V-Ray and rerender using the bucket renderer for the final result. Make sure to get the same result after denoising. Will aid in finding the threshold for the desired quality.
Alternative way to work, start with denoiser preset and high threshold, find something that is in GI, in focus and render with a large threshold. Draw render regions in different areas such as in focus, out of focus, in shadow, bur, reflections and render quick versions and check out the noise and look at the denoiser with different settings with the threshold. Compare the different versions and start to see where the denoiser starts to lose detail then adjust in the presets with adjusting the denoiser lower by two times, each time where there is no noise. This will render the fastest to this chosen quality.
Maya & 3D Max (tools) in different folders. Default will use the graphics card, input = (sequence of frames) and will denoise. Better for denoising animated sequences, when use the one on the interface only have a single frame and V-Ray does not know that there might be a frame before and/or after and use an external tool for that.
Use the stand alone denoiser because there is a sequence of frames, if run from within the frame buffer it does not know there is a frame before and a frame after and will only denoise each frame separately. This can result in some artefacts due to some flickering, consider the frames around the current frame to smooth out all the noise.
Feed it with a sequence of frames and can take frames before and after, depending on what is set to do. Use there frames for analysing the data of the noise, will not simply blur between the frames, even though there is hand held shakiness there is no motion blur from that.
VR MATERIAL SCANNER reduces the gap between photorealistic materials and authored materials. With textures you can get to 80% quickly and then takes a lot of time to fine tune. VR material scanner, take a piece of a physical material and provides a digital replica of the material and will make the look consistent. Adjust the material, adjust the lighting and the material scanner will remove the step giving the real material and how it is in reality and then need to work on lighting and correct exposure. Option to change the paint of the material without affecting the reflections. Reflects the different properties of the materials.
GPU update & CPU, general GPU OPTIMIZATION
Aerial Perspective, Clipper – single plane on the GPU, Shadow Catcher, Directional Light Support,
ON DEMAND MIP MAPPING When have large textures, will optimise them, how much memory are they taking up? 1.2GB down to 10 MB. Creates smaller versions of the textures, done automatically. In the GPU settings have the option for ondemand mip map textures and enable from here.
Rendering with GPU, small amount of memory, to render on the graphic cards need to load all the assets into the memory, optimisation is vital. The out of core optimisation, if the texture is too large the render can start putting textures into the computer memory and it is much slower and the rendering speed slows down.
Knows what is close and further away from the camera, based on distance, creates mip map levels for the maps for the textures for this point of view. Will detect a black and white image, when grey scale not selected will only take one of the RGB channels. Alpha channel, if solid colour will not store alpha for every pixel and will strip away the alpha channel.
ADAPTIVE LIGHTS If you need to render lots of lights, the more lights the better the difference in render time. Global settings > advanced/expert mode > adaptive lights. V-Ray finds out which lights contribute more to the current rendered area and samples only these lights.
Takes into consideration lots of lights and reduces render times about 5 times faster. Understands which 8 lights (can be changed in settings) are most important for this pixel that is being rendered.
GLOSSY FRESNEL
Everything has Fresnel Have to put Fresnel on every reflective surface.
Particular for metals and some kinds of plastics, illumination relies on reflections does not take into consideration the roughness of the surface. Keeps the energy conservation more accurate.
Not only from the viewing direction of the camera, also from the point of view of the light, the angle of the light shines on the object and the angle of the light on the surface for glancing angle. For rough reflections it dulls the surface and on the glazing angles.
Reflections are important and a small amount of light back into the scene. Important when considering energy conservation, when we have some roughness on the surface we are losing some reflection, does not make any difference when the surface is perfectly glossy. When we start taking away some glossiness is does not reflect all the light back in one direction and this setting accounts for this.
The MDL Material library. The VRayMDLMtl material loads NVIDIA Material Definition Language files (.mdl) and renders them directly with V-Ray.
CONNECTION to VR DEVICES and IMPROVEMENTS
RESUMABLE RENDERING progressive and bucket rendering, animation. Tick box under Global Settings. Specify the V-Ray image file format if using progressive rendering and EXR for bucket rendering.
INTERACTIVE RENDER or Production Render
Will the Render be Progressive or Bucket
Render on GPU or CPU
PHOENIX FD – Fluid Dynamics 3.0
https://www.chaosgroup.com/phoenix-fd/maya
Flip solver, quick presets, faster rendering for volumes, improved fire and smoke solver, viewport preview.
Wet and dry map, foam, splashes, removed grid artefacts, better for thin layers of liquids, presets from the tool bar, new forces such as spline attraction, body force can get from one type of emission to another and better preview in the viewport that interacts with scene lighting giving better shading.
Presentation by DMITRIY TEN
https://www.chaosgroup.com/gallery/profile/dmitriy-ten
Workflow:
- Good Reference & Good eye for small detail, is most critical for photorealistic images, is 90% good final result. The interior of a spacecraft.
- On the Maritime Museum project took over 1,000 shots for reference for the modelling and texturing remembering to focus on the imperfections.
- Break down to smaller and smaller pieces until you get simple shapes and some are very repeatable.
- Started modelling, looking at positions and block out, deciding on which shapes and angles look better and what you are going to do. Use simple geometry making sure to replicate the main shapes.
- Use different cameras, settings and lenses. Look at as many renders as possible to see different possibilities, what looks better for that image.
- Consider everyone using the same software.
- Create a library of materials, with everyone using from this library.
- While modelling started combining the parts into one big piece.
- Start lighting, learn about real life, how they work in real life then understand better in 3D. Had the Sun, lights for the Lamps, lights for the Tunnels so light there.
- Always a way to improve render, reflection, specular, lighting passes for compositing.
- Colour grading and using photoshop.
Used V-Ray, did not have another solution for proper translucency, speaking about GPU not using CPU anymore.
Getting high quality and photo real renders. Used VR Scans in GPU mode, attempting to replicate them. Custom shaders, referencing VR Scans with custom built texturing. 16K texture to apply the imperfections.
How do things work in real life? VRscans provide very precise results and different lighting set up in different conditions to get an idea. The biggest problem with photo reference has baked lighting into the pixels and cannot see from different angles, the reflections how they appear from different angles. In production need the flexibility to change things in post, such as reflections, lighting pass and other stuff and is critical to have them for making adjustments in post.
V-Ray 3.6 for SketchUp – Webinar
CORONA
Corona Renderer is a new high-performance (un)biased photorealistic renderer, available for Autodesk 3ds Max and as a standalone CLI application, and in development for Maxon Cinema 4D.
The development of Corona Renderer started back in 2009 as a solo student project of Ondřej Karlík at Czech Technical University in Prague. Corona has since evolved to a full-time commercial project, after Ondřej established a company together with the former CG artist Adam Hotový, and Jaroslav Křivánek, associate professor and researcher at Charles University in Prague.
Despite its young age, Corona Renderer has become a production-ready renderer capable of creating high-quality results. It has been already downloaded over 80 000 times.
Proudly CPU Based
Corona Renderer does not need any special hardware to run. It uses the CPU and you can run it on any processor from Intel or AMD released in the past decade. Why Only CPU? By rendering only on the CPU we avoid all bottlenecks, problems, and limitations of GPU rendering, which include the unsuitability of GPU architectures for full GI, limited memory, limited support for third party plugins and maps, unpredictability, the need for specialist knowledge or hardware to add nodes, high cost, high heat and noise, and limited availability of render farms. Read our in-depth look at the advantages of CPU-based rendering.
DEADLINE
The center of your pipeline AWS Thinkbox Deadline is a hassle-free hybrid administration and compute management toolkit for Windows, Linux, and mac OS based render farms, supporting more than 80 different content creation applications out of the box. Deadline provides flexibility and a wide range of compute management options, giving you the freedom to easily access any combination of on-premises or cloud-based resources for your rendering, render management and processing needs.
DISNEY, WALT
HYPERION
Disney’s Hyperion Renderer. A renderer is the software that takes all of the models, animations, textures as well as lights and other scene objects and produces the final image that make up an animated movie by calculating how the light bounces around a virtual scene and shades the objects. Hyperion is our in-house renderer and is a physically-based path tracer.
ISOTROPIC
Isotropix has released Clarisse 3.6, the latest version of its 2D/3D rendering system, adding support for outline rendering, a shadow catcher for live-action compositing, and a new shading variable system. The update also makes it possible to remove the watermark from the free non-commercial PLE edition. New outline shader for non-photorealistic output, shadow catcher for realistic work.
New Watermark free PLE
NPR Using the Outline Shader
MARMOSET VIEWER
MAXWELL
Maxwell Render is an unbiased 3D render engine, developed by Next Limit Technologies in Madrid, Spain. This stand-alone software is used in the film, animation, and VFX industry, as well as architectural and product design visualisation. It offers various plug-ins for 3D/CAD and post production applications.
MERCENARIES ENGINEERING Guerilla 2.0
Rendered in Guerilla: a still from French animated feature Mune. The new version of the software, Guerilla 2.0, updates the core path tracing engine used in both the renderer and look dev tool Guerilla Station.
Mercenaries Engineering has released Guerilla 2.0: the latest version of its suite of production tools for lighting, look development, scene assembly and rendering. The update overhauls Guerilla’s core path tracing engine, improving performance on complex scenes, and adds support for interactive rendering and light path expressions.
MITSUBA
Mitsuba is a research-oriented rendering system in the style of PBRT, from which it derives much inspiration. It is written in portable C++, implements unbiased as well as biased techniques, and contains heavy optimizations targeted towards current CPU architectures. Mitsuba is extremely modular: it consists of a small set of core libraries and over 100 different plugins that implement functionality ranging from materials and light sources to complete rendering algorithms.
NOTCH
Follow along with Notch product specialist Will Smith as he guides us through setting up a real-time scene in Notch, a rendering engine with a powerful WYSIWYG workflow. This tutorial will guide you through the steps of setting up a real-time scene in Notch, a rendering engine with a powerful WYSIWYG workflow. I’ll be touching on a number of different areas during the tutorial including:
● The asset
● 3D tools and applications
● Mesh optimisation – high and low poly mesh
● Baking high poly details
● Materials
● UVs
● HDRi Images
● Notch user interface
● Lighting parameters
● Importing meshes and materials
NIVIDA
NVIDIA: DISCOVER FASTER, MORE ADVANCED GPU RENDERING
GPUs are transforming rendering—and the entire design process. NVIDIA gives you more ways to enhance your creative workflow with fluid 3D visualizations for better results and immediate decision making. Explore designs with your client in the room. See actors rendered in real time as they portray a character. Even experiment with prototype materials as you accurately simulate real-world lighting conditions.
NVIDIA solutions scale to meet any demand. Instantly accelerate your rendering with NVIDIA® Quadro® GP100 and multi-GPU workstations. Connect a network of local or remote GPU servers with NVIDIA DGX-1™. Or access the cloud for the fastest final frame results possible.
Includes: ELASTIC USES GPU RENDERING WITH OCTANE FOR THE ALIENIST TITLE SEQUENCE, REDSHIFT RENDERING ACCELERATES CREATIVITY AT AIXSPONZA, DABARTI STUDIO: GPU RENDERING IN PRODUCTION WITH V-RAY
NVIDIA ANNOUNCES OMNIVERSE CLOUD TO CONNECT TENS OF MILLIONS OF DESIGNERS AND CREATORS
PHOTOREALISTIC RENDERING in REALTIME
On demand webinar Introducing NVIDIA Quadro RTX REal Time Means Real Change
NVIDIA | WOODS BAGOT TRANSFORMS VISUAL COMMUNICATIONS WITH MOST ADVANCED GPUs
Webinar, Woods Bagot Transforms Visual Communications with Most Advanced GPUs. We hope you found the information that was discussed valuable.
Quake II RTX Releasing for Free with Ray-Tracing Support
NVIDIA has announced that Quake II RTX will be available on GeForce.com as a free download on June 6. Quake II RTX is the world’s first game that is fully path-traced, a ray-tracing technique that unifies all lighting effects such as shadows, reflections, refractions and more into a single ray-tracing algorithm. The result is a stunning new look for id Software’s Quake II, one of the world’s most popular games, originally launched in 1997.
Plugin Products Transition Iray, Cinema 4D and Mental Ray. To bring AI and further GPU acceleration to graphics, NVIDIA continues to significantly focus on developing SDKs and technologies for software development partners who create professional ray tracing products. With this emphasis, NVIDIA has made product development changes around the Iray and Mental Ray plugin products.
NVIDIA IRAY for MAYA
NVIDIA® Iray® for Maya is a plug-in for Autodesk Maya® that DELIVERS EXCEPTIONAL PHYSICALLY BASED IRAY RENDERING. Scene lighting and design are extremely interactive and intuitive throughout the entire look-development process using native Maya controls. This means you can easily create or modify physically based lights and materials with material nodes integrated directly into Maya. All the materials and lights, including the NVIDIA vMaterials Library, are built with the NVIDIA Material Definition Language, so they can be shared with other MDL-compatible tools.
LESTER BANKS GETTING STARTED USING [0X1]’S IRAY FOR MAYA Consultancy posts a look at using their implementation of iRay in Maya, showing off the installation, integration and use of iRay in Maya 2014. Although iRay can Maya can be “ticked” into working together, [0x1]’s iRay is completely integrated into Maya and offers an easy setup and workflow making use of iRay’s embedded features.
NVIDIA – Mental Ray
Nvidia discontinues Mental Ray
Nvidia is stopping development of Mental Ray. As of today, 20 November 2017, it will no longer be possible to buy new subscriptions to the standalone edition of renderer or its 3ds Max and Maya plugins. No new features, but bugfixes to continue throughout 2018.Nvidia announced its intention to discontinue development of new features for Mental Ray in an email to subscribers last week.
mip_fgshooter is a mental ray production shader that allows you to shoot final gather points from multiple cameras instead of just the render camera.
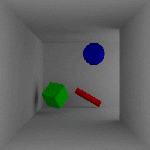 Flicker – Generally, flicker is a result of changing indirect lighting contribution computations between frames. This indirect contribution computation is based off of the perceived indirect lighting at each of the FG points. Because the location/number of FG points is camera/geometry dependent, and cameras/geometry move between frames in animation, subtle differences in the locations of the FG points causes flicker.
In general, the more stable the final gather points, the more stable the final gather, so it is best to use the stationary cameras in combination with the render camera.
Learning to use and enhance your experience with mental ray
Mental Ray Architectural and Design Visualization Shader Library – link
NVidia Mental Ray Webinar. Exciting new features! 7-Feb-2017
misss_fast_shader2_x shader setup Mental Ray Maya
OTOY – Octane Render
OctaneRender is the world’s first and fastest unbiased, spectrally correct GPU render engine, delivering quality and speed unrivaled by any production renderer on the market. OTOYis proud to advance the state of the art once again with the release of OctaneRender 4™ – available now – with groundbreaking machine learning techniques, out of core geometry support and massive 10-100x speed gains in the scene graph.
Top GPU powered projects created with OctaneRender
OTOY unveils OctaneRender 3: Massive upgrade to the world’s best GPU renderer defines the state of the art for VFX in films, games and beyond
Octane Render is the world’s first GPU based, un-biased, physically based renderer.What does that mean?
It uses the video card in your computer to render photorealistic results fast…really fast.
This allows the user to create stunning works in a fraction of the time of traditional CPU based renderers.
What is OctaneRender? is the world’s first and fastest GPU-accelerated, unbiased, physically correct renderer. What does that mean? It means that Octane uses the graphics card in your computer to render photo-realistic images super fast. With Octane’s parallel compute capabilities, you can create stunning works in a fraction of the time.
NVIDIA GPU RENDERING WEBINAR SERIES: ELASTIC USES GPU RENDERING with OCTANE for the ALIENIST TITLE SEQUENCE
Quick little overview of setting up a diamond material to look accurate in C4D Octane. Hope it helps you out!
C4D Octane Tutorial: Cleaning Up Artifacts with Ray Epsilon
Quickly Set up SSS (Subsurface Scattering) in Octane for Cinema 4D
C4D Tutorial: SSS (Subsurface Scattering) Faked in Cinema 4D
PIXAR | RENDERMAN
REYES
Render Man – free non-commercial
With the new state-of-the-art RIS framework optimized for physically-based rendering, RenderMan can deliver unmatched flexibility for any production pipeline.
Making Art with Soul | The Latest from Pixar’s RenderMan – Foundry
DNEG Spotlight – Building an Animation Pipeline with Katana & RenderMan
RENDERMAN RIS
RenderMan’s RIS is a new rendering mode that is designed to be fast and easy to use while generating production-quality renders. Global illumination works out of the box and interactive rendering provides rapid iteration for artists. The new mode supports many of the same features as traditional RenderMan but introduces a wholly new shading pipeline. Understanding what’s new as well as what old techniques still apply is key to getting the most out of RIS. The following is a high level overview of how it works.
Unlock the secrets of Pixar’s RenderMan through a series of in-depth tutorials that focus on rendering an animation in Maya with photo-realistic materials and dramatic lighting. For over 30 years, RenderMan has been used in the film industry to render movies featuring groundbreaking visual effects and animation. Now, from Rusty Hazelden, the same dedicated visual effects artist that brought you “The Art of Nurbs“, comes a brand new 5-part YouTube tutorial series: The Art of RenderMan Volume 1, which provides an introduction to Pixar’s RenderMan for Maya.
Pixar Makes Painterly CG: New Research Could Change The Look of Their Films – link
3drender.com – Three D lighting and rendering including challenges
QUBE
At PipelineFX we partner with you to improve your render pipeline. We work hard to understand your rendering workflow and requirements, and offer comprehensive products and services to dramatically improve your rendering performance. We will offer an appropriate amount of installation assistance, targeted end-user and administrative software training and consulting services as needed. Success in digital media today requires maximum efficiency and we will strive to optimize your existing infrastructure as well as planned future expansion.
RADEON PRO
Radeon™ ProRender is a powerful physically-based rendering engine that enables creative professionals to produce stunningly photorealistic images. Built on highly efficient, high-performance Radeon™ Rays technology, Radeon™ ProRender’s complete, scalable ray tracing engine uses open industry standards to harness GPU and CPU performance for swift, impressive results.
RED GIANT
In Depth Look – Red Giant Universe 2.2
“It’s rare we get to introduce technology that is entirely new! Universe is an entirely new foundation for tools. It marries the simplicity of Javascript with the power of the GPU to deliver speedy renders and pixel-perfect results. Users are going to love how quickly we offer new plugins.”
REDSHIFT
Redshift is the world’s first fully GPU-accelerated, biased renderer.
Redshift is a powerful GPU-accelerated renderer, built to meet the specific demands of contemporary high-end production rendering. Tailored to support creative individuals and studios of every size, Redshift offers a suite of powerful features and integrates with industry standard CG applications.
RENDERPAL
RenderPal V2 is a professional Render Farm Manager, dedicated to managing network rendering across small to large render farms. It offers unrivalled functionality and a wide range of features, delivering an enterprise-level solution for distributed rendering. From the artist’s workstation to the various rendering nodes, RenderPal V2 takes care of the entire rendering pipeline.
SIDE FX
As an independent filmmaker or indie game developer, your goal is to create professional-quality work with a small team and tight budget. Houdini Indie helps you accomplish this by making all the features of Houdini FX affordable for indies.
Mantra
Mantra GPU Rendering option
Mantra is the highly advanced renderer included with Houdini. It is a multi-paradigm renderer, implementing scanline, raytracing, and physically-based rendering. You should use the physically based rendering engine unless you have a good reason to use another engine. Mantra has deep integration with Houdini, such as highly efficient rendering of packed primitives and volumes.
Understanding mantra rendering
The following information about how Mantra works may be useful for understanding the various parameters and how they affect the renderer, performance, and quality. The Mantra render node settings let you choose a rendering engine. You should generally leave it at the default (“Raytracing”), but the following explains the settings. Mantra essentially has two operating modes: physically based raytracing and micropolygon rendering. Micropolygon rendering was a performance compromise that has largely been supplanted by raytracing in modern rendering setups. The micropolygon algorithm was designed for memory efficiency: geometry is diced and shaded once, then discarded when it is no longer needed (though it remains in memory if it is hit by a ray). Now that we have models with very high polygons counts and machines with tons of memory, raytracing/PBR is usually a more efficient method.
SMEDGE
Smedge is an open-ended distributed computing management system with extensive production history at facilities small and large. Create any rendering pipeline imaginable, with local and cloud resources, mixing Windows, Mac and Linux seamlessly.
SOLID ANGLE – Arnold
Render > Render Sequence and you have to render within Maya
What do people at Autodesk / the Arnold team think when having a look back at the “infancy” of the Arnold render?
It is very pleasant to look back and see how versatile Arnold has become after so many years. The first few weeks and months of Arnold renders were all of clay-like stock 3D models with diffuse shading under a flat sky, and maybe a directional light. It’s crazy that even “simple” renders like these were shocking to see in the day, but it was particularly hard to obtain these sorts of images from the mainstream renderers that were available at that time.
Arnold is an advanced Monte Carlo ray tracing renderer built for the demands of feature-length animation and visual effects. Originally co-developed with Sony Pictures Imageworks and now their main renderer, Arnold is used at over 300 studios worldwide including ILM, Framestore, MPC, The Mill and Digic Pictures.
Arnold was the primary renderer on dozens of films from Monster House and Cloudy with a Chance of Meatballs to Pacific Rim and Gravity. It is available as a standalone renderer on Linux, Windows and Mac OS X, with plug-ins for Maya, 3ds Max, Houdini, Cinema 4D, Katana and Softimage.
Arnold is a fast, memory efficient and scalable physically-based raytracer. Its aim is to simplify the pipeline of VFX and animation companies with a reduced set of user interface elements, and by promoting a single pass approach removing all the associated storage and management costs.
ARNOLD ANSWERS COMMUNITY This is the place for Arnold renderer users everywhere to ask and answer rendering questions, and share knowledge about using Arnold, Arnold plugins, workflows and developing tools with Arnold.
Rendering the Future: A Vision for Arnold
French CG news site 3DVF just released a video interview with Solid Angle’s Marcos Fajardo recorded at FMX 2016 in Stuttgart. The interview focuses on the origins of Arnold, its direction and the Autodesk acquisition. The interview is in English, subtitled in French.
Arnold – Solid Angle
ALSHADERS A complete, production-oriented, physically plausible shader library for arnold.
Getting Lighting Render Passes With Arnold Render
HOLLYWOOD-FAVORITE RENDERER ARNOLD NOW AVAILABLE FOR CINEMA 4D
Shading The Car using the Ai Standard Shader
Arnold Rendering a Car in an Exterior, Car Materials
ARNOLD LIGHT BLOCKERS AND MESH LIGHTS
10 Pro Tips For Lighting & Rendering In Maya
How do I make my renders look like photos?
Lee Griggs, Arnold Rendering Tips and Tricks
CGI Tutorial HD: “Arnold Maya Rendering – Basic Interior Sunlight” by – Jon Tojek
Introducing Max to the Power of Arnold
TOOLFARM This major new update includes improved performance and new shaders, bundled with 3ds Max 2018. Arnold is now a standalone renderer as well as a plug-in for Maya, 3ds Max, Cinema4D, and Katana. Fur & Hair, Motion blur, Sub-surface scattering, Volumes, Flexibility and extensibility, Scalability, Instances, Memory efficient, Deferred geometry loading, Subdivision and displacement, Arbitrary Output Variables (AOVs), Standalone command-line renderer.
TOOLFARM Arvid Schneider explains how to set up a lifelike skin shader with the aiStandardSurface shader, and it’s a lot easier than you may think!
AREA Autodesk Newsletter
- Color Correcting Donut Sprinkles By Lee Griggs – Nov 3, 2016: In this tutorial, we will use the versatile Utility shader to generate random colors for the sparkles on a donut. We will then use a variety of MAXtoA shaders to further adjust the colors of the sparkles.
- Flash Photography Effect in MtoA By Lee Griggs – Oct 25, 2016: This short tutorial will show you how to emulate a flash photography effect used to enhance this shocking render of a zombie attack.
MtoA 110 | Detailed Skin Shader | using Arnold with Maya 2017
MtoA 505 | Human Skin with Arnold 5
Tutorial: Creating Realistic Human Skin with Maya and Arnold 5
Rendering with Arnold in Cinema 4D
Arnold for Maya Tutorial – Shaders – HD
Arnold for Maya Tutorial – Lights
Arnold for Maya Tutorial – Image Based Lighting
Arnold for Maya Tutorial – Render Settings – HD
Arnold for Maya Tutorial – AOVs – HD
Maya 2011 Attach Image Sequence Gobo to Spotlight Tutorial by Stuart Christensen .mov
How to Use the AiStandard Shader in Arnold
Maya 2018 – Arnold Workflow Basics
Maya 2018 – Arnold Workflow Part 1
Maya 2018 – Arnold Workflow Part 2
Maya 2018 – Arnold Workflow Part 3
Maya 2018 – Arnold Workflow Part 4
3DELIGHT
The Best of SIGGRAPH 2018 This year at SIGGRAPH we had a few standouts for advances in technology, but also for paradigm shifts in terms of services for at least the media & entertainment realms of computer graphics. I didn’t have much time to attend many panels or talks, but I did get to moderate a panel for Autodesk regarding some changes in how visual effects production is accomplished as more and more people and companies have to contribute to the process.
UNITY
Bringing the 2019 European Games Mascot to Life in Real-Time
With state-of-the art motion capture technology, Asterman was able to meet tight deadlines to deliver a live mascot in two days. Asterman recently delivered a live 3D mascot for the 2019 European Games, which brought together 4,000 athletes from 50 countries. To mark the official presentation of “The Flame of Peace”, participants were joined by the 3D model of a fox cub called Lesik. This digital co-host entertained audiences by moving around, making comments and joking on screen in real-time, powered by Xsens MVN Animate motion capture.
Writing Your First Shader in Unity
In this live training session we will learn the fundamentals of authoring shaders for Unity and you will learn how to write your very first shader. No prior knowledge of authoring shaders is required. In this first step we will introduce our project and goals.
Unity Masterclass: How to set up your project for pixel perfect retro 8-bit games
Retro games with simple mechanics and pixelated graphics can evoke fond memories for veteran gamers, while also being approachable to younger audiences. Nowadays, many games are labeled as “retro”, but it takes effort and planning to create a title that truly has that nostalgic look and feel. That’s why we’ve invited the folks from Mega Cat Studios to help us talk about the topic. In this blog post, we’ll be covering everything you need to create authentic art for NES-style games, including important Unity settings, graphics structures, and color palettes.
UNREAL ENGINE – Epic
Unreal Engine 5.2 electrifies GDC 2023 attendees with photorealistic visuals
AWS Thinkbox Deadline Supports Final-Pixel Renders inside Unreal Engine 5
This tool uses machine learning to animate 3D models on-the-fly, and it’s getting Unreal Engine support soon
Real-time roundup: the growth of interactive 3D and emerging 2021 trends
Behind the scenes at Epic, this story has been reflected in the numbers. By the end of 2020, nearly half of announced next-gen games were being built in Unreal Engine; the number of film, TV, and animation projects that are using or have used Unreal Engine doubled; and innovation in areas like HMI saw real-time workflows fuel cutting-edge new experiences, such as the digital cockpit in General Motors’ recently announced GMC HUMMER EV and Cadillac LYRIQ.
50 Mind Blowing Unreal Engine projects you need to see
Unreal Engine is arguably the world’s most open and advanced real-time 3D creation platform. It continuously evolves to serve not only its original purpose as a state-of-the-art games engine. The platform extensively by aspiring artists at The Rookies as it gives them freedom and control to deliver cutting-edge content, interactive experiences, and immersive virtual worlds. Here are some of the best content we’ve seen already this year.
Creating a Stylised Environment in Unreal Engine
Alejandro Díaz Magán is a 3D Artist from Málaga, Spain. After finishing his studies in the Master’s Degree in 3D Character Modelling at Animum Creativity Advanced School, he is currently looking for a job in the Games Industry and working on personal projects as a self-taught artist.
REWIND Delivers an Explosive VR Experience for INFINITI
Manufacturers from private jets to the latest sneakers constantly seek innovative ways of communicating brand values to their target customers base – which has led many to incorporate VR into their experience design process. Common sense dictates that the more engaging an experience is, the more likely someone will be affected by it. VR, or full immersion, is one of the most powerful tools for engagement available, especially when wielded by an expert.
“Unreal Engine allowed us to take that huge CAD model, get it into engine and make it run in real-time,” says Solomon. “The challenge for the INFINITI project was that not only could you see the outside of the car, but you could see every nut and bolt it was made from, so we had to find a way of getting the exact model including nuts, bolts, and screws into the game engine and running in real-time with it.”
HOW REAL-TIME RENDERING IS CHANGING THE DESIGN LANDSCAPE
Design is evolving, and there’s never been a more exciting time for tapping into the creative possibilities driven by the rapid change of technology. As real-time engines continue paving the way for a new age of experience, designers are gaining greater flexibility and control over their visualizations for architectural, engineering, automotive, and product design. Designing at the speed of thought is no longer a pipedream for today’s digital artists, now that powerful new tools like Unreal Studio are breaking down the barriers keeping data imprisoned in proprietary CAD tools.
misss_fast_shader2_x shader setup Mental Ray Maya
WETA DIGITAL
Manuka: Weta Digital’s new renderer
After many years as one of the world’s largest and most accomplished visual effects studios, Weta Digital began a research project that has evolved into their own full blown physically-based production renderer: Manuka. In fact, the project encompasses not just the final renderer but as part of work in the lead-up to the new Avatar films, they have also developed a pre-lighting tool called Gazebo, which is hardware based, very fast and also physically based, allowing imagery to move consistently from one renderer to another while remaining consistent and predictable to the artists at Weta.
CLOUD and RENDERING SERVICES
SEE ALSO CLOUD – www.therese3d.com under TUTORIALS, MAGAZINES, LINKS & RESOURCES under C
WHAT NOW and WHAT’S AHEAD FOR CLOUD RENDERING
Method Studios Takes AWS Cloud Rendering to the Next Level
Visual effects company Method Studios works on content for all screen types – feature films for cinemas, television content and commercials for home or mobile screens, title designs and others. At its locations around the world – Los Angeles, Melbourne, Montreal, New York, and Vancouver – each team customises its own production workflow based on project requirements, and meanwhile the company uses a common suite of tools to collaborate between facilities.
RENDER FARMS – WHERE TO BEGIN
So, you already know a render farm harnesses greater processing capacity to enable your artists to create multiple creative iterations, get jobs out faster and achieve photo-realistic output where desired.
You get it and have already tried…
So why doesn’t mine work, how do I make it better?
Many applications such as SketchUp are primarily linear applications for modelling and utilise single-threaded processing for majority of tasks. Most applications, at least on the workstations, rely heavily on OpenGL, which provides robust 3D APIs and raster pipelines, but were designed decades ago without multi-core considerations. You may have invested in multiple (12-24+) core processors when you could have invested in lower core count with higher speed like 3.5Ghz+ for the artists and investing in a 3rd party.
Q&A with Arvind Sond and David Sanchez: the studio founders going cloud native. Cloud technology will revolutionize visual effects (VFX) in the coming years. Studios will be able to harness the power of huge render farms without needing the space to house them, or pull in the best talent around without uprooting their families.
DLF has a series of conversations listing Renderers
Appleseed – http://appleseedhq.net/
Arion (was Fryrender) – http://www.randomcontrol.com/arion –
Arnold
Blender cycles
Corona
Clarisse http://www.isotropix.com/
Guerrilla
Indigo
LuxRender
http://www.luxrender.net/forum/gallery2.php
http://www.luxrender.net/en_GB/download
Mental Ray
– has won an Academy award
Mitsuba
http://www.mitsuba-renderer.org/download.html
Modo
Mantra (with Deep) and Houdini
Maxwell
Octane
http://render.otoy.com/gallery2.php
http://render.otoy.com/downloads.php
Povray
http://www.povray.org/download/
Redshift
Render Man
3delight
Thea Render
Turtle
Vray
http://vray.cgdo.ru/gallery.html
http://vray.cgdo.ru/download.html
Vray release a new renderer UVRAY
http://www.fxguide.com/fxpodcasts/fxpodcast-292-v-rays-new-renderer/
http://www.chaosgroup.com/en/2/vray_maya_licensing.html#tab2
Yafaray
SOME NOTES
Consider the generalisations people have about lighting and how the scene is going to look.
180-DEGREE RULE
 Is a basic guideline regarding the on-screen spatial relationship between a character and another character or object within a scene. An imaginary line called the axis connects the characters, and by keeping the camera on one side of this axis for every shot in the scene, the first character is always frame right of the second character, who is then always frame left of the first. The camera passing over the axis is called jumping the line or crossing the line; breaking the 180-degree rule by shooting on all sides is known as shooting in the round.
The continuity of the character’s movement needs to be consistent as they move across the frame to avoid confusing the audience with changes in direction and orientation. There is a 180º arc or imaginary line with the camera to one side of that line.
ELECTROMAGNETIC SPECTRUM
Light is manifested as a wave or particle, the space between the waves are wavelengths or distance between the crests. The height or trough of the crest is the amplitude and the speed of the crests move based on a fixed given point is the frequency.
INVERSE SQUARE LAW
Light fading over distance, affecting the apparent brightness or perceived brightness. Intrinsic brightness is the lights’s own energy emission per second, which is luminosity.
WEIN’S LAW
The wavelength of the peak radiance decreases linearly as the temperature increases, the hotter the object, the bluer the radiation it emits. Cold objects are not visible at night and burning objects give off heat and visible light. Studying heat and its colour emission is known as black body radiation.
COLOUR TEMPERATURE
Measured in the Kelvin scale in degrees.
EIGHTEEN-PERCENT GREY
Is when equal amounts of what and black paint are mixed together.
THE LAW of REFLECTION
The angle of the reflection equals the angle of the incidence as relative to the surface’s normal, a line perpendicular to the reflecting surface at the point of incidence.
SNELL’S LAW
The angles of incidence and refraction is a constant on opposite sides of the normal at the point of incidence or entry. The bending of light as it crosses a boundary causes magnification and distortion, critical angle.
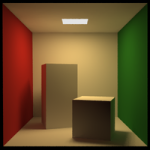
 Anisotropy reflections are just like regular reflections, except stretched or blurred based on the orientation of small grooves (bumps, fibers or scratches) that exist on a reflective surface. They are stretched in a direction perpendicular to the grooves, channels or undulations of the reflecting surface. So now how do we replicate them in 3d?
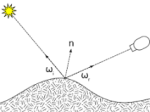 BRDF or Bidirectional Reflectance Distribution Function, defines how light is reflected at an opaque surface. It is employed both in the optics of real-world light, in computer graphics algorithms, and in computer vision algorithms. The reflective quality of diffuse surfaces with the strength based on the viewing angle, the incident angle between the viewer and the surface normal and the inherent properties of the surface.

Ambient Occlusion, allows you to simulate the soft shadows that occur in the cracks and crevices of your 3D objects when indirect lighting is cast out onto your scene. Additional soft shadows that are created inside surface convolutions and where surfaces are in close proximity. It can help to define the separation between objects in your scene and add another level of realism to the render. The darkened areas are usually where there are cracks, crevices and where one surface sits close to another, calculating whether a surface point is blocked by nearby surfaces, potentially reducing the amount of light the surface point receives.

A ray of light being refracted in a plastic block
IOR or index of refraction, describes how light propagates through that medium, how much light is bent, or refracted, when entering a material. The number indicates the change in the speed of light when a light ray crosses the country between two materials, producing subtle variation in the diffuse quality of opaque surfaces, the way the surface scatters light. Isotropic, Anisotropic.
Photon Mapping, the realism of ray tracing can be improved by simulating individual photons that are emitted from a light source and bounce around the scene. Leading to realistic color bleeding and soft shadows. Effects like caustics that are very difficult to compute using traditional Monte Carlo ray tracing are easily obtained with the photon map. It involves the constructing the photon map by emitting photons from the light sources in the model and storing these in the photon map as they hit surfaces.
Caustics, light refracted or reflected causes patterns called caustics, usually visible as concentrated patches of light on nearby surfaces. For example,  as light rays pass through a wine glass sitting on a table, they are refracted and patterns of light are visible on the table. Photon mapping can trace the paths of individual photons to model where these concentrated patches of light will appear.
- A Practical Guide to Global Illumination using Photon Maps Siggraph 2000 Course
- The Secret Life of Photons
- Raytracing / Photon mapping
Some renders fully account the light transfer from the light source to the material and back out the material and then the light path is traced again from the eye back into the environment; the intersection of these two rays and subsequent ray generation is computed. These are the so-called bi-directional retracers, which can generate caustics or focused specularity through refraction or reflection.
arnold, motion vector aov
Motion Vextor encodes the option of an object into an image’s colour channels, they compress and store changes to an image from one frame to the next. The process is a bi-dimensional pointer that communicates to the decoder how much left or right and up or down, the prediction macroblock is located from the position of the macroblock in the reference frame or field. The Motion Vector AOV outputs a color channel that shows object movement within the scene. This AOV can be used by post-processing software to calculate a 2D motion blur effect. The advantage is that it is usually quicker to render compared to true 3D motion blur. Another way to create a motion vector pass is to use a custom AOV and assign an Ai Motion Vector shader to the default ‘Shader’ attribute.
Z depth channel viewed within Nuke
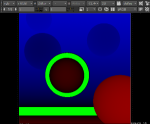
focal-plane setup enabled (green area is in focus)
Z Depth, AOV contains the depth information of the shading points. Encodes the distance from the camera to a surface point. Is the management of image depth coordinates in 3D graphics, usually done in hardware, sometimes in software. It is one solution to the visibility problem, which is the problem of deciding which elements of a rendered scene are visible, and which are hidden. When an object is rendered, the depth of a generated pixel (z coordinate) is stored in a buffer (the z-buffer or depth buffer). This buffer is usually arranged as a two-dimensional array (x-y) with one element for each screen pixel. If another object of the scene must be rendered in the same pixel, the method compares the two depths and overrides the current pixel if the object is closer to the observer. The chosen depth is then saved to the z-buffer, replacing the old one. In the end, the z-buffer will allow the method to correctly reproduce the usual depth perception: a close object hides a farther one. This is called z-culling.
Mattes are used to cue or block a part of another render pass. The matte option enables you to create houldout effects by rendering the alpha as zero. The matte options are available for the Ai Standard, Ai Hair and Ai Skin shaders. In addition, an image can include an invisible fourth channel, called an alpha channel, that contains transparency information. They define transparency and often delineate objects or selections as a matte or stencil. Alpha channels can come pre-matted (“shaped”) or as straight, with transparency anti-aliased only when composited.
Normal, the normal at shading point, encodes the surface normal direction and maybe relative to the camera particular light or the surface itself in object or world space.
Render Layers, instead of rendering the whole shot the shot is divided into layers for key elements. Specifically referring to separating different objects into separate images, such as a layer each for foreground characters, sets, effect, shadows, distant landscape and sky and they are rendered separately for efficiency.
Render Passes or AOVs in Arnold, further divides the shot into specific shading components, lighting contributions or compositing encoders such as colour, diffuse, specularity, reflectivity, depth, ambient occlusion, reflection occlusion, surface normal and motion vector renders. Rendering in passes refers to separating out different aspects of the scene, such as shadows, highlights, or reflections, into separate images.
Contribution Maps, custom frame buffers, to customise the render passes further for each layer. It specifies which objects and lights are included in a render pass. By default the created render pass includes all the associated objects on that layer. Using a contribution map enables the the inclusion of only certain lights and objects to the render pass giving more flexibility when rendering for compositing.
Overrides as surfaces assigned to a render layer are illuminated only by the lights that have ben assigned to the render layer. This including surfaces cast shadows and receive shadows only if these lights and objects are included in the layer. Overrides changes this such as preventing a surface from casting shadows on a particular layer. Material overrides are nondestructive, not affecting the original material assigned on the master layer. Render setting overrides using different render settings for different render layers, changing the master settings are passed up to al the other players except where an override has been applied. Feature Overrides for Solid Angle’s Arnold renderer. Light Overrides
SOME NOTES FROM READING the following wonderful and very interesting books:
Schoolism class Rendering Reflective Surfaces with Scott Robertson
Gallardo, A., 2000. 3D lighting: history, concepts and techniques. Charles River Media, Rockland, Mass.
Gurney, J., 2010. Color and light: a guide for the realist painter. Andrews McMeel ; Simon & Schuster [distributor], Kansas City, Mo. : London.
Derek Jenson Blog and IES Light Profiles
Live Blog: Margaret Livingstone, “What Art can tell us about the Brain”
Livingstone, M., 2008. Vision and art: the biology of seeing. Abrams, New York.
Lessons Learned from Scott Robertson’s How to Render Book – HUGE MATERIALS TUTORIAL
Goethe’s theory, Ewald Herin, Thomas Young, Sir Isaac Newton, Carl Jung, Albert Munsell, Ernst Gombrich, James Gurney, Colour Wheel, Colour Space, Hue Plane, CIE Colour Plane, Primary Colours, Complementary, Chroma, Value, Hue, Peak Chroma Value, Local Colour, Gradation, Tints, Perception, Luminance, Black, White, Chiaroscuro, Counter Shading, Perspective, Shading, Occlusion, Haze, Depth Perception, Relative Motion, Centre Surround, Stereopsis, Relative Motion, Atmosphere, Additive, Subtractive, Subtractive, Achromatic, Analogous, Monochromatic, Contrast, Chromatic Adaptation, Successive Contrast, Simultaneous Contrast, Warm, Cool, Colour Opposites, Colour Constancy, Kelvin, Colour Temperature, Additive Colour Mixing, Triads, Colour Accents, Colour Strings, Gamut Mapping, Colour Scripting, Subjective Primaries, Subjective Neutral, Saturated cost, Edges, Depth, Chromotherapy, Rayleigh scattering, Solar Glare, Horizon Glow, Antisolar Point, Well of the Sky, Atmospheric Perspective, Golden Hour Lighting, Sunsets, Fog, Mist, Smoke, Dust, Rainbows, Sunbeams, Shadow Beams, Dappled Light, Cloud Shadows, Snow, Ice, Water.
As light interacts with matter manifests itself in many ways reflection or bounding back, refraction or bending, transmission or through, diffraction or bending around edges, interference results in changed waves, scattering or spreading, diffusion or even scattering, absorption or retention , polarisation or selective transmission and dispersion with different wave lenghts for different materials. There needs to be a separation between the objects in the foreground and the background.
LUMINANCE, value or perceived lightness, how bright a light is. The luminance of any particular number photons varies depending on the wavelength of that light. It is the luminance makes it possible for us to recognise objects, perceive three dimensional shapes and spacial organisation. But appears dim and yellow seems bright. It is a per ceptual measurement, not a physical constant and changes it changes with high or low light levels.
DAY LUMINANCE VS. NIGHT LUMINANCE, the luminosity response curve and apparent brightness of different wavelengths.
PURKINJE EFFECT or dark adaptation is the tendency for the peak luminance sensitivity of the human eye to shift toward the blue end of the color spectrum at low illumination levels, the reds darker and the blues lighter. The difference in the rod and cone responses as a function of wavelength. Most sensitive to greenish wavelengths of light resulting in blue-green hues appearing lighter in tone in dim conditions.
CORNSWEET ILLUSION is an optical illusion. The image at right, the entire region to the right of the “edge” in the middle looks slightly lighter than the area to the left of the edge, but in fact the brightness of both areas is exactly the same, as can be seen by blacking out the region containing the edge. Our visual systems are selectively sensitive to discontinuities and not to gradual changes in luminance
The Cornsweet Illusion explained
PHOTONS: is an elementary particle, the quantum of all forms of electromagnetic radiation including light and I thought it was something to do with 3D computer rendering software, they actually exist. Invisible units (or quanta) of light energy, called photons, travelling in a wavelike manner. What is light made of? What can we see? Charged particles are moving. Luminescence and Incandescence which is created by heated materials such as the sun, fire, tungsten lamps containing many wavelengths.
An oil slick looks clouded because of interference. If the reflections of light striking the top and bottom layer of the oil are in phase (the peaks and droughts of the waves concise) the lightwaves will reinforce each other. If the thickness of the oil from matches the wavelength of a particular colour then the slick will look more like that colour. White light is reflected form two parallel surfaces very close to each other. The iridescence of soap bubbles is due to thin-film interference. Other examples are butterfly wings, oyster shells, opals and battle carapaces. The colours change with viewing angle because the distance light travels changes with the angle of the light hitting the surface.
DIFFRACTION involves a change in direction of waves as they pass through an opening or around a barrier in their path. The light is reflected from a surface that has striations spaced on the scale of the wavelength of light, some wavelengths reflect in phase and others out of phase. Examples such as butterfly and bird wings due to the fine, regular striations and CD’s. The colours change with viewing angle because the distance light travels changes with the angle of the light hitting the surface.
VISUAL PERCEPTION is the ability to interpret the surrounding environment by processing information that is contained in visible light. The resulting perception is also known as eyesight, sight, or vision. Recognising objects, animals, people, colours, motion, depth, left or right and seeing complex objects as a whole.
Luminance Differences Affect Our Perceptions. Artists use the technique of “equiluminance” to blur outlines and suggest motion. We cannot perceive the edges of objects where object and background have the same luminance. If parts of a painting are equiluminant, their positions become ambiguous. They may seem to shift position or to float. Plus Reversed, Richard Anuszkiewicz, 1960.
CENTRAL and PERIPHERAL VISION Our vision is sharpest at the centre of gaze for fine detail, peripheral vision is a part of vision that occurs outside the very center of gaze being used to organise spatial information and we usually move our centre of gaze to whatever we want to look at. What information is in the fine, medium or coarse components of an image, our central vision does not perceive coarse image components very well. Are we more able to correctly internet facial expressions in our peripheral visions? Why does our visual system complete incomplete pictures for us, spatial imprecision?
SPATIAL RESOLUTION and ECCENTRICITY – eccentricity is the degrees of visual angle from the center of the eye so what determines where we look? The resolution of high-contrast, fine detail or higher resolution and items of biology and can be picked out by our peripheral vision.
COLOURS There is so much information about this what can be said? Colour is low resolution and course, we do not have to colour inside the lines.
Our brains process colour information separately from luminance information, there is a difference. Hue tells us about surface chemistry, biologically information. Vary the luminance of colours without changing their saturation with variations in reflected light became known as chiaroscuro. A wide range of luminance creating a vivid depth from shading.
Colour constancy, the ability to perceive colour in its original hue even under different lighting conditions.
Color Vision 5: Color Opponent Process
WAVELENGTH of DAYLIGHT TUNGSTEN and FLUORESCENT The rations between the three cone classes for these objects are similar under these different lighting conditions and what differences there are in the cone-activation ratios for the light reflected from each object are compensated for by similar differences in the one ratios fro light reflected from he surround.
DEPTH PERCEPTION is the visual ability to perceive the world in three dimensions (3D) and the distance of an object. With relative mitten near objects seem to move more than distant objects. Depth from the difference in the images in the two eyes adding to distance and depth.
DISTANCE and DEPTH with relative motion, shading, perspective, occlusion and stereopsis. Stereopsis is a term that is most often used to refer to the perception of depth and 3-dimensional structure obtained on the basis of visual information deriving from two eyes by individuals with normally developed binocular vision. The differences in the two images of the two eyes are interpreted by the brain as depth information.
Using shading, luminance contrast, blurriness with the visual system responding to abrupt more than gradual changes in depth which also affects stereopsis. Relative motion can be created with bright colours that do not have much luminance contrast, making their position uncertain. Luminance contrast giving depth, how to see the shape and depth from the shading. Does not matter what colour the shadows are so long as the luminance is right. Ability to depth, spacial organisation, figure ground segregation and motion or lack of motion are carried by the colour blind part of our vision.
CENTRE SURROUND Visual system more sensitive to abrupt than gradual changes. Therefore, by introducing gradual changes in the background luminance, artists can induce opposite apparent shifts in the luminance of the foreground. (Gradual darkening of background near object makes object look brighter). Rembrandt’s Meditating Philosopher, showing depth from luminance contrast. Low luminance contrast gives a flatter appearance then what happens with little or not colour contrast or with bright colours colour contrast, shading, perspective? The use of luminance contrast, not colour for depth perception, the correct relative luminance to represent planes and shadows, without using colour to convey shape. Equiluminance colours to blur outlines and as we cast our eyes where there is no change in luminance causing the illusion of motion.
VERGENCE is the simultaneous movement of both eyes in opposite directions to obtain or maintain single binocular vision. Binocular vision is vision in which creatures having two eyes use them together. Normal, crossed and divergent Fusion.
BLENDING creating illusory borders, sometimes adjacent colour oppose each other and other times colours can blend consider the resolution, luminance, size of the elements.
LIGHT
Top Ten Tips for More Convincing Lighting and Rendering
LIGHTING TIPS FROM THE MASTERS
Light from an angle to sculpt the figures, use of shadows from objects outside the scene, effects of illumination and atmosphere, weather, moods, time of day, naturally environment.
What’s the technical difference between artificial and natural light?
How the brain visually interprets the world around us, rendering based on physics and science. use a monochromatic palette to start with, looking at matching perspective, light direction and angle. Design the light in the way that works best to communicate the form.
Objects surfaces are shaded based on the material properties of the object and need to consider the way light affects the object’s material.
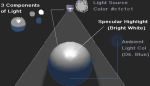
Local Illumination is the direct illumination from a light source, not including interject reflections and light bounced around the environment.
Global illumination accounts for the indirect reflected light in the scene simulating the diffuse and specular light.
Ambient light is the sum of all the indirect light reflections in the scene.
Shading is created when different parts of a surface reflect different amounts of light depending on the angle of the light hitting the object. There is an orderly and predictable serious of tones. Why is the luminance independent of colour. Vary the luminance of colours without changing their saturation with variations in reflected light became known as chiaroscuro. Greys mixed frombhue and orange, red and green or violet and yellow. Constant, Flat, Gouraud, Phong, Lambertian and Blinn.
Values across a surface, bump, edges. Lightness or darkness of colour, variations in light and darkness. Surfaces defined by their difference in value, not by outlines by light to dark values. There is the lightest surface, mid-value surface which still has direct and clearly differentiates the edge/surface change with the lightest then there is the shadow side which is the darkest surface. The shadow surface clearly differentiate the edge/surface change with mid-values and giving a three dimensional volume.
Diffuse, colour, weight, roughness for diffuse reflections, colour info without spec, perceived as the color of the object itself rather than a reflection of the light. It represents direct light hitting a surface, dependent on the incident angle, light hitting a surface at a 90 degree angle contributes more than light hitting the same surface at a 5 degrees.
Ambient light is the light that enters a room and bounces multiple times around the room before lighting a particular object. Ambient light contribution depends on the light’s ambient color and the ambient’s material color.
Specular light is dependent on the direction of the light, the surface normal and the viewer location.
 A specular highlight is the bright spot of light that appears on shiny objects when illuminated (for example, see image at right). Specular highlights are important in 3D computer graphics, as they provide a strong visual cue for the shape of an object and its location with respect to light sources in the scene. Specular highlights are reflections of bright light sources. Secular reflections are as varied as the bright light sources that create them and the surfaces on which they appear.
Reflection, Glossiness for mirror-like or degraded. Objects appearing in reflections.
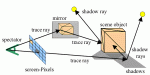
Ray tracing uses rays or photos to keep track of the light path in a scene determining the colour or chroma and brightness of luminance of each pixel. The ray determines whether the surface is reflective, refractive or luminous. Forward, backward, bidirectional ray tracing, radiosity, view dependence, view independence, thermodynamics, discretization, tone mapping.
Lights, is each light serving a single purpose, multi point source lighting, how is it colouring an object and illuminating the surface considering intensity, colour temperature, falloff, placement and position.
Can create the main light first then peripheral lights that are 3/4 or 1/2 the intensity of the main light. Secondary lights can function as a kind of shadow tonality control, the shadow density. A non-shadow casting light to fill the shadows without a fill light. More complex lighting set ups can include diamond shaped, pyramid, dome, ring, box, tubular, combination
5 Good Reasons to Use Light Texture
ARNOLD – LIGHTING/SHADERS V002
COLOURED LIGHT INTERACTIONS, additive colour mixing. Blend the colour in the eye with a higher value then either light alone. The resulting hues differ with green and red mixed to make yellow. If there are two light sources of different colours shining on the same form, the last shadow from each light source will be the colour of the other source.
Three-Quarter Lighting, 45º from the front leaving a fraction of the form in shadow.
Frontal lighting shining directly at the subject.
Hard light is direct light
Soft light has many different points of light
Spot light
Non shadow casting lights
High and Low Key Lighting
Lighting ratio is the measured f-stop difference between the key leith and the fill light, difference between the lighter and darker sides considering light placement, elevation and intensity and consider the tones in the scene.
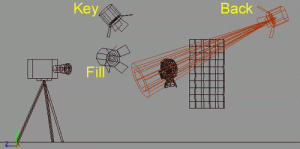
Key Light, dominant and obvious light is the main, principal light. The placing of the key light near the camera results in front lighting. Side lighting is the placement at 90º to the side of the subject and rembrandt lighting places the light 45º to the camera, elevated a bit above the subject illuminating three-quarters of the subject. Broad lighting lights the subject from the same direction as the camera with a three-quarters turned face, illuminating the broad side of the object. Short lighting has the narrow side of the turned object or face illuminated. Top lighting has the key light positioned at the top and can be to the side, called butterfly lighting. Under or Down lighting is what it says, the key light is below the subject illuminating from the bottom creating unusual shadows. Backlighting positions the key light either above or behind the subject creating intense highlight glow outlines with volume and depth visually separating the foreground and background. The key light is often placed outside the actor’s look, looking between the camera and the light.
For the key light consider the height, angle, direction, position, distance, type, intensity, elevation, size, colour and the shadows it is creating.
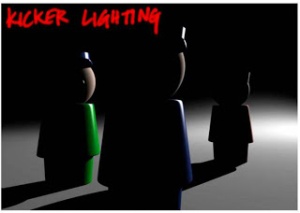
Fill light affects both the object and the cast shadow, they are secondary lights simulating indirect illumination. It can be set to have equal intensity to the key light and controlled through the distance or adjust the intensity or both the distance and intensity are adjusted to create the lighting. They can be positioned opposite the main light, close to or in from of the camera considering shadow tones, overall contrast and to avoid secondary shadows.
Edge, Rim or Kicker is outlining with value, coming from behind to touch the sides of a form separating it from the background. When the sun is low in the sky. The kicker is filling in the shadow areas with bounced or reflected light. The rim with the light behind and slightly offset creating an edge highlight, showing off a profile.
Supplementary lighting can be chandeliers, table lamps, portable lights, candles, flashlights, car’s headlights, campfire and can be used for motivational lighting.
Skylight, Dome light is a collection of diffuse light with the brightness varying across the sky with light scattering and transmission through the atmosphere, light dispersion.
Moon light creates dark, directional shadows with either bluish white to light blue grey light. Could have a white or bluish-white key and a blue fill light or a blue key light and consider having the specular highlights and upper areas a yellow-white like the sun. Look at it as reflected sunlight with low intensity.
Artificial Lights: Incandescent lights, burn at a lower temperature than the lighting giving an orange-yellow light. Fluorescent lights, white coloured lights that burn cool. Vapour-Filled lamps. Metal Halides, HID lamps. Sodium Lamps, HID lamps. They are perceived by the human eyes differently from the way they register on film. In CG consider following the way they register on film or video as the highlights, middle tones and shadows register differently.
Candle and Fire Light are yellow-orange in colour, weak and dropping off rapidly. At night it comes more noticeable.
Candle light burns as about 2300 – 2500K with a colour shift to the yellows and reds in all visible illuminated objects wrapping around the object with subtle tonal graduations. Candle light middle tones tend to be desaturated and colourless becoming grey instead of shifting their colour to grey. Focus more on the highlights and middle tones rather than the shadows. Consider tis for most local lights.
Fire Light, consider using an array with yellowish near the base and reddish-orange for the flame above.
Centre Jour, type of backlighting where the subject blocks the light, the colours lose saturation and shadows stretch forward. Might help to have some colour int he background haze and lower a bit from white.
Below light, usually from warm orange glow of firelight, blue flicker of computer screen, reflected from reading a book, light hitting smoke or dust kicked up for some reason. This could include lighting part of a form and falling off rapidly with small, weak lights.
Half lighting usually for visual interest and/or a focal point.
Ambient light adjustments, light strength determines the darkness of cast shadows. It is the light left when the key light is removed.
Reflected light will affect nearby shadow areas, could pick up the colours of other objects, the sky, the ground or a combination depending on where the light is reflected from.
Transmitted Light , travels through a thin, semitransparent material and becomes coloured such as leaves, balloon. Transmitted, down facing shadow, up facing shadow and top lit.
Translucence and subsurface scattering has light spread out under the surface creating a glow affecting forms with depth and volume. The contrast of the matte-surface is minimised and has a weaker shadow side and core shadow while the colour of the cast shadow lighting matches the colour of the translucent material, lower in contrast.
Luminescence is where the surfaces glow and emit light, while not receiving cast shadows. The lower the strength of coloured light the more of its colour is visible, gets brighter then goes to white. Integrating the light emitted by illuminating some neighbouring surfaces.
Water has both reflection and transparency being more transparent in the foreground than further away. The observer’s sight lines bouncing off the surface, when it is smooth it is more like a mirror with a fresnel effect or glass, looking straight across it. The reflection is less transparent where the sight lines become more tangent to the surface. The rougher the water the more diffuse and softer the reflections edges will be to the point where they can disappear, the reflections are more distorted or stretched and cover a larger area. Muddy water at dusk will reflect just as well as clear water. Looking directly down onto the water’s surface it will look darker and not much light from the sky is seen. A wet surface is like a water coating Think of the roughness of the surfaces, depth of the water and the reflections can change over the surface where a rough surface is like rougher water and smooth might have smaller, crisper reflections. Cast shadow on water work with sediment and their edges are more diffuse than on land. In mountain streams, the warm colours of the shallows and blues and greens in deeper pools, there is also the green colour of the trees and the slue from the sky reflecting off the water. What about underwater? Water attenuates light due to absorption which varies as a function of frequency. In other words, as light passes through a greater distance of water color is selectively absorbed by the water. Color absorption is also affected by turbidity of the water and dissolved material. It happens over distance both down and across with impurities discolouring the water in different ways.
Caustics is the envelope of light rays reflected or refracted by a curved surface or object, or the projection of that envelope of rays on another surface. Transparent objects with the caustic effects clustering inside the cast shadows. Under water caustics occur not much deeper than 20 or 30 feet and on sunny days being visible on top surfaces. Caustic reflections almost anywhere the sunlight shines through curving glass, water acting like a concave mirror or reflects off shiny metallic surfaces.
Colour corona or lens flare forming around any very bright source or reflected source including streetlights, car headlights and solar highlights on wet surfaces. The glow takes on the native colour of the source.
Greens can be mixed from blue and yellow, use pink or reddish grey and weave with the greens, Smuggling Reds with Stapleton Kearns
Light decay for a strong mood have strong decay
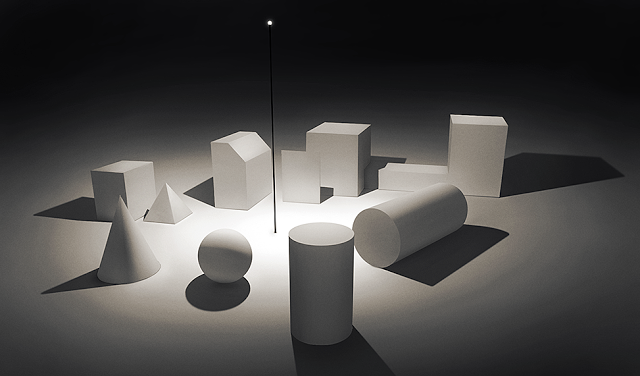
Spheres as an example for different lighting.
Sunlight, as it rises it scatters blue spectra in the atmosphere and lets the reds and yellows pass through, colour temperature 3000K to 4000K in the early morning. Sometimes it is a pale tangerine light that breaks on the horizon an slowly becomes a bright yellow as the sun moves higher becoming a yellowish-white sunlight. The colour balance of daylight around the middle of the day is 5000 – 6000K with the time of day affecting the exposure and the colour temperature. Need to consider the areas between the highlight and the shadow, sunlight wraps around objects with only the sides directly opposite the sun that are completely dark, what are the shadow edges doing.
Moon light is reflected sunlight, colour temperature the same as sunlight and the moon acts like a huge grey cared that is neutral in colour. We perceive blue because of the low light levels.
Direct sunlight, the passive highlight being the true value and the core and cast shadows being halfway to black and have the reflected light off the ground creating an effective core shadow wrapping around the sphere’s terminator. Wrap the value shading around the minor axis that points from the centre to the sun. Direct Sunlight has the sun, the sky which is diffuse soft light and reflected light from illuminated objects.
Overcast Light reduces the dramatic contrasts of light and shade, colours appear brighter showing patterns staying constant throughout the day, very diffuse and a colour temperature around 7600K to 8000K.
Side sunlight, change in position of the core shadow being wider on the shadow side and the shape of cast shadow and is symmetrical. Maintain the correct relationship of the minor axis for the core shadow and the passive highlight location.
Direct local light, the core shadow can become wider than in direct sunlight as it is further from the reflected light source, the ground. The cast shadow receives less ambient light and is darker than the sunlight cast shadow. Local light with light coming from a single point, the angle of incidence changes over distance. Shadows can go from light to dark with extremes of fall off, include on object surfaces.
Side direct light, be mindful of the falloff on both the ground plane and the sphere, the ground shifts to nearly black and the cast shadow has a value structure darker than halfway to black. The reflected light off the ground reaches a little past the equator cut line of the sphere causing the core shadow to disappear in the half facing on the shadow side of the sphere.
Window Light, not direct sunlight, the daylight is usually bluish and mixes with the orange colour of artificial lights. The bounced light from the ground reflected on the ceiling.
Indoor Electric Light, incandescent and fluorescent. Consider Brightness or relative brightness depending on wattage, type of lamp, proximity to the subject and how bright the other lights are. Hard, which is more directional and dramatic with a crisper shadow bringing out more surface texture or Soft light that creates a wider area with softer shadows. Colour Cast in Kelvin, being the dominant wavelength of the light source. Incandescent are strongest in the orange and red wavelengths and weak in the blue. Warm white and cool white fluorescents emphasise yellow-treen.
Spectral Power Distribution Curves
Streetlights and Night Conditions moonlight which appears blue or grey. There are a large variety of night lights, incandescent fluorescent, neon, mercury vapour, sodium, arc, metal halide, led lights. Suggestions, use a camera on night setting, disable white balance and take photos of the colour wheel under different lighting conditions, use a led light to illuminate my palette when painting at night. Moon light is the sunlight reflecting off the grey surface.
Luminescence, not Incandescence which is hot or flaming objects giving off light, giving off their own lightened can graduate from one hue to another. Fluorescence with objects when lit by ultraviolet light.
Outdoor environments have the sun or moon as the light source and has gradation which is darkest straight up and lightest at the horizon being colour depends on the time of day. Need to think about where the line of sight bounces off the form into the sky and think bout the value and colour the sky is at that point. The contrast between the object and the sky affects how much of the reflection of the sky is seen in the object and this could be where there are shadows, an illusion of the cast-shadows being more reflective. There is solar glare governed by the proximity to the sun and horizon glow which depends on the angle above the horizon.
On a clear day with clear air the sky is more blue-violet and the shadows are darker and bluer relative to the sun. With more clouds the shadows become paler and with more haze or smog the shadows appear relatively closer to the tonal value of the sunlight. With fog, mist, smoke and dust the contrast drops off rapidly, the sun cannot penetrate and forms recede in space.
Toward the sun clouds have dark cents and light edges with the sky being a more dull grey-green. Away from the sun, shinning from behind the viewer, they are lightest at the tops or centres and get darer at the sides and bases and the sky the blue is higher in saturation and more towards violet, looking completely different. Smaller clouds are not as white. Rayleigh scattering of sunlight in the atmosphere causes diffuse sky radiation, which is the reason for the blue color of the sky and the yellow tone of the sun itself.
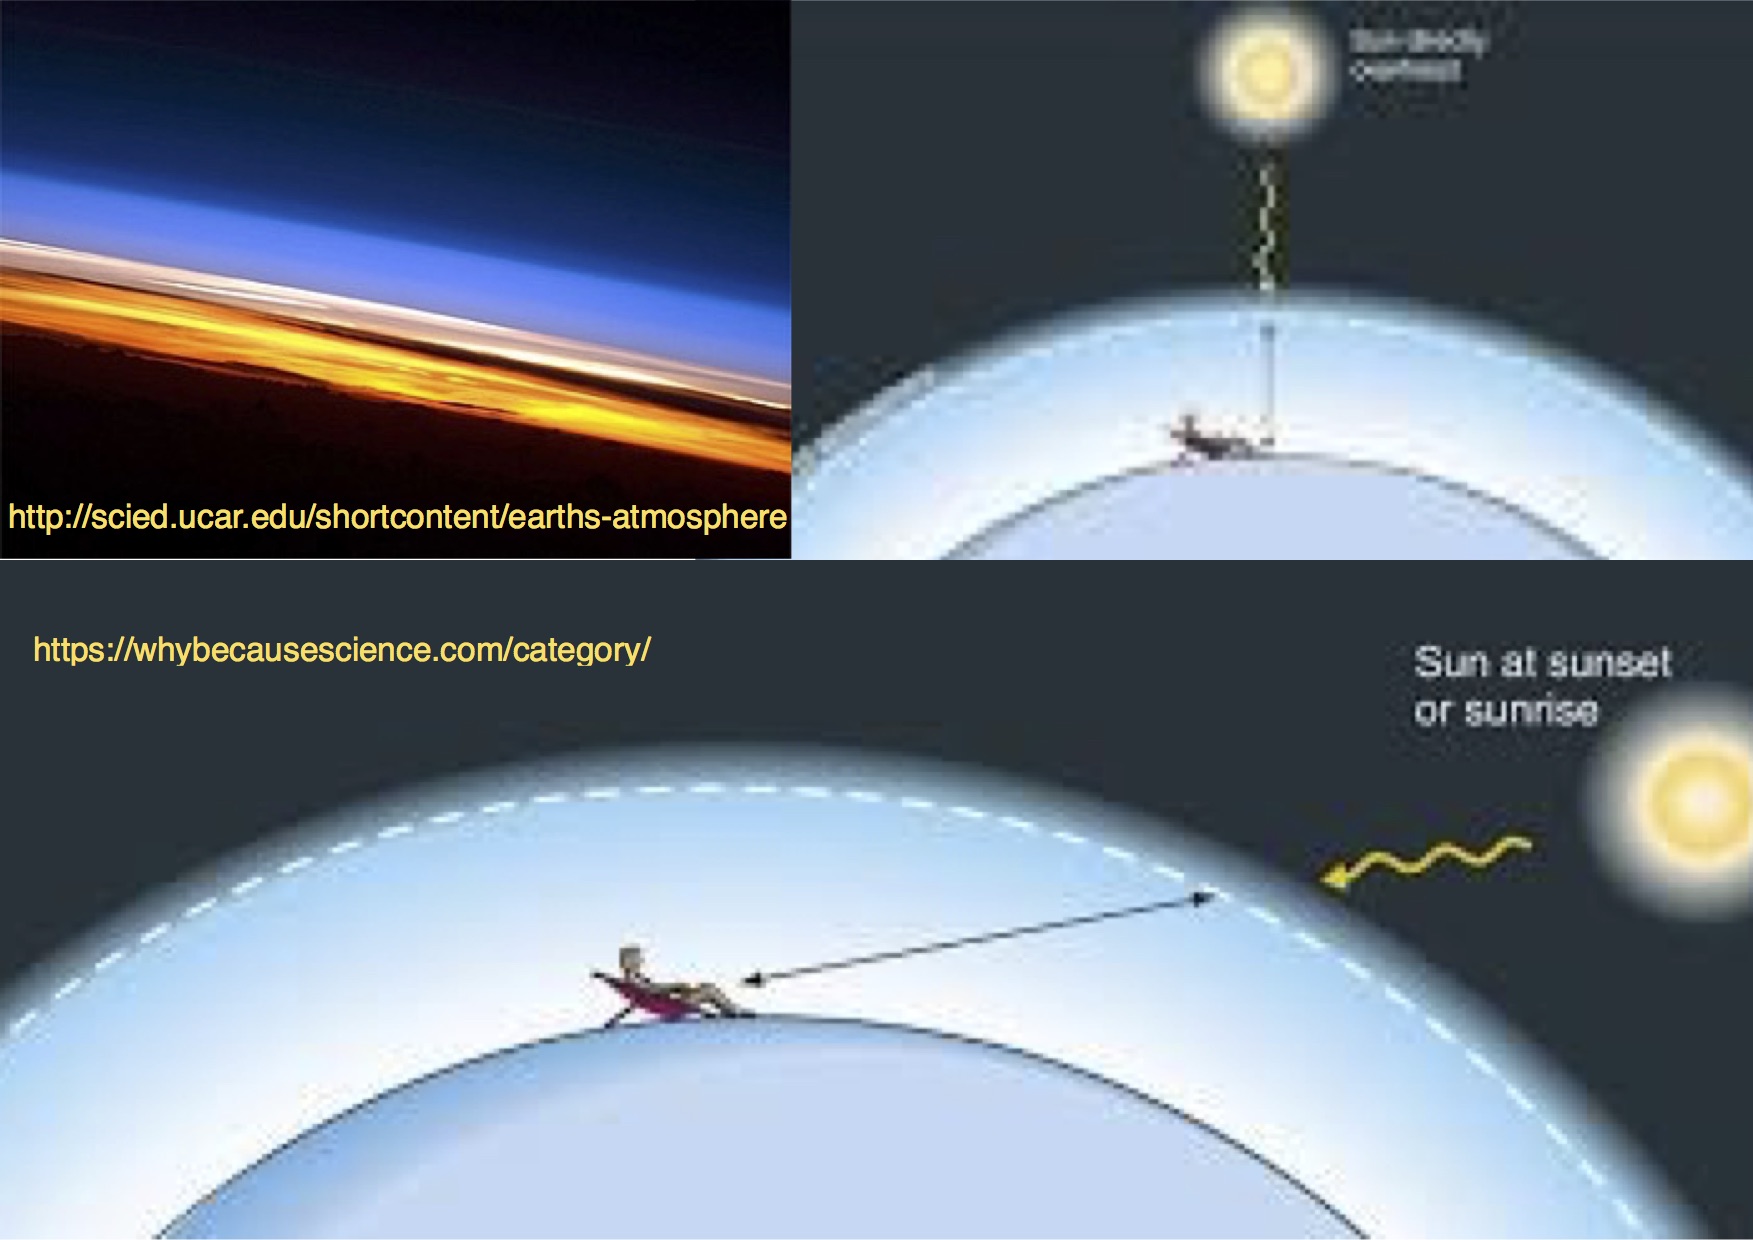
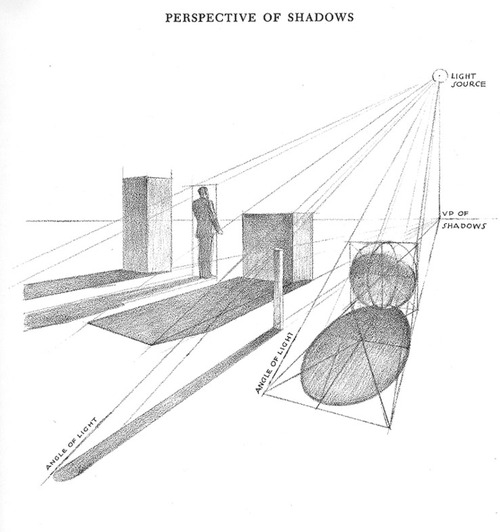
Solar glare making the sky lighter and warmer nearer the sun with a noticeable lightening at the anti solar point which is 180º opposite the sun. The sky getting lighter as we move from zenith to horizon, the horizon glow, because we are looking through more atmosphere. The darkest, deepest blue called the well of the sky is at the zenith only at sunset and sunrise. It is 95º away from the setting sun across the top of the sky. At other times in the day, it is about 65º away from the sun.
Atmospheric Perspective or perceived depth of how objects appear as they are views in the distance, further away having less value. this changes on a cloudy day, if there is moisture, dust, haze, smog or if it is illuminated. The contrast shift between the light and dark values with less colour saturation than surfaces that are closer. Strongest at the horizon as has more atmosphere, looking straight up has less then looking further away such as the horizon. White and black objects are different, them becomes warmer in colour with oranges and reds of the setting sun. Clouds are also affected, becoming more orange and darker near the horizon eventually merging with the sky at the horizon. White objects remain visible the longest. Generally warm colours advance and cool colours recede and in reverse atmospheric perspective the rule is reversed, such as at sun rise or sun set on a misty or dusty day.
The Golden Hour where the light travels almost parallel to the surface of the earth, travelling through more atmosphere making the sky bluer with forms lit by this light are more golden and shadows bluer. If the air has moisture and dust the clouds will take on more colour with the boldest where the sun crosses the horizon, the higher clouds are whiter being pinker for sunrises. A weaker glow at the anti solar point then after sunset a grey layer raises up from the horizon being the cast shadow of the earth. Remember the colour of the earth below, it is not black.
Not all materials respond to light the same. Clouds vary in density, thickness and composition where there an be a definite light and shadow side. Clouds transmit a greater quantity of light to the shadow side through internal scattering than the volume of light they pick up from secondary sources. Trees, foliage, hair, glass, metal.
Sunbeams or Crepuscular rays in atmospheric optics, are rays of sunlight that appear to radiate from the point in the sky where the sun is located. These rays, which stream through gaps in clouds (particularly stratocumulus) or between other objects, are columns of sunlit air separated by darker cloud-shadowed regions. Despite seeming to converge at a point, the rays are in fact near-parallel shafts of sunlight, and their apparent convergence is a perspective effect (similar, for example, to the way that parallel railway lines seem to converge at a point in the distance). There needs to be a high screen blocking most of the light, a darker backdrop with a few openings, a view toward the sun, going through some dust, smog or similar and influences the value of the shadows more than the light side. Sunbeams, small areas of atoms being illuminated and edges of cast shadows of clouds.
Shadowbeams, a bar of unilluminated vapour seen edge-on, the adjoining illuminated air is slightly lighter in value and usually only visible when there is a light hazy sky behind.
Rainbows are a meteorological phenomenon that is caused by reflection, refraction and dispersion of light in water droplets resulting in a spectrum of light appearing in the sky. It takes the form of a multicoloured arc. Rainbows caused by sunlight always appear in the section of sky directly opposite the sun. Created from rain droplets after a storm, it does not occupy a particular geographical space, it is an angle in relation to the viewer. The primary rainbow forms at about 42º from the anti solar point. As the sun descends the anti solar point rises from below the horizon towards the horizon. The anti solar point is at the centre of the rainbow and all shadows need to be oriented to that point. A secondary rainbow is the reverse colour and weaker and the sky is slightly darker between them. Alexander’s band or Alexander’s dark band occurs due to the deviation angles of the primary and secondary rainbows. Both bows exist due to an optical effect called the angle of minimum deviation. The refractive index of water prevents light from being deviated at smaller angles. The region between them the sky appears darker. The rainbow colours are lighter than the background. Even curvature.
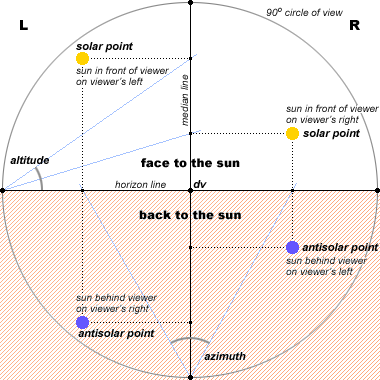
Sunlight direction and shadow construction is parallel and parallel lines in perspective have a vanishing point. Light rays share a vanishing point. Long when close to the horizon. Positive Sunlight, above the horizon and back lit. Negative sunlight which is below the horizon and front lit. Sunlight always has a constant angle of incident giving an even value over a surface. When the form changes the light’s rays change angles of incidence and the values change.

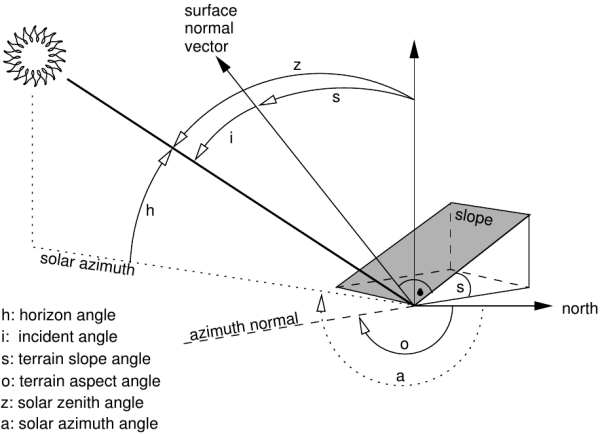
Light Plane is the direction of light, being the direction of shadows and the length of shadows.
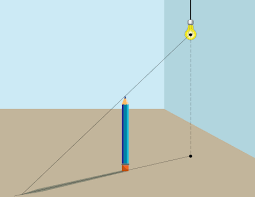
Lighting Ratio of the lit side and the shadow side.
SHADOWS
The recognition and understanding of how we see colour enables us to create emotional lighting through the use of colour, which is dependent on lighting and affects the way we interpret the image’s emotional content. We need an understanding of how the light source affects objects.
When an object obstructs the light and does not let it pass through partially or totally it creates a shadow. The penumbra is the area of the shadow that is partly illuminated and partly occluded, generally lighter in tone than the darker central area. Umbra is totally occluded area of the shadow that has no illumination, mostly dark in the centre with a gradual tonality change as it merges with the penumbra.
The shadow position gives us spatial orientation based on information about the depth of objects, their size and form, depth perception. The position of the shadow is also used for evaluation of textures, material density and composition.

The shadow value is halve the value between the true value and black and shadows use the ground or shadow surface true value. White is one and Black calculated as 10. The object and ground have different true values. Darker objects have less range to work with. Ambient light, the halfway-to-black occurs again. Not in direct light then consider the light ray angle. Avoid linear graduations in the shadows and occlusion as it gets to the core-shadow. White looks different outdoors than indoors with fluorescent light.
Small light sources have hard-edged, dark shadows with almost no detail, no middle tones and with a very bright and small highlight. The penumbra generated by the small light source blends with the umbra. It is directional and indicates the orientation of the light source such as a sunny, cloudless day or far away spot light.
Medium light source is directional, soft, diffuse, light mid tones with less separation between light and dark areas such as window lights, covered overhead ceiling lights and diffuse incandescent lights.
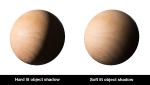
Large light source, no dark shadows, very diffuse, light envelops the object, no penumbra and umbra separation, orientation difficult to determine, highlights are spread out and blended together such as an overcast, cloudy sky.
Cast Shadows are flooded from various sources, it is when direct light is intercepted by an object that casts a shadow. On sunny days they tend to be more blue and on partly cloudy days they are whiter. Observe the edge quality of shadows and the light source creating them. The edge of shadows gets softer as the distance increases from the object that casts the shadow. Consider how the shadows are cast and how the tonal values are compressed, the full tonal range is there and becomes dominated by one tone.
Some different types of shadows such as Two side-by-see lights will cast two side-by-side shadows. Shadows on snow pick up the colour of everything around it and has subsurface scattering with back-lighing showing more taking on blue-green hue as the red is absorbed. Half shadows creating part shadows on objects which could be from something far away. Where is the shadow, foreground, middle or background.
Dappled shadows of light passing through small spaces creating varying size shadows considering the distance between the object and the shape of the object where the shadow is. The sky holes are not necessarily uninterrupted views of the sky, lessens the amount of light coming through from the sky giving the sky a darker colour.
Cloud shadows have soft edges and take some distance to happen, match the clouds in the visible sky with the shadow area being darker and cooler than the sunlit area with not as much blue cast as a clear day. It is a mixture of the sky blue light and the diffused white cloud light.
Occlusion is shadow light being blocked by neighbouring surfaces such as corners, crowding out the light leaving small and dense areas of shadow. It is usually the darkest part of the shadow, creating dark accents.
Specular reflections from shiny surfaces of what is around it.
Highlights are specular reflections of the light source on wet or shiny surfaces.
Reflected light will often increase the tone of a shadow.
Luminance contrast giving depth, how to see the shape and depth from the shading. Does not matter what colour the shadows are so long as the luminance is right.
Shadow Edges, the sharpness indicates how far away the object is from the cast shadow.
- long such as from the top of a light pole to the ground, soft
- medium would be from the top of a stool to the ground
- short would be from the top of a cube to the top of the stool, sharp
The shadow edge can transform from hard to soft. Perspective foreshortening also sharpens a shadow’s edge WS, CU.

Curved surfaces usually do not have edges to define shadows.
- light side is the direct light.
- shadow side is not exposed to direct light and usually receives reflected or ambient light.
- terminator is between the light and shadow side, it position is determined by the tangency of the light rays to the surface.
- cast shadows from the terminator to ground plane.
- core shadow when ambient and reflected light is affecting the shadow side of an object. The reflected light is bouncing off the ground plane and lighting up the shadow side.
- occlusion shadow occurs where the object makes contact with the ground.
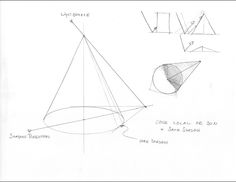
The core shadow jumps when the tapering angle of a cone changes.
Avoid adding dark values to the surface to create contrast, use a background value instead for stronger silhouette. Adjusting the values of the background extends the illusion of the range of values of the object in the foreground. Can control which areas of an object appear lighter or darker. To make an object look brighter put on a dark background, to make it look darker put on a lighter background.


Cut lines or panel lines, part lines, shut lines, thought of as two edges and the way light catches these edges. The brightest spot of the highlight is where the light strikes at 90º to the direction of the part line, if it is from above it it illuminates the bottom edge of the part line and the top edge drops into shadow. As a part line wraps from the light side of an object to the shadow side, the edge highlight fades to no light with an exception being when a strong, reflective light source makes another highlight fade in a different direction.
Textures are the physical roughness of a surface being indicated by changing values and the reflectivity of the surface. Lighting changes over the textured surface showing the textures differently. Linear and atmospheric perspectives make textures int he distance appear flatter.
Matte surfaces, the true value is the physical colour of the object. With a matte surface they would be lighter towards the top where the surfaces are more perpendicular to the light and darker on the sides were they are more tangent.
Highlights are the brightest area and there can be both a reflective and a passive highlight on a matte surface. Both can be visible though not necessarily matching with position and located on different areas on the surface. The passive highlight stays in the same position relative to the light source while the reflective highlight moves when the line of sight’s angle of incidence changed into the surface. It is important to note the shape of reflections.
Reflected or bounced light is how objects affect on another from a shiny car to a wet surface with a stronger influence on the shadow side due to the absence of direct light. It can bounce more than once illuminating soft light back into shadows. Reflective light can lighten core shadows interacting evenly with objects and environment. Surfaces that are in shadow and face downward towards a reflected light source can actually be lighter than upward facing surfaces within the same cast shadow.
The form of any shiny object is communicated by varying the strength of the reflections of the surrounding environment, it is not to do with where the light source is coming from. They are the reverse of matte surfaces the less shiny areas show more body colour, while the shiner areas there is more of the chrome look, getting skinnier.
Shiny surfaces are sensitive to small scratches and are most obvious in the reflection. The reflections on a shaped surface may be reflection different parts of an environment such as buildings, landscape, sky and/or ground, thus returning different colours on the same object. Think about designing the environment to enhance the scene’s reflections and the form of the objects.

Angle of Incidence is the angle that the line of sight bounces off the shiny surface into the environment with the line of sight’s angle of incidence is always equal in-equal out – the line of sight. The angle at which a line of sight hits a surface is exactly the same as the angle out which it bounces away from the surface. The line of sight will bounce/reflect off the chrome form, into the environment around it. The reflections are what surrounds the reflective surfaces. The horizon line is reflected in the surface where your line of sight bounces off of the surface parallel to the ground plane. When the surface is curved the light bounces off into different parts of the environment, concave stretches and convex compresses. Where the line of sight will bounce off the reflective surfaces into the environment.
When light bounces off a shiny concave surface we get reflection flipping, where the sight lines bounce back to the same point. It is about the sections of the surface and where the sight lines bounce.
Concave mirrors (like the inside bowl of your spoon) can flip your image upside-down, but if you are really close it makes you appear right side-up and larger!
http://www.dailymotion.com/video/x3jyupe
harrisonscience Uses of Energy
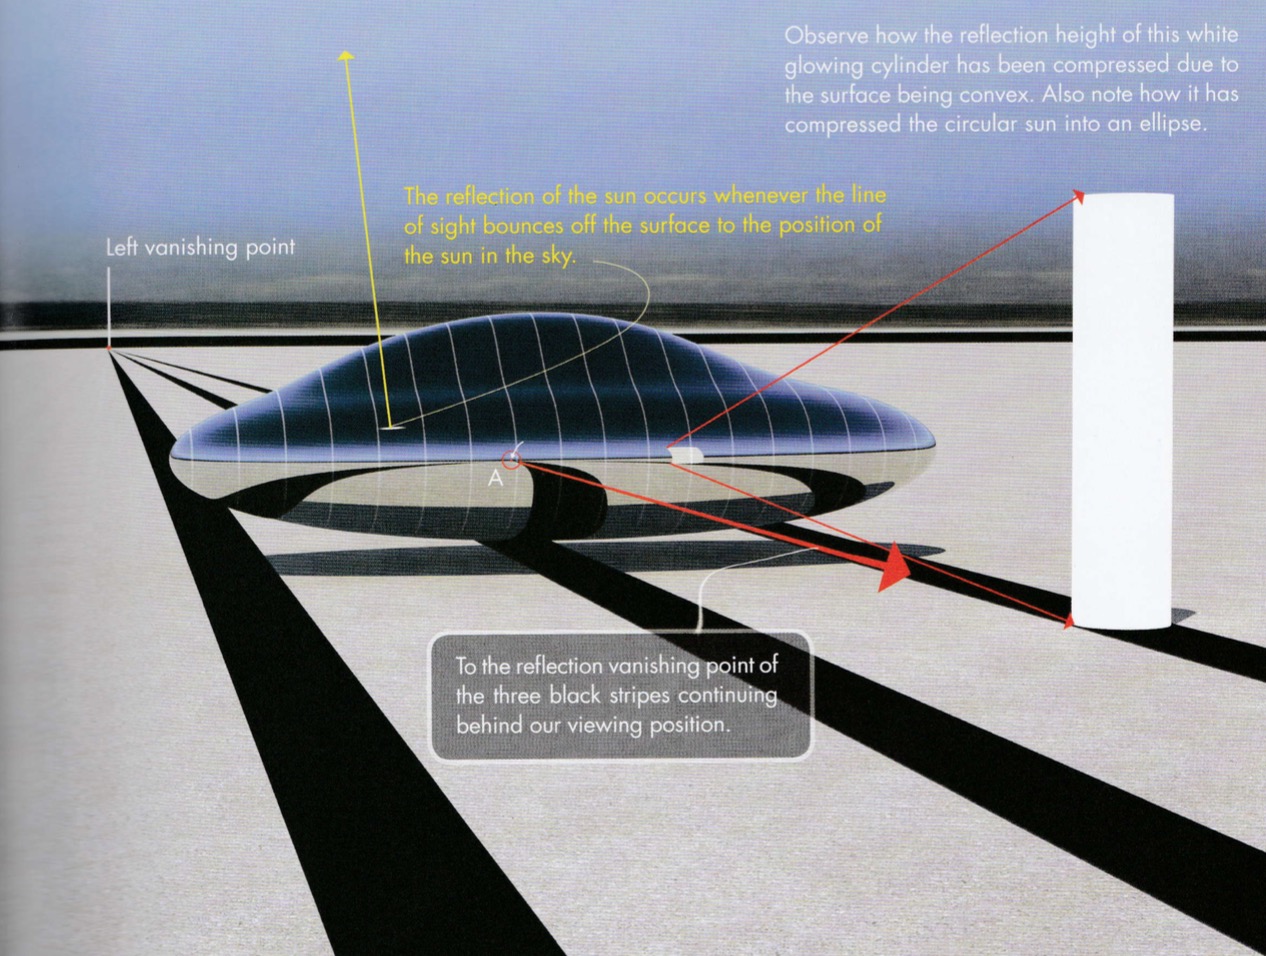
Robertson, S., 2014. How to render: the fundamentals of light, shadow and reflectivity. Design Studio Press, Culver City, CA. page 165
The lighter the value the less the perceived reflection, our brains the amount of matte surface eases reflective surface differently. The same reflective surface and environment for a white and black ball, the white ball the brain perceives mostly matte surface with little bit of reflection, seeming to have a strong core shadow. Our brain perceives a very shiny surface with just a little matte surface for the black object, meaning no core shadow on the light side is visible on the black ball. For a middle-value colour like red equal amounts of matte surface and reflection are perceived. The light values shining off the black ball appear as white on black and on the white ball are white on white.
Shiny surfaces become a mirror of their environment, when they overlap and touch they become the same colour and value of that surface. If this is not want I want then possibly dull down the surface.
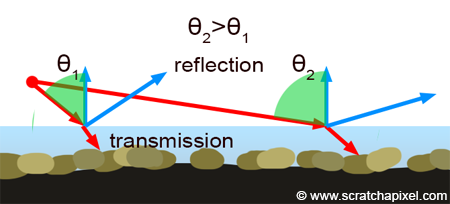
Introduction to Shading Reflection, Refraction (Transmission) and Fresnel
The “Fresnel Effect” describes the amount of reflected and refracted light that we see on an object depending on the angle form which it is viewed. An effect we will see on everyday objects, including skin. Look at something at eye level, tilt away and notice the reflection at the grazing angles – this is the effect of Fresnel.
On all surfaces other than chrome, the strength of the reflection changes based on the line of sight’s angle of incidence into that surface. The strength of the reflection of the environment changes and grows stronger as the surface rolls away from the line of sight. When the line of sight is perpendicular to a surface, which would be the centre of a sphere, the reflection is weakest. When the light of sight cases tangent to a surface, the reflection is strongest. Chrome is the exception and is 100% shiny from any angle.
Vary the strength of the reflections due to the angle of incidence. Remove the reflection where the line of sight is perpendicular, this is where the reflection is least shiny and where the line of sight is tangent to the form, leave the reflection layer more opaque. Where we see a gradation change across a surface we see a form change.
A black car, the parts that are perpendicular to your line of sight will appear less shiny, more matte than the areas where the angle of incidence of my line of sight is tangent to the car’s surface. A light road reflecting onto a dark car provides the most contrast. When looking straight at the surface the line of sight is bouncing in all different directions of any irregularities. When looking tangent to it, the irregularities align and many more of the sight lines bounce off the surface in the same directions causing the Fresnel Effect.
Thinking about waves, the front of each ripple facing the viewer and the back of each ripple causes variations in the strength of the reflection which results in a value change, thus the brain perceives a form change.
In addition to how hard or soft a reflection is, the amount of reflection on most objects will change depending on the angle you look at it. This is achieved in the 3D environment with the use of a Fresnel layer applied to the texture. https://photoreal3d.wordpress.com/category/photorealism-in-3d-cgi-imagery/fresnel/
With water looking straight down it looks more like its true colour and while looking out across the water, it becomes brighter and brighter, more of the light colour of the sky. The same for glass.
Renderosity: Glossy materials with true Fresnel effect using matmatic
The observation that the amount of reflectance you see on a surface depends on the viewing angle. As shown in the renders above, if you look straight down from above at a pool of water, you will not see very much reflected light on the surface of the pool, and can see down through the surface to the bottom of the pool. At a glancing angle (looking with your eye level with the water, from the edge of the water surface), you will see much more specularity and reflections on the water surface, and might not be able to see what’s under the water. http://www.3drender.com/glossary/fresneleffect.htm
Mirror, if it is clean has no cast shadows because all the light striking it is reflected away. If it is dusty, a light shadow starts to appear.
MATERIALS
The materials properties are how the surfaces interact with light.
Specular vs Diffuse, if 80% of the incident light reflects as specular 20% reflects as diffuse. If 60% of the reflected light is diffuse then 40% will be specular.
Matte has a dull, rough finish spreading light equally having almost no specular depending on the orientation of the material it can reflect highlights and diffuse illumination on other surface.
For shiny nonmetal objects the specular colour is white and for metals it takes on the colour of the metal. There is the movement of reflected environments on glossy and reflective surfaces which can be difficult to light maintaining their own form and shape particularly with light or dark backgrounds.
Generally solid objects have a wide tonal dynamic range having white highlights and some dark greys or black.
Semigloss with the amount of texture affecting the sharpness of reflections, with reflections where the sight lines are most tangent.
Transmissive objects always have limited tonality not representing both ends of the tonal spectrum.
Since light gets scattered and absorbed not all the energy would be present in the reflection with highly reflective objects having minimal diffusion. Specular reflection does not always have to be sharply defined.
Glass is transparent, usually shiny and it both reflects and refracts. Glass has the ability to both reflect the environment as well as blend into it. The fresnel effect of whatever is behind is least visible where ever the fresnel effect is strongest an most visible where the reflection is weakest. When it is further away there is less fresnel effect and larger reflections as the sigh lines are becoming more parallel.
Refraction is a change of direction of a ray of light creating distortion, the bending of light as it passes from one medium to another.
Metallic paint’s reflection could be multiple soft reflections across a larger surface area reflecting less of the surrounds and more of the light, increasing the value change across the surface. The clear coating will have the sharp reflections of the light. Reflects the environment the way metal would with less specularity and muted reflection.
The curvatures of the sections control the width of the reflections of the light source, chore shadow and distortion of the environment while the flatter or softer sections reduce the gradation changes.
Chrome has no matte-surface qualities, no core shadow, no light side, no shadow side and reflections stay sharp, gradations happen because they are in the environment. It is usually one-half to one full value step darker than what it is reflecting. Take everything from around the object, drop on the surface and then the whole layer can be darkened. Let it blend in a bit to the background and reflect the colours and values of the environment accurately. There is no fresnel effect.
Metals such as brushed metal have a series of very small, aligned scratches, anisotropic, which are most visible next to where the light’s reflection is strongest, stretching the reflection. Machined metals can also show anisotropic qualities, the ability to change the amount of reflected light as the viewing angle changes, anisotropic reflections which can be sharp or blurred. Aluminium can have a matte surface or polished like chrome, the more matte it is the less reflective it is. Most metals can vary depending on age, polish, exposure to the weather and quality.
Isotopic objects that reflect equally as the viewing perspective is changed.
Wood think about the grain, colour, values and levels of reflectivity.
Leather and cloth think about the design, context, construction, textures, reflectivity.
Carbon fibre weave and how it reacts to light, usually only one of the directional rows reflect the light source while the other row looks darker and look at the fresnel effect.
Textures are most visible on shiny surfaces where the light source is reflected and on matte surface, not on the main highlight, other areas such as just before the core shadow on round objects.
Camera effects such as motion, bloom and glints can add more personality and life to my renders along with the effects of weathering. With motion blur, what is moving, the camera, the object and how is this movement creating motion blur? Bloom creates fringes or feathers of light extending outward from the centre of the bright areas of an image across the borders of these areas giving the illusion of a very bright light. Glints, like blooms, are reflected at an angle from a surface in the form of highlights, to give off reflection in brilliant flashes.
With Relative Motion near objects seem to move more than distant objects.
Depth of field is the distance between the farthest and nearest objects in a scene that are both in focus.
When rendering the surface could be chasing form in all directions so concentrate on key points, considering the continuation of the shape under the surface or off the area. There might be no visible area that has the true value of the object since none of the surfaces are perpendicular to the light rays. Concentrate on the orientation of the surface towards the light source. Observe that both the round and the object are affected by the light’s decay. Remember the reflected light within the shadow side and it communicates the form of the shape’s surface, even within the shadows. Remember to assign similar values to surfaces that have the same orientation to the light source.
Adding colour, choose the colour that will appear on the mainly lit area, know the value and not the value of the grey in the same area. It is not necessarily the value of white at 1, white point. This white point many need to be darkened down to something closer to represent the values, making the adjustment to darken the value for the desired colour. The white might be the equivalent to a 20% grey or even 50% grey.
Show the colour and the material.
Workflow Approaches
- know my environment, surroundings
- start with all in grey scale getting the forms working by focusing on changes in value, matte values
- design and place lights, the light direction and primary light source, including the position of the sun for outdoor scenes
- start with the largest volumes and adjust the overall proportions and the lighting
- how each area will be lit, looking at light rays
- headlights, wheels and some smaller forms by adding a new layer and seeing how new forms can be created
- shadow area and shadow placement
- colorise the grayscale matte surface and add details
- details like exhaust vents, levels adjusted, bright spots starting to take on the metallic look
- rim lights
- edges against each other, possibly disappearing into the other
- ground plane
- reflected light and in the shadows
- fresnel effects
- reflection of the sun thinking about the time day, colour or value of the sky and shape
- masks
- background refinement
- final adjustment layers
- consider prioritising matte-surface rendering for light values and reflective rendering for dark values. Red being the hardest with equal amounts of matte-surface and reflectivity. Matte surface underneath reflections show more value change on a lighter-value surface than on a darker on.
- simplifying and controlling the environment can help work get done more quickly
- render the reflections of a light source separately from reflections from the rest of the environment and also cast shadows on reflective surfaces
Workflow Approaches
- Motivation of the scene, miss-en-scene
- Planes of light, levels of illumination for foreground, mid ground, background and subjects giving tonal relationships that create depth both locally and globally
- Colour, direction, reflections, visibility of objects, type and quality of light and shadows
- Study and analyse the subject using one light
- Position the key light
- Change the intensity or move the key light
- Add a fill light
- Add a backlight/rim light
- Add kicker light
- Add other lights including character lights and object lights
- Modifications
Scott Robertson Draw Through, Draw Through Blog, Youtube
Robh Ruppel
Shadow In Perspective Drawing- Art Technique
Vision and Art: The Biology of Seeing Paperback – April 1, 2008 by
Color and Light: A Guide for the Realist Painter Paperback – November 30, 2010 James Gurney
Below are copies of parts of posts made to DLF in December 2015 which I thought were interesting. The most recent is at the top.
MR LINEAR 32Bit WORKFLOW – 7 Steps
The following is a 7 step checklist for linear Workflow in Maya.
1. Have Maya Render at 32 Bit Color
1. Change the Renderer to Mental Ray in the Render Globals Window
2. Change rendering to 32 Bit
Render Globals > Quality Tab (Scroll Down)
FrameBuffer Menu
Change to…
Data Type: RGBA (Float) 4 x 32 bit
3. Image type to .exr for full 32 bit images
Render Globals > Common
Image Format: OpenEXR (exr)
EXR’s are the industry standard for 32 bit images. We can render out passes that appear like layers in Photoshop etc.
2. Maya Render View Settings
Now we need maya to preview our images properly. This is a two step process and requires a restart. Save your file first.
These settings only affect the way your images look inside of Maya previews. Rendered images will be fine if viewed in other packages… however you will need to tell the other programs that your images are linear color. See the section at the bottom of this page for viewing images in other packages.
1. Change the way maya deals with images to linear and keep the display profile to sRGB
Render View Window > Display > Color Management
Image Color Profile: Linear sRGB
Display Color Profile: sRGB
This shows our images in maya accounting for our monitor settings.
2. Switch On 32 bit floating point (HDR)
Render View (window) > Display > 32 bit floating point (HDR)
And restart Maya, that will remove any banding in previews in Maya.
3. Procedural Colors/Swatches Linear Workflow
For shaders with no textures, eg a grey lambert the colours are not colour managed!!
1. store the swatch color by changing it slightly and then back
2. Create a Gamma Correct node (type gamma above the “favorites”)
3. Change the color of the gamma to that of the stroed swatch
4. Map the gamma’s “outvalue” into your shaders original “color” (drag and drop)
5. In the gamma node make all the gamma values .4545 for each colour
Or just use the following script*. I will have to update my prefs to include it too.
Gamma Adjust Color Swatches
Once downloaded view the .mel file for install instructions.
*Note the script will only work on certain shaders. Otherwise just build the nodes manually.
Now we obviously have to gamma correct the diffuse color of our shader, but how about other swatches? Luckily a guy called Royterr over at CGNetworks made an image with the swatches for mia_materialX and car paint, but we should be able to figure out other shaders such as SSS shaders from this list.What to Gamma Correct ImageOut of interest there is no need to correct 1 or 0 values for colour say 100% Red or Blue or Green, white or black.It’s a good idea to try and use Mental Ray Shaders instead of the Maya shaders. Try to use mia material x is usually a good start and comes with a lot of presets. Mental Ray shaders are physically correct which means they’ll react to light in a realistic way. Maya shaders may not react realistically!4. Adjust Texture Linear WorkflowOur textures files will usually be normal 8 bit images created in Photoshop or Mudbox etc, so we need to tell maya this to correct for the differences in Gamma, betweenregular images (sRGB)
and
The Linear way that maya renders (Linear sRGB)Turning on Color Management with the following settings will ensure our textures are rendered with the proper color correction.*Render Globals > Common > Enable Color management (on)
Default Input Profile sRGB
Default Output Profile Linear sRGB
In short No. Not all texture images are cool now. In particular bump/displace and normal maps should all be
Color Profile: Linear sRGB
See the next section for more.
This from the Autodesk Help Files….
“Scalar or single channel texture images intended for bump, normal, displacement or other non-color applications should select Linear sRGB as their Color Profile under the File node Attribute Editor.”
Again we can look at this image, anything with a cross on it should have it’s color profile set to…
Color Profile: Linear sRGB
5. Check Bump/Normal/Displace Linear Workflow
Bump, normal and displacement maps (and some other) file types need to be changed to “linear srgb” in the file node for each file texture.
So for each bump/displace/normal texture we need to change their default type to linear srgb.
This is found in the file node of your textures. Change “Use Default Input Profile” to…
Color Profile: Linear sRGB
We need to remember this for all Bump/Normal/Displace file textures!!
This from the Autodesk Help Files….
Scalar or single channel texture images intended for bump, normal, displacement or other non-color applications should select Linear sRGB as their Color Profile under the File node Attribute Editor.)
Again we can look at this image, anything with a cross on it should have it’s color profile set to…
Color Profile: Linear sRGB
CHECK LINEAR IMAGES OUTSIDE MAYA
To check a linear image outside of Maya the easiest program to use is
imf_disp
32 bit images are also supported by almost all major compositing programs including Photoshop, After Effects and Nuke etc. Each program has it’s own way of dealing with 32 bit images and linear color management.
imf_disp
This program comes with Maya and is a Mental Ray Tool to check renders.
1. Load imf_disp (on mac you can open through the spotlight)
2. Open your rendered image by browsing to it. Never save an image from Maya’s Render View “File > Save Image” Do not use this!
Images in the Render View are automatically saved to
images/tmp
So get the images from there, or render with Batch render like you would rendering an animation.
4. Change the gamma
If we are using linear 32 bit workflow our images will come in too dark. Adjust the gamma to 2 in the upper right of the image window. Now we’ll be seeing the image correctly outside of Maya.
5. Render Layers in imf_disp
imf_disp also supports viewing the render layers of an .exr file. To view layers go
Layer > (select the layer you’ll wish to preview)
After Effects Notes
We’ll be wanting to work with Linear workflow. This is very easy to setup in After Effects.
Click the number at the bottom of the project tab. should be something like 8 bpc. We’ll want to change that to 32 bpc, if using .exr images and linear workflow in maya. (see here for the maya linear workflow settings)
We also want to check the box “Blend Colors Using 1.0 Gamma” So we can view our images in normal sRGB color which our monitors are.
Viewing .exr Layers in After Effects
Unlike in Nuke .exrs are not supported well in After Effects.
It’s best to download a free plugin which helps us manage .exrs in After Effects.
The following tutorial show’s how to use exr’s in After Effects. I’ve also noticed that when extracting using proEXR you must also convert each extracted comp to linear color…
Effect > Utility > Color Profile Converter (check “Linearize Input Profile”)
http://youtu.be/StqSiJ46O4Y?t=8m5s
http://forums.cgsociety.org/archive/index.php/t-966210.html
MR LIGHT SETTINGS – BASICS
1. Make our scene is at correct scale, 1 unit = cms
2. Directional Lights are mimicking sun or moonlight, so these lights won’t have any falloff because they are so far away we’ll never notice the drop off.
3. For lights other than sun/moon will have a light falloff, just like in the real world. The physically correct setting in Mental Ray is in the light settings…
Decay Rate to “Quadratic”
These lights will need much bigger numbers as values, up to 5000 or more. These are lumen values I believe, mimicking the real world.
4. Mental Ray is a Raytrace Engine
MR is a Raytracer, depth map shadows don’t work well with MR. Depth map shadows are for Viewport 2.0 or the maya software renderer. Raytracing is much more physically accurate anyway.
Switch all lights to raytrace shadows, no depth maps.
5. Blury Shadows
If we want blurry raytraced shadows on lights, usually spotlights or point lights (sometimes directionals) we change…
Raytrace shadow attributes “Light Radius” to a larger angle
Light Radius = Blur Amount as an Angle Value
Shadow Rays = make the shadow less grainy. Can be values of up to 50 or more.
To clarify Mental Ray isn’t as bad as everyone suggests, it’s certainly not as developed as VRay but in 2016 it’s pretty easy to use and teach. The MILA shaders are my favourite shaders of any renderer.
Most of the MR bashing comes from when it was a nightmare to use and the kids didn’t know how to use it so peppered the forums with “MR sucks posts”. If you ever speak to real lighters they always would say, MR is ok. Pre 2016 the MR setup of proper linear workflow was a nightmare to teach and it was also for a long time quite difficult to set the lights up correctly, about 3 checkboxes in strange places. So newbs and most instructors would never figure it out and say it sucks. It did suck for it’s complexity, agreed.
Since 2016 it all works out of the box and is easier than most other renderers now. Not that it’ll make much difference to it’s popularity.
AO isn’t really needed if using MR properly with the correct bounce light FG or irradiance particles or whatever. AO in modern lighting is a bit of a no no.
Search MR vs VRay and there’s a difference but it’s minor. VRay is agree to be better but MR’s fine. Renderman is the other free renderer and is awesome for direct light and big area lights. IMO way better for character turntables. Renderman can suck for proper window lit interiors due to very slow render times. Arnold is similar with slow times on interiors and bounce light but awesome for area lights… unlike MR and VRay which have trouble with big area lights. Pros and Cons.
______________________________________________________________________________
I’d re-render the turntables in Renderman RIS, they look much better that MR turntables, try learning Renderman it’s very easy and free. Interiors are still nice in MR, but those character turntables Renderman is much better straight out of the box and you get that lovely look. Arnold is good too but watermarks in the free version. There’s loads of little things you can pick on otherwise but nice work!
______________________________________________________________________________
To clarify Mental Ray isn’t as bad as everyone suggests, it’s certainly not as developed as VRay but in 2016 it’s pretty easy to use and teach. The MILA shaders are my favourite shaders of any renderer.
Andrew Silke
3d Animator and Instructor


That’s interesting that if you render in real time that it can make you change the way you see the project. I would think it would be interesting to try and do a project both ways so that you can see what the best way to do it would be. I feel like there would be benefits of rendering graphics both ways so It might be interesting to do both.